Among the various single components of a functional scythe, the snath (due to its length) is
most troublesome and/or expensive to ship long distances around the globe. Yet the actual
making of it on a home scale does not require significant woodworking skills or any
specialized tools. Additionally, the raw materials abound practically everywhere; literally
millions of potential snaths are left each year on the forest floor behind both small and large
tree-cutting operations. In the still “underdeveloped” parts of the globe, sticks of wood
suitable for snaths are commonly used for fencing, etc., or burned as firewood. Admittedly,
making a snath that will indeed function as expected does call for gaining an understanding
of snath and blade fitting (detailed in Chapter 5) beyond the level required to merely attach a
blade to a purchased/commercial snath and make the (usually limited) adjustments.
However, once the process outlined below is understood, it can be implemented – from start
to a functional snath – in about an hour, in some cases less. Not necessarily on the first try,
but what is otherwise the cost of a snath which is already fitted to a person and the blade to
be used with it?
One more note on the topic of ‘value’: While a whole lot can be learned about scythes without
the need to ever make one’s own snaths, there are nuances of this tool’s function that, we
believe, can not be acquired any other way.
Regarding the principle design, from among the various styles of snaths, the straight-shafted
‘Eastern’ (typically one-grip) versions are the easiest of all to make. As mentioned in Chapter
3, they are also more forgiving with regard to fitting blades to them. For those reasons we
begin the topic of snath-making with a version of this design.
Eliminating the journey to the sawmill
The approach presented here takes a detour from the industrial age’s norm in that it
assumes working with raw material, which we’ve come to refer to as ‘wildwood’ – meaning
saplings or branches of trees, rather than mill-sawn lumber. In addition, we suggest that
whenever possible, neither saplings nor healthy trees are cut specifically in order to make a
snath. Instead, snath-makers can often utilize material left behind whenever wood is cut for
other purposes, such as logs or firewood, roadside brush clearing and similar forest growth
‘management’ practices.
A few notes on species of wood fit for the task
Regarding the suitability of raw material the range is very wide, both in the North and South.
In our location we have made functional snaths out of every single species of deciduous
trees or shrubs that grow to a large enough diameter (at minimum 35 mm or so, in the
round). The saplings of the common evergreens (fir, pine, spruce) are mostly too weak, but
branches of mature specimens (containing a far greater density of growth rings per cubic cm)
are sufficiently strong. Naturally, we also make use of this region’s traditionally preferred
handle woods (ash and sugar maple), but for snaths their innate strength is not necessary.
One of our favorites is the lowly alder (Alnus incana) – the “good for nothing” pioneer species
in all damp and neglected parts of Eastern Canada’s countryside. Its strength is in the range
of poplars and willows (both of which are suitable as well). The main reason we like alder for
the shaft’s material is that within the clumps of alder growth it is very easy to find just about
any curvature a snath maker could dream of. Secondly, its supply is ‘never-ending’; if we did
not occasionally cut back the new growth, Alnus would have reclaimed some of ‘our’
hayfields and pastures long ago. The local supply of poplar and willow is also in no short
supply, though neither matches the shape-related bonanza of alder.
It is preferable that the wood be well seasoned prior to being used, or at least partially
seasoned (whatever exactly that means to the respective reader). However, if circumstances
dictate, even a green sapling can be cut off the stump one day, then promptly turned into a
snath which can propel a blade the next morning, or sooner. Should that be the case, we
recommend the following:
a) While in the midst of the initial snath-making steps outlined below, do not remove bark
from any more than the bottom 15-20 cm of the shaft (where it helps to facilitate the marking
of a few guiding lines while fitting the blade).
b) Once bark is removed, cover the freshly exposed wood with some air impermeable
substance such as linseed oil/turpentine mix, lard, tallow or paint in order to slow down the
drying process. Failing to do so often leads to “checks” which then are likely to continue
deepening until they reach the center of the wood.
These hints are particularly pertinent if the material worked with consists of any fruitwood
species (apple, cherry, plum, serviceberry etc.) or hop hornbeam (Ostrya virginiana; also
called “ironwood”). It is also the case with practically all species cut at the height of their
moisture content (from early spring to mid summer).
The grips themselves would really benefit by some pre-drying. We suggest that they
(preferably several of them) are made well in advance of proceeding with the snath-making
steps outlined below. Still, given ‘emergencies’, they will serve their purpose even if freshly
cut.
Snath-making tools
There are many combinations of woodworking tools that can fill the need here. The ones we
regularly use are:
a handsaw, small hatchet, drawknife, hand brace with 2 or 3 bits of different size.
A rasp is the next very useful tool, as is some means of clamping the shaft securely while
material is being removed. In this regard we consider the “shaving horse” a most convenient
invention (for many other woodworking purposes as well). A vice can substitute, somewhat,
and so can – if these conveniences are not available – a friend helping to steady the shaft
against a chunk of wood laying on the ground. Some individuals can do the steadying alone
(with the help of a forked tree trunk, for instance), requiring neither a shaving horse, a vice, or
a friend…
One other aid we consider a ‘luxury’ (despite having made good use of it ourselves) is an
accessory called the “plug cutter”, which can greatly speed up accurate sizing of the grips’
tenons. However, we surely would not spend money on them (available in four sizes) if we
were to make only a handful of grips. To refine the size of a tenon which had been roughed
out with a hatchet, a jackknife and/or a rasp is adequate for an individuals’ own snath-making
purposes.
In case of limited tool options, keep in mind that a sharp hatchet can take over the role of the
saw, and other than for sizable cross-grain cuts, the drawknife can replace the hatchet. The
drawknife or the hatchet can, up to a point, take each others places, if need be. But if only
one can be procured, the hatchet is definitely more fit for multiple tasks during snath-making.
(Please note that we are referring to a hatchet sharp enough to take accurate shavings from
the shaft’s blade-attaching ‘flat’, the grips’ tenons etc. Held in a ‘constricting grip’ near its
head, it should, in all those brief surface corrections, be able to replace the common
woodworking plane.)
Two other tools we are familiar with but do not presently use for this purpose ourselves, both
of which can replace the hatchet, the saw and the drawknife, all in one, are a kukri/gurka
knife and (even if less conveniently) a short-bladed machete.
As a parting note on the subject of tools: In an emergency, a functional snath of the sort we
are at this point discussing, CAN be made with a stiff, sharp-pointed small knife as the only
tool. Not a common little pocket knife, but something along the line of many traditional
Scandinavian models – the design originating with wooden sled making as one of the
Laplander life’s needs in mind. Cross-grain cutting of a 40 mm piece of wood just takes a bit
longer, the blade’s knob’s seat is no challenge for such a knife, and the making of a grip’s
mortise in the shaft can be helped with a small burning coal…
Making snath grips – a simple approach.
We have not found a simpler, more functional way to make grips on a home scale than
shaping them from small diameter branches. This was common enough prior to the times
when electrical lathes and routers became widespread in the industrial countries, and is still
the approach of some small regional snath-makers in Europe. Where we broke away from
tradition – on this count – is that we attach them by way of a round mortise / tenon joint (as in
Figure 47).
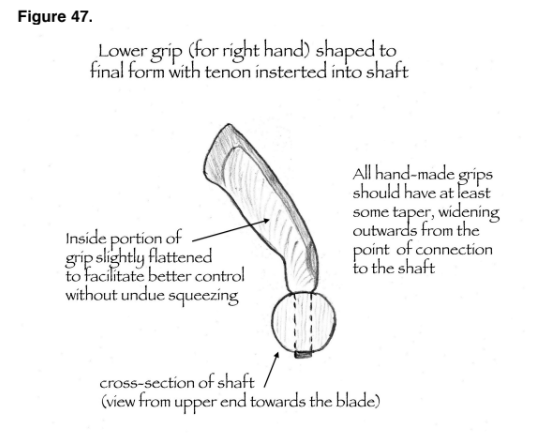
That appears to be something inconceivable in the old school of European snath-
making joinery, where using glue to keep the joint tight was, until not very long ago,
considered a poor practice. It is true that good glue makes up for the former skill of accurate
workmanship, but here we confess to willingness in trading skill for a ‘crutch’.
The shape of the grips
Consider the various curves illustrated in Figure 48, and then find something of similar shape
from among discarded branches or small rounds of firewood. All three grip shapes (with
variations in between) are suitable, though we consider ‘B’ closest to “ideal”.
The differences between the shown curvatures can be used to help fine-tune the Horizontal
Balance at the stage when the blade’s relationship to the snath’s bottom end is already more
or less finalized, the mortise drilled into the shaft but the grip not yet solidly fixed. (Outlined
below, in Step 12).
Figure 48. Some examples of functional grip shapes
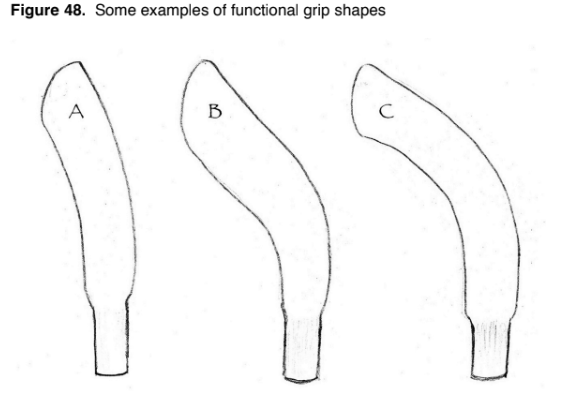
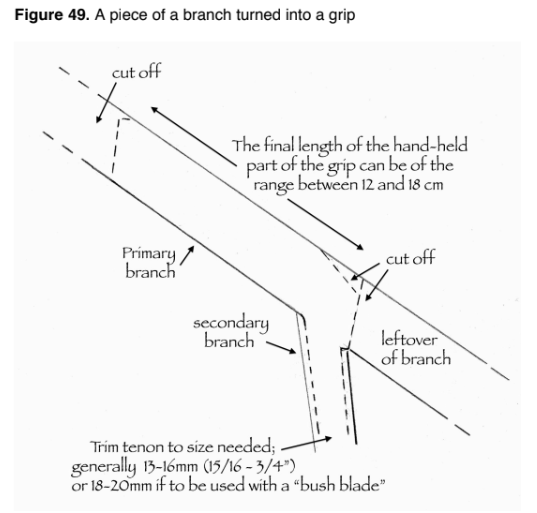
As shown in Figure 48, a tenon can be shaped from the same size of raw material as will be
needed for the whole grip. However, the easiest and least time consuming approach is to
start with pieces 30-40 mm in diameter, which have smaller secondary limbs (10-20 mm)
branching off at various angles. The straight (or very slightly curved) thicker portion becomes
the part actually held in ones hand, and the smaller side branch becomes the tenon. Thus
the grip-maker ends up with a tenon already closely sized for the intended purpose. See
Figure 49.
Figure 49. A piece of a branch turned into a grip
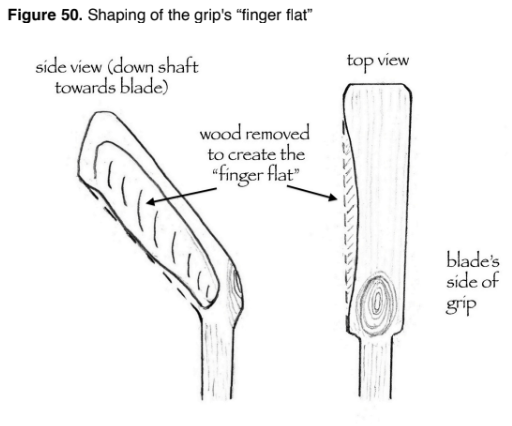
Considering the ergonomic principles
Most tools function best if their handles are shaped in such a way that minimal gripping is
required for them to perform well. In the case of brooms, shovels or hayforks, a
symmetrically round shape fulfills that role very well. With respect to snath grips, we believe
that is not quite the case, however common it may be. In addition, we think that a snath grip
ought to have a “knob” at its outermost end, because that alone reduces a portion of the
(otherwise necessary) squeezing.
The quickest way to achieve at least some desired asymmetry (i.e. ‘improved functionality’ in
this case) is to flatten the grip’s inner side – a the one that the fingers rest against during use
– stopping short of the last 3-4 cm, so as to leave a small “knob” (see Figure 50).
Our approach to this “grip-flattening” is to score the chosen finger-resting side of the branch
with a few shallow and diagonal hatchet cuts, and then remove the chips in-between by
directing strokes of equal depth in the opposite direction. Then finish to desired smoothness
with a rasp or a carving knife.
It is convenient to perform this step before all the superfluous portions of the branch are cut
off; leaving 15-20 cm of extra material can interim act as a convenient handle and thus put
some distance between the hatchet’s sharp edge and the person’s fingers.
Figure 50. Shaping of the grip’s “finger flat”
Making the snath’s shaft
The sequence of steps in the guidelines below is somewhat different than has been the
norm. Commercially, snaths are made from start to finish without much regard for exactly
which blade the new owner may wish to use with it. Such an approach was likely born during
times when blade options in any one region were limited, and it was easier for the village
snath maker to figure out how to make his product be almost fit for the respective blades
available in the local store, and leave the final fine-tuning to others. Well, much has changed
since those times, and not always in line with changes in blade supply. What has
consequently suffered are the details in how old or contemporary snath designs can
gracefully accept whatever blade may be obtainable these days, whether in regional stores
or via mail-order.
The diversion from tradition we take here is that we assume the blade to be used with the
snath being made is already available for the snath maker to be guided by during the
process. That is how we have fitted snath/blades for a rather long time.
Then one bright day several years ago it occurred to us to tentatively attach the blade to the
shaft BEFORE the grip’s exact position is ascertained. That turned out to be the single most
significant among our few snath making “revelations”. This one, in particular, takes much of
the guesswork out of the blade-fitting process.
We shall start this segment with a piece of wood, still in the round as it came from the forest.
It becomes the main shaft, and will be outfitted with a grip also shaped out of piece of a
branch. No worries if the whole shaft is not completely straight; in many cases the lack of
straightness can sometimes be advantageous.
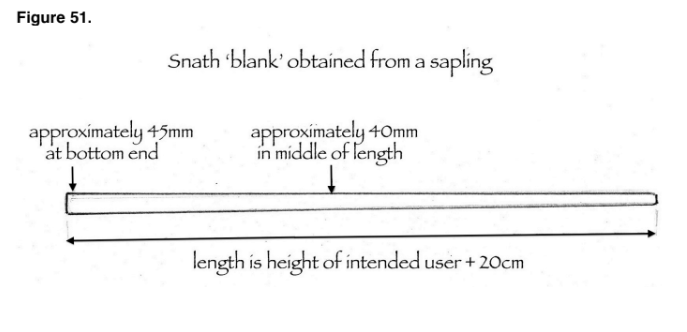
Step 1.
Obtain a relatively straight piece of wood about 20 cm longer than the height of the intended
user, and approximately 40 mm in diameter near the middle of its length. This is somewhat
longer and thicker than necessary but will provide a bit of room for error. Such a piece,
illustrated in Figure 51, might measure 45 mm at its thicker end. The minimum depends on
what species of wood is used, the weight / length of the blade to be used on that snath, and
the sensibility of the person swinging the tool…
Figure 51.
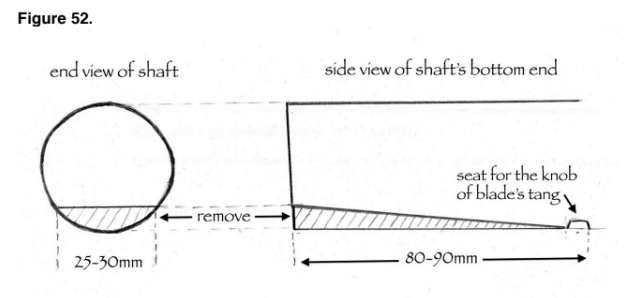
Step 2.
Flatten approximately 8 cm on the underside of the shaft’s end chosen as the one to hold the
blade (Figure 52). That, in case of the ‘Eastern’ snath, would usually be the thicker of the two
ends. The ‘flat’ (and it should be flat, not slightly rounded) needs to be only wide enough to
accommodate the tang well enough without a wobble, no more. In addition, if there is some
back and forth curvature in the raw piece, assure that the bottom 15-20 cm which is to
receive the flat, is parallel with the overall length and does not make a slight deviation to
either left or right.
Figure 52.
Step 3.
Make a seat for the tang’s knob. (Don’t follow the seeming norm; refer to Figure 23 in
Chapter 5 for its placement)
Step 4.
Attach the blade, temporarily. At this stage, to use an adjustable clamp of some sort may be
better than an actual scythe ring because in order to allow most common scythe rings to
slide over the tang would necessitate the sideways wood removal of that (40-45 mm wide)
shaft. And, as will be detailed below, leaving extra material in that area for now may ‘save the
day’ later.
Step 5.
With the blade flatly and somewhat firmly fixed against the shaft, check the Hafting Angle
and shift the blade forward or backward slightly as needed to obtain the desired adjustment
(refer to Chapter 5). Draw onto the bottom flat of the shaft two visible lines hugging both
sides of the tang. (They will be helpful once the end of the shaft is being shaped so as to
accommodate the actual ring.)
Step 6.
Set the blade/shaft unit (with the blade down) alongside the body of user-to-be, (see Figure 2
in Chapter 3) locate the point of the hip, and then transfer that measurement onto the shaft
by making a visible line with a pencil or a knife. This will be the initial orientation point for the
placement of the grip – though not exactly where the mortise for the grip will be made. To
settle on its exact distance from the blade, consider the following:
a) We suggest that beginners at this task leave approximately 8 cm of extra length as a
safety measure – a piece which will be cut off later. (Reasons explained in Step 14.)
b) For the trimming version of this style of snath we suggest the grip be placed 5 cm above
the mark (arrived at by finding the person’s point of the hip). For use with blades 70 cm or
longer or in relatively open terrain, place the grip 15 cm above that mark. As briefly
discussed in Chapter 3, there are many uses for a ‘multi-purpose’ snath version – with the
grip positioned halfway between the distances suggested above.
Combining these considerations, at this stage in the process, the respective task-oriented
distances of the mortise mark should be 13, 18 or 23 cm (above the person’s point of the
hip).
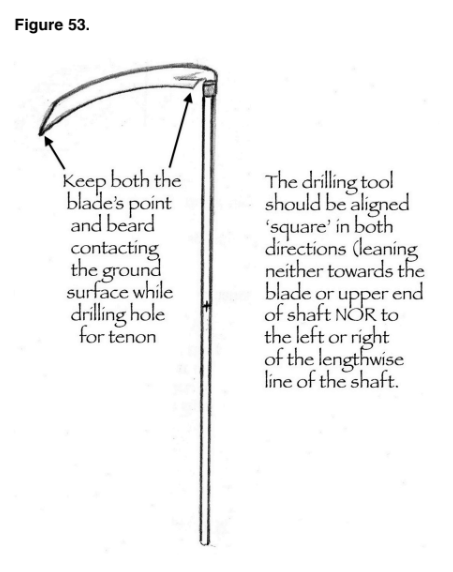
Step 7.
Lay the unit on a flat surface with the blade’s edge downwards and see to it that both the
blade’s point and the point of its beard are touching the surface (see Figure 53, below).
Step 8.
With the blade contacting the surface as stated above, place another (lengthwise) line in
exactly the center of the shaft, crossing the previous mark so as to have a little cross
indicating the center of the mortise for the grip. Now drill the hole – with the drilling bit
positioned directly perpendicular to the shaft, and care taken to also keep it square the other
way (left to right) while drilling.
A 16 mm (3/4”) size round hole (same, of course, for the grip’s shank) is a good safe average
for a variety of applications. In plenty of instances we use only a 13 mm (5/8”) hole/grip’s
shank, and have used such ‘weak’ units for years. Conversely, for the so-called bush type
work the mortise / tenon diameters can be increased to 18-22 mm.
Figure 53.
Step 9.
A grip can now be tentatively inserted but not yet glued. If accurately sized, it should fit
snuggly and, even without being permanently fixed, make some testing in the field possible –
in order to settle the grip’s final position. (More on this below.)
Step 10.
At this point the blade – unless its tang is very steep (35 + degrees) – may not yet ‘Lay’
against the ground surface flat enough. In that case, an additional wedge of wood will need
to be removed from the bottom end of the snath (as shown in Figure 54).
Step 11.
Before removing that extra material from the bottom, the sides of snath’s end should be
partially trimmed down to the width that will accommodate the intended ring (Figure 54).
Figure 54.
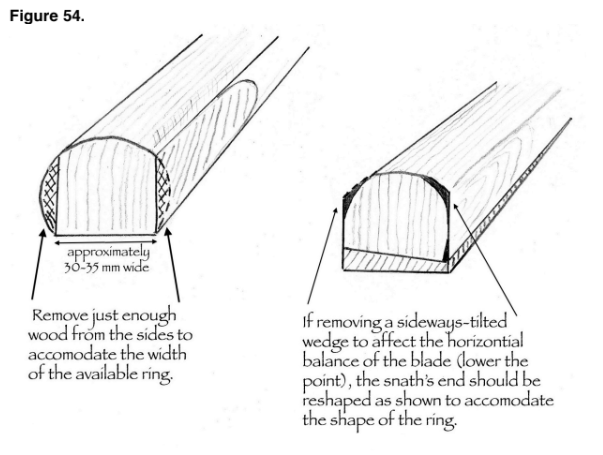
Onto the (now squared) sides, mark the lines of the additional wedge to be removed from the
bottom in order to get the blade’s final Lay as desired. Exactly how much wood to remove in
order to do so will initially be a matter of ‘somewhat calculated’ guess; it is best to do so
carefully, in perhaps 2-3 mm increments, or even less. Keep in mind that at this stage the
snath is still longer (by the extra ‘safety measure’ of 8 cm) than its ultimate length, and that
when cut off to final size the Lay will be somewhat affected – in that the blade’s edge will end
up slightly further from the ground. This can be compensated for beforehand, or an additional
thin wedge of wood may be later removed from the bottom ‘flat’ of the finished snath (Figure
55, below).
Step 12.
Take the unit into both hands and simulate the mowing posture with the blade not quite
touching the ground. Focus on how comfortable the position of the right wrist feels when the
blade’s point and beard are equidistant from ground surface. Move the blade’s point up and
down, slowly, and see if in another position (than the shape of the present grip pre-dictates)
the wrist would feel more at ease. If another grip, either straighter or more curved, is
available (Figure 48) insert them both in turn and repeat the test. For instance, if in the most
comfortable wrist position the blade’s point has the tendency to hang a bit lower than its
beard, inserting a grip which is slightly more curved will improve the unit’s Horizontal
Balance.
Figure 55.

Step 13.
Assuming the blade presently feels well balanced and has the desired Lay, as the final touch
before permanently affixing the grip we suggest one more test:
Find a patch of semi-dense grass and spend a few minutes actually cutting with that almost
finished new unit. Try to determine if the grip might feel more comfortable turned slightly
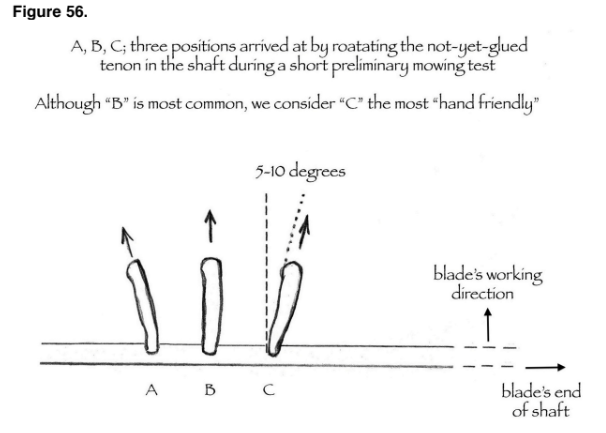
outwards instead of pointing directly forwards (see Figure 56). Take a few strokes with it
while it is turned a bit to the left, then right, and then back again. Repeat with slightly different
positions until it is fine-tuned to the “best” spot. Then mark a line on both the shaft and the
grip, so that when the grip is pulled out to apply the glue (and/or rivet) it will, by lining up the
marks, be replaced in exactly the same position.
We think that a slight (maximum 5-10 degrees) turn outwards (to the right, towards the blade,
as in ‘c’) of the grip is preferable to exactly perpendicular to the snath. But this is something
that ought to be decided by the individual user. Once that position is settled the grip can be
permanently affixed, and the scythe (consisting of the snath and the blade it was being made
for) is ready to be used.
Figure 56.
Step 14.
This step can be dispensed with once a person makes one or two snaths from start to finish
and has learned how to avoid the possible mishaps without the need for a ‘safety measure’.
But for now – in line with the (“safety measure”) approach we took as of Step 6, the snath
can be cut down to the size it was originally calculated to be for the height of the user and
one of the respective mowing tasks (trimming, field, or multipurpose, along with the terrain
gradient variations) before the extra 8 cm were added to the shaft’s measurement.
This step consists of accurately transferring both angles (up/down and sideways) of the
existing snath’s flat 8 cm further up the snath, cutting off the surplus and re-making the ‘flat’
and the seat for tang’s knob.
Two additional steps can provide a finishing touch; they are not essential, but recommended:
a) Smoothing the upper end of the shaft
b) Trimming the extra weight of the shaft’s bottom half.
Regarding a):
Either just before or after the grip is fixed in place, the upper half of the shaft may call for
some attention, especially if it has some knots or other rough spots. While in use (and
depending on the type of use) the left hand will sometimes end up sliding up and down the
shaft within a 25-30 cm range, sometimes more. For this reason the upper third or so of the
shaft should be smooth and comfortable size-wise – of smaller diameter for small hands,
larger for bear-paws).
Regarding b):
This step is less important to the actual function of the snath, but it can be a matter of an
additional few minutes of time we consider worth taking. The shaft’s dimension in the length
between the blade and the grip has, up until now, received no attention and is, presumably,
still 40-45 mm in diameter. An average snath’s shaft needs not to be so thick and, depending
on species of wood it is made of, it can be somewhat lightened. Try, initially, trimming some
material off the top and bottom of the round, starting 5-10 cm below the grip and blending the
removal in approximately the same thickness with the spot where the hole for the tang was
drilled.
Snath sizing / adjustability; the multi-grip concept
Historically, snaths with easily adjustable grips were uncommon; even today they are not the
global norm. (46)
The typical commercial approach to “adjustability” is to provide an arrangement whereby the
grips (held in place by some bracket and/or small bolts) can be easily loosened, moved to
alternate positions along the shaft and re-tightened. With that accomplished the unit is then
referred to as “adjustable snath” – a term we consider misleading.
(46) Up until sometimes soon after WW2 the only two examples we are aware of were the sliding grips on traditional Russian
and American (possibly UK) snaths. With the proliferation and widespread availability of the cheaply produced metal snath
models with simple sliding grips – widely available throughout Europe and elsewhere – it is becoming more so the case.
What the adjustable grips of such a snath do allow is the accommodating of (up to a point)
the user’s height, or (with lesser effectiveness) the nature of work/terrain. Thus it could be
said that they provide for diversity of users (and just for now let’s pretend that they always do
that well, which is also not “the whole truth”). What they do not automatically accommodate,
or only sometimes and/or partially accommodate, is the diversity of blades’ tang settings and
thereby the blade/snath unit’s harmonious fit. And because a snath without a blade is a
useless thing for the task it claims to be, such snaths at best deserve the title “half
adjustable” (that half being the user). Calling them “adjustable” – without qualification – gives
the uninitiated the impression that they be adjusted so as to fit everyone, in any terrain and
function well with a variety of blades. Mindful of that fact, we have as of long ago, and
throughout these guidelines referred to these popular “adjustable snath” versions as “snaths
with adjustable grips” instead.
For a snath to be truly adjustable it would need to have a metal joint somewhere within its
bottom half OR have a piece of hardware attached to its very end that itself holds the blade,
either of which contraptions would have to be simultaneously adjustable in 3 ways – from
side to side, up-and-down and rotatable sideways. While this would be technically possible
(and has been experimented with) it was given up on due to (you guessed it!) higher
production costs.
We have no intention of getting that fancy; the path we pursue is helping people come to
understand the underlying concepts and make snaths to suit each specific need without
incurring cost aside from one’s time.
A very practical arrangement is to place two grips – both for the same hand – into the
traditionally one-grip shaft. Doing so can make such a snath be both partially and ‘instantly
adjustable’ regarding length – that is, one for trimming and the other for field mowing (for a
person of the same height, of course). The principle approach can also be applied while
making what presently are two-grip snaths. Though we have not heard of anyone else
making such a bizarre suggestion, among other aspects of snath design, we have played
with this one in the field enough to feel that is a worthwhile/useful concept to present.
The awkward thing now is to throw the snath nomenclature we have used thus far for a bit of
a loop, and quit (at least in a portion of the cases) referring to the Eastern style snath as a
“one-grip snath” – a term which many people in the scythe circles presently understand. But
because a certain amount of terminology-related confusion on scythe matters now appears
to be the norm, and has to be reckoned with, it should not be too difficult to tweak the term in
question here to something like ‘The Eastern Multi-Grip Snath’, no? In any case, that is the
snath version we turn to now.
It really is very simple. In Step 6 (of the snath making process above) when the
measurements to match the snath to its future user is being made, the snath maker can additionally
take the route of providing an extra grip (or two) for the same (right) hand. Such an approach can
make the snath itself better suited for both ‘trimming’ and ‘field’ mowing
than if it only featured the standard one grip. Taking this concept yet another step further, a
third grip can be added, referred to as a ‘multi-tasker’, but in this case an enhanced one.
Essentially a 3-grip snath. (A “three-gripper”?)
Keep in mind that we are talking of all these grips to be for the same hand. Plus, the grips
are of the up-and-forward style (really the only ones suitable for the ‘Eastern’ style of snaths).
With the (round) mortises for them placed between 5-7 cm from each other, they can quite
effectively fulfill the respective person’s grip (not blade) adjustability needs, not interfere with
each other while held, and not materially compromise the overall strength of the snath. One
issue that may, perhaps, concern some folks could be the ‘extra weight’. But the grips (when
dry) can weigh as little as 50-60 grams each; we think the advantage of such instant
adjustability fully justify so little extra weight in that portion of the snath.
Of course, for units dedicated to either ‘trimming’ OR ‘field’ moving, and used where the
gradient of terrain does not change much, those extra grips would be superfluous. The
situations where these multiple grips are most appreciated is in a very varied terrain – one
changing after only little distance from perhaps level to a ditch followed by a steep incline,
etc. – with all of them desired to be mowed in ‘one go’. In situations like these (and they are
not rare) it is far quicker to shift hand positions and continue more or less with the same
bodily comfort than re-adjust the grip/s of an “adjustable snath” every few feet. Though the
latter is theoretically possible, in real life scenarios nobody is likely to tinker with adjusting the
grips so frequently. Well, the multiple grips help maintain the most suitable distance between
the right hand and the blade, thereby reducing the bodily discomfort during those short spells
when the single (adjustable) grip cause the snath feel momentarily too short or too long.
Figure 56 (above) more or less illustrates what the grip-featuring portion of this odd model –
“Multi-Grip Eastern snath” – would look like when finished, except we suggest that all (2 or 3)
grips are affixed in the position shown in ‘C’.
As already mentioned, the concepts discussed in this section are readily applicable for the
making of the typically two-grip snaths. Adding this touch we have made and used 4 and 5-
grip snaths – and they function very well in similarly diverse situations mentioned above.

