“The only thing that a dull scythe downs is the mower”
– From Whetstone Holders: An ode to labour, skill, creativity, individuality and Eros, by Inja
Smerdel (the remarkable ethnologist and curator of the Slovenian ethnographic museum).
Seasoned mowers everywhere would certainly endorse that Slovenian saying. An old
Austrian adage adds yet another twist: “You should be able to rest yourself while mowing” 2
…And if not, then something must be wrong with you or your scythe, is the often unspoken
implication. And, though what exactly that ‘something wrong’ could be remains also
unspecified, lack of a good edge was surely one of the chief factors. In the not so distant
past, “Guade Schneid!” – “Good Edge!” in old Austrian dialect – was, among the farmers, a
greeting equivalent to “good morning,” “may God help with your work” or “good luck”.
Considering the characteristics of “The Keen Edge”, and how to achieve them
Regardless of any other single factor, the scythe blade’s actual moment-to-moment
sharpness makes the single greatest contribution to a satisfactory mowing experience, or
lack thereof. It needs to be emphasized, however, that new scythe blades are rarely sold
sharp enough for serious use.
Contrary to some retailers’ claims, and in spite of labels to that effect frequently put on in the
factories (at the request of wholesalers), only a miniscule percentage of global scythe blade
production leaves the factory in truly “ready to use” condition. It doesn’t matter whether a
blade was made in Austria, Italy, or any other of the few countries left that still have a scythe
industry; this is the rule. There are also significant differences between the various makers’
degree of product ‘un-readiness’. For instance, the average blade made in Austria today is
usually closest to being ready to use, while blades made in China are the furthest from it.(3)
(2) To qualify the term “rest” in this context: During the times when this adage was born, the average farmer’s daily work
entailed more physical effort (than is the case now) and swinging the scythe was considered the easiest of his tasks – hence
the association with “resting”.
(3) At the time of this writing only two companies – and only on special request from wholesale customers – prepare edges
on some of their blades suitably sharp (or nearly so). One of these is Schröckenfux in Austria and the other is Falci in Italy.
Schröckenfux blades of this “ready to use” edition are, after factory peening, carefully finished on a small belt-sander, and
can be, at least in most general mowing conditions, swung as they come “out of the box”. Falci blades of the same “ready to
use” edition still require some edge finishing before actual use. They usually come with a somewhat thinner bevel overall,
but with less consistency throughout the length – the few cm nearest the point as well as the last portion of the beard call
for additional peening to make them as thin as the rest. In situations equivalent to cutting the American-style lawn, they mayoutperform Schröckenfux blades but only if the new owner finishes the job started in the factory with the good intent
of making edges above today’s global standard. That, unfortunately, is a job mostly for those with some experience
(because it would be difficult to explain to a novice from exactly which point on the additional touch-up is called for…)
In any case, most newly purchased blades need a certain amount of edge preparation before
it would make sense to start using them. Understanding the reason for the initial un-
readiness of the edge helps with the process of preparing a new blade for use.
The final production step, which is primarily a cosmetic operation, usually involves one back-
and-forth pass of the blade’s edge on a large grindstone or abrasive belt. This effectively
accomplishes the goal of making the edge visually even (which seems to be important for
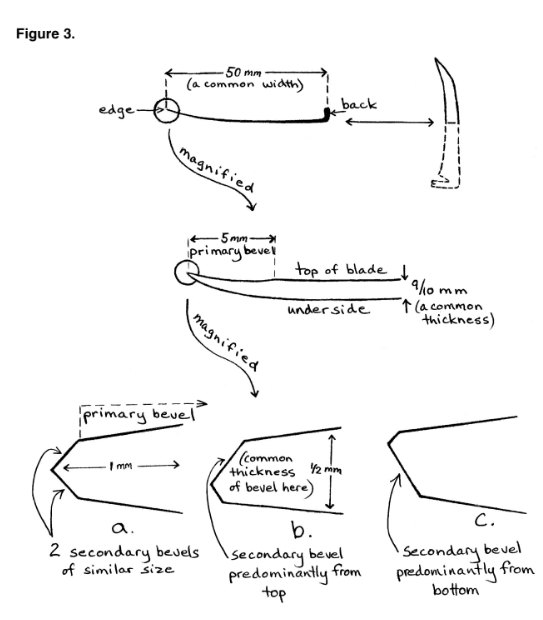
marketing purposes). As a side effect, this “evening out of the edge” also creates very short
(less than 1mm) and steep secondary bevels that reduce the edge’s ease of penetration.
These bevels may be more pronounced either from the top or bottom of the blade, and be
wider near the point, or not. Regardless of each blade-specific condition, at the point where
those two little bevels meet some burr is left behind. While such an edge may feel “sharp” to
the uninitiated (should they conduct that typical, but hardly adequate, test of lightly moving
the thumb across it), the blade would perform poorly in the field for two reasons. One is the
presence of those too-steep secondary bevels, and the other the type of burr that results
from most production line edge “finishing.” This burr is usually relatively coarse, uneven, and
weak (with portions of it barely attached to the blade), and it either breaks off in use or is
rather quickly worn away by the action of the whetstone.
In spite of this, large numbers of blades purchased today are simply put on snaths as they
come from the factory and taken to the field. Functioning somewhat like a fine-toothed saw,
the blade may perform adequately in some conditions, initially. However, the cutting effect of
this factory burr diminishes rapidly, leaving behind a progressively duller edge. The reason is
that the in-field whetting alone does not bring the blade back to its original “saw-toothed”
condition and, given the absence of the serrated effect, the combined angle of those two tiny
bevels is too steep to allow for the edge’s easy penetration into the stems of plants. Mowing
then becomes increasingly more difficult and the scythe may begin to lose its appeal. The
aim of these guidelines is to prevent such a scenario; we suggest inspecting a new blade’s
edge very closely. The use of a 10x loupe can be very revealing. Figure 3 depicts what will
likely be found.
A blade with an edge like this will still cut something, somewhat. But trying to mow a dense
stand of grass with it would be like riding a bicycle uphill with the brakes partially on,
undoubtedly contributing to many novices’ poor impression of the scythe’s potential
efficiency. It is therefore well worth the time it takes to sharpen the blade properly, right from
the beginning. Because they slice with greater ease, sharp blades encourage gentler mowing
strokes, thus incurring less of the damage that can result from overly forceful swinging of the
tool.
Sharpening of tools in general is a two-step process consisting of:
1. Beveling (shaping the primary bevel), and
2. Honing (the finishing step).
Those two steps compliment each other in ways that defy some simplistic correlation.
Performing either one of them poorly can sometimes be partially compensated for by doing
the other one very well, but to repeat: only sometimes and only partially.
In German language, the importance of both respective steps of scythe edge maintenance is
expressed by the following maxims:
“The man who sleeps while peening, will surely come awake while mowing”, and
“Well-whetted is half-mowed”
Preliminary steps.
The preparation of an average new scythe blade for real work involves two or three steps,
outlined below.
Step 1: Removing the sharply pointed corner of the blade’s beard.
This rather uncommon step is listed here first, because that is what we do before proceeding
further. Having done so countless times with well factory-peened blades of old production,
we know that given a steady set up and a sharp file it takes, on average, 15-20 seconds, or
less. What we do not know is why this was not standard practice in the past. (One can find
scores of old blades throughout Europe still sporting this sharp little point after years of use.)
Of course, not all blades require this treatment. Those that do not are ones that were poorly
peened at the factory before sale – and into this group, admittedly, belongs the majority of
present global production.
That fact, however, we see as no reason to leave this issue unaddressed. Our point here
(pun intended) is that blades which are more thoroughly pre-peened in the factory than the
average4 do feature a variously pronounced point at the corner of their beard – illustrated in
Figure 4. If that point is not removed, it tends to hinder the release of grass at the end of the
cutting stroke and may drag a certain amount with it on the return stroke, particularly while
cutting creeping or tangled vegetation. Secondly, while loosening the ring, the knuckles of the
hand working the wrench could have a confrontation with that sharp point… Well, many of the
old timers – bless their hearts and their skill – apparently got along fine without paying
attention to this detail. Still, we recommend that beginners make whatever provisions they
can to ease the initial stages of their learning, hence this hint.
(4)Chinese-made blades, for instance, have no pronounced corners on their beards because the pretense of a few peening
hammer-like lines along the edges of their blades is a joke. Unfortunately, they are not the only ones. However, Peter has,
for nearly a decade and a half, worked on the ground with factories in Austria, Italy and (most recently) Turkey with the
aim to improve the level of factory peening. Although some definite improvements have been made, there is more work to
be done…
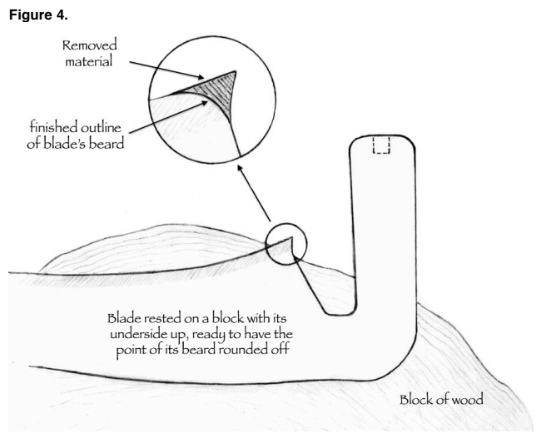
A convenient way to remove this corner is to rest the blade topside down upon a block of
wood, an edge of a bench or the peening anvil. Using a flat file, start at approximately 45
degrees to the blade’s plane, increasing that angle after a few strokes and continue until the
last bit of steel bends over. Then finish rounding it off with a couple file strokes from the other
side.
Step 2: Removing paint and lacquer
Please note that if the new blade in question is to be beveled with a file or a grinder – rather
than peened – this step and the following one can be skipped.
Scrape away paint and lacquer from within approximately 4-5 mm of the edge on both sides
of the blade. While this can be a time-consuming and frustrating task, there are good
reasons to justify the effort. For those who will peen their blades, one concern is that minute
particles of the lacquer, if driven into the steel, can predispose cracks along the edge.
Various chemical solvents can probably speed up the process, but may not be readily
available to everyone, and are objectionable to some.
We endorse the manual or mechanical approach. For instance, the point of a knife, the end
or side of a flat file, or even a sharp rock, can be effectively used as a scraper, initially. All of
these function better while removing the majority of the material than does the common
emery or sandpaper alone, which paint and lacquer tend to plug up rather quickly. Those
among the numerous buffing wheels for use on bench grinders or hand-held electric drills
which do not remove any noticeable amount of steel, are becoming more commonly used in
the industrial countries; for this particular task (lacquer removal) most scythe users would
find them very helpful.
Lacquer is meant to protect the blade from rust only prior to actual use. Once in the field, it
becomes a nuisance because it inhibits smooth gliding action. Perceptive mowers might
notice within the first few strokes the difference between the action of a well-used, shiny
blade and a new, still-lacquered one. The latter, in our view, ‘drags its belly’. As the lacquer
gradually cracks and chips away, it also makes thorough cleaning and drying of the blade’s
topside after use more difficult. For those reasons, it would actually be best to completely
remove the lacquer from most of the blade’s body – certainly not a quick or easy task, and
the main reason why it is usually neglected. Left alone, the lacquer from the underside of the
blade will eventually wear off after a certain number of hours of serious mowing. But not so
with the upper side! Typically, several seasons of use later, many of the blades purchased by
today’s generation are still half lacquered (and half rusty) on the upper side, and sport the
leftovers of the glued-on labels. Those labels, by the way, also have no place on the blade
once it is put to use. In any case, at the very least the outermost 3 mm of the edge should be
made completely clean on both sides of the blade.
Step 3: Smoothing the secondary bevels.
The surfaces of the secondary bevels contain small grooves left behind by the factory’s
grindstones, which are generally 100 grit or coarser. The outermost points of those grooves
can, upon peening, turn into tiny cracks. We might go as far as to say that this is usually the
case. Such cracks may be hardly visible to the naked eye and may not, initially, hinder the
blade’s function. There may even be situations (short, dry grass) where the cutting will seem
‘more efficient’ with them present than if the edge had no minute cracks but was otherwise
poorly prepared (by lack of adequate peening and/or honing). Why? They function a bit like
an edge with serrations, irregular and spotty as they may be. However, unlike deliberate
serrations (either manufactured on some edge tools in factories or user-made by application
of coarse stones or files) the possibly ‘helpful’ effect of what we are addressing here is short
lived. During subsequent peening sessions those tiny cracks are likely to increase in size and
become more troublesome. Eventually small pieces of the edge between two cracks in close
proximity to each other bend over and break off during use… and then an actual edge repair
is in order. In any case, we consider it a better approach to prevent their existence right from
the start, which can be done by smoothing those grooves. The principle is somewhat
analogous to hemming up a piece of lightly frayed cloth that might otherwise tear further
under stress.
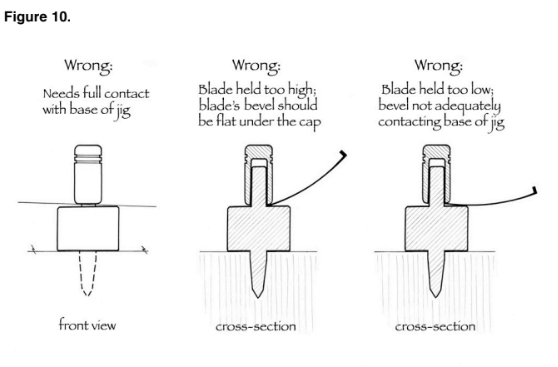
Depending on the method used to free the edge of lacquer, not much additional ‘smoothing’
may be needed. If, for instance, a piece of emery cloth was folded over the edge and held
tightly while being moved back and forth along the length, much of the smoothing of those
grooves may have already taken place. But if the secondary bevels are rather large (in which
case they will also be steep) the lacquer-removal process may have missed them. If so,
finish the job with a synthetic whetstone held at approximately the same angle as the existing
angles of these short bevels – which may be as steep as 30 degrees or even more per side
(see Figure 10) and move the stone more sideways along the edge than is typical during
normal honing.
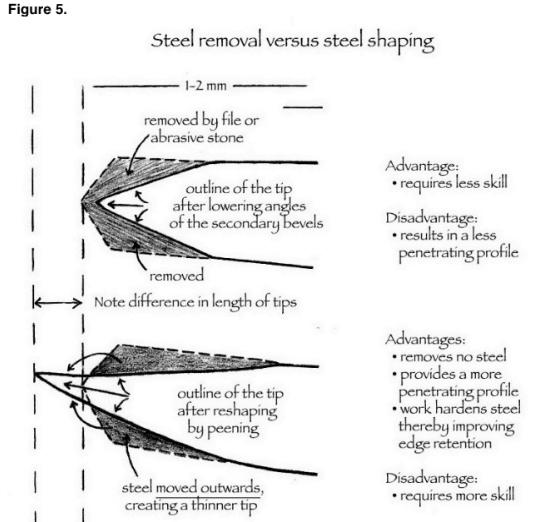
With the preliminary steps finished, the actual sharpening begins with reshaping the
secondary bevels, either with or without removing material, before the blade is attached to
the snath.
The objective, and the differences, between the options of steel removal (by grinding or filing)
and steel shaping (by peening) are illustrated in Figure 5.
If the steel removal approach is chosen, there are at least two ways to do this:
a. By using a flat “fine-cut” file or a hand-held stone (preferably a coarse grit synthetic stone
which removes steel quickly). This is the option that most people around the globe could
implement without any specific training and using commonly available tools.
b. The bevels can also be lowered with a hand-operated grindstone, a belt sander or an
electric grinder – but these are options that require somewhat more skill, and equipment not
always readily available in many regions of the globe.
Peening (the steel shaping approach) involves the use of a hammer and anvil, or the aid of
various “peening jigs” (specialty tools described below). The objective of peening is to flatten
the first 1-2mm of the edge, and thereby draw it slightly farther outwards into a thinner profile.
We consider this approach preferable; especially once some competence is gained it will
also be faster than a file or a hand-operated grindstone. The added long-term benefits of
peening (as opposed to maintenance by filing or grinding) are:
a) Extending the useful lifespan of the blade several-fold
b) Increasing the hardness (and thereby edge retention) of the hammered portion, and c) The tools required for peening, once purchased or made, can last for several generations.
With the above reasons in mind, these guidelines focus on peening as the method of
maintaining the geometry of the primary bevel.
Please note that to peen an already well-used blade, the steps discussed above
(“Preliminary steps”) are not necessary. However, the edge should still be clean and smooth,
and any edge damage (dents, cracks or tears) should be repaired beforehand (discussed in
Chapter 9).
Peening
“To peen” is a term from the metalworking trade and refers to shaping and work-hardening of
the material. In applying the process to the shaping of a scythe blade’s edge, there are two
distinct approaches:
a) The classical method referred to, in today’s scythe-jargon, as “freehand”, which involves
the use of a hand-held hammer and an anvil.
b) Peening with the aid of mechanical devices of various designs, commonly referred to as
“peening jigs” in English. The most effective of these (more accurately called “apparatus”
rather than “jig”) is operated by means of a hand and/or foot powered lever and shapes the
edge by compressing it between two steel jaws. Its potential virtues notwithstanding, it is
complicated to manufacture, and thus costly. It also requires more skill to properly adjust and
to operate than the majority of new scythe users may be ready for. For these reasons we do
not consider it a viable option for most people.
On the other end of the spectrum is the German-designed “Dengelmax” which thins the edge
by pressure from a series of roller bearings and requires very little training to operate. The
theory seems reasonable but the implementing of it less so; it produces mediocre results at
best. For thick/neglected edges this one may be the bottom-of-the-line in effectiveness.
Suffice it to say that after well over a century of countless designers’ attempts, the perfect
device – one that would be readily affordable and more or less automatically produce the
ideal task-specific results – has yet to be invented. However, one of the designs (referred to
in German as “Schlagdengelapparat”, loosely translated as “[Hand] Hammer-driven Peening
Apparatus”) has become the “Volkswagen” among the peening aids in recent years. To the
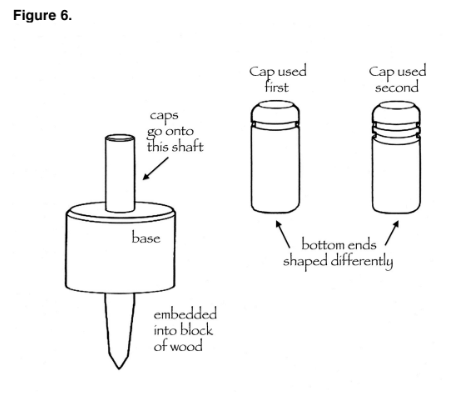
English-speaking mowers of today, this is the “Peening Jig” (pictured in Figure 6.) Various
versions of it are currently manufactured in several countries, including China (and most
recently also India). They are readily available in much of Europe and from most mail-order
scythe suppliers, internationally.
However, it should be mentioned that among the different versions of this popular peening jig
there are variations in quality of material used (which affect the longevity of the shape of the
caps’ bottom end) as well as finesse of their finish. Also, the actual geometry of the contact
surface differs, with some better suited for well-maintained edges than for those that have
been sorely neglected or inadequately pre-peened in the factory. The latter are sometimes
too thick for the jig to handle as intended. In cases where the first cap does not produce an
immediately noticeable effect (and that without overzealous pounding) the bevel’s thickness
should first be reduced with a file, grinder or a coarse hand-held synthetic stone.
On the basis of numerous trials conducted in recent years by individuals and groups of
instructors in different countries, there appears to be some consensus that an average
beginner can achieve acceptable results more quickly and easily by peening with this type of
a jig than by peening freehand. Its primary advantage is that using it requires less accuracy
with the hammer. The design also automatically prevents “overreaching,” that is, striking too
far into the body of the blade (a common error of many novices who begin their peening
experience by the freehand method).
Nevertheless, even though we outline peening with the jig first, we encourage everyone to
graduate to (or even begin with) the freehand method, because in the long run it is the most
versatile and economical path to a keen edge. Plus, we have witnessed some complete
novices peening very well without the aid of a jig.
How to use the peening jig
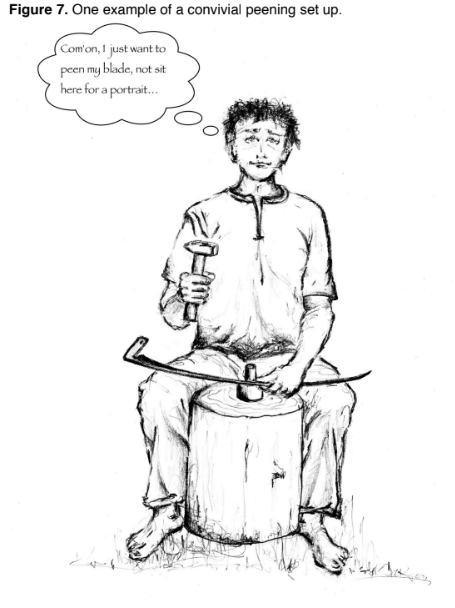
1. Set up a steady base.
A block of wood, preferably at least 30 cm in diameter and 50 cm tall, at which a person can
sit comfortably, is one example. Setting a peening block directly on the surface of the ground
or on a wooden floor is far from ideal, and best avoided. Better options are a solid concrete
floor upon which a fairly heavy block can sit without a wobble, or a heavy peening bench.
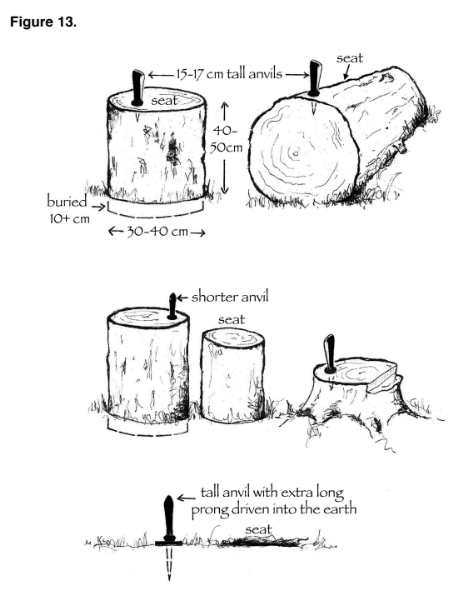
The best option is to bury the block about 10 cm into the ground, as all the old time
blacksmiths did with the bases for their anvils. Then place a stool or another smaller block for
a seat next to the first one (the anvil base) so that the seat is 10-15 cm lower than the top
surface of the peening block. If the block serving as the anvil base is large enough, it can
also serve as the seat. In this case, part of its surface will need to be cut away, (about 10-15
cm deep) so that the jig will be level with the top of one’s thighs. These are approximate
dimensions only; they should be adjusted to each person’s comfortable sitting and working
position. The relationship between how high a person is seated and the position of their
thighs can be fine-tuned by means of various sized cushions (a folded jacket or an armful of
grass can serve quite well). This fine-tuning is highly recommended, because it is easier to
hold the blade steady if the operator’s thighs can readily support both ends of the blade,
while the feet are resting squarely on the ground (as in Figure 7). From this position, slightly
lifting or lowering the support (by a little shuffle of either foot) can provide precise
adjustments in exactly how the blade lays on the base of the jig. With this degree of support,
the results of peening will be far more consistent than if the blade wobbles, or if the fine
adjustments are awkward to execute. Figure 13 illustrates a few examples of many possible
peening set ups; in most of those cases the jig can take place of the traditional anvil shown
there.
2. Secure the jig into the block.
Drill a slightly undersized hole, both width and depth-wise. Without a cap yet in place,
carefully drive in the jig most of the way with a small round of firewood, or use a piece of
hardwood as a buffer between the jig and the hammer. The central shaft upon which the
caps rotate should never be struck with a steel hammer without one of the caps in
place, as it could be damaged enough to prevent smooth movement of the cap. It is also not
advisable to hammer on the caps without a blade inserted; they will retain their lower ends’
shape much longer if not beaten against the base itself, which – at approximately 60 Rc
hardness – is considerably harder than a scythe blade.
At this point the blade can be inserted and peening begun; the base of the jig will gradually
be driven down to fully contact the surface of the block.
The two standard caps supplied with this version of a peening jig (Figure 6) have differently-
shaped bottom ends. The caps are used in progression. The first (usually marked with one
groove or #1) will reach somewhere between 2 to 3 mm in from the edge (depending upon
the model of jig) and should produce a visible depression akin to a shallow trough running
from beard to point.
The second (marked with 2 grooves, or #2) cap will flatten the material between that ‘trough’
and the apex of the edge. Both caps move the steel outward, but the effect of the second one
is more noticeable. Exactly how much the steel is thinned and drawn outwards depends on the
thickness of the primary bevel and how hard the hammer is applied. If the blade has
been used too long without peening, it may be necessary to repeat a step with either or both
caps. If peening is done at regular intervals, after perhaps four, but not more than six hours
of mowing, the first cap may not need to be used every time.
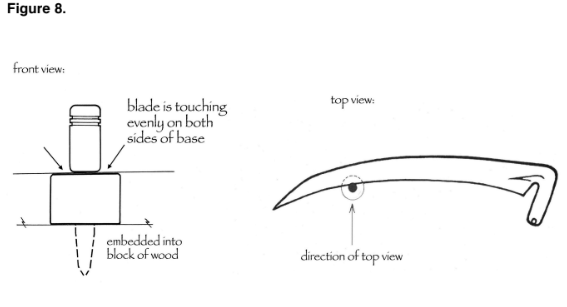
While peening, ensure that:
a. The blade’s bevel zone is lightly (but completely) touching the base as it enters the cap
and remains on that angle (horizontally aligned with the base – as shown in Figure 8) during
the actual hammering.
b. The blade’s bevel zone is well supported at the very spot where the cap contacts it. The
convex shape of some blades requires that they be tilted slightly towards the central shaft in
order to accomplish this. What exactly is “slightly”? We’d rather not even offer a solid range,
never mind an exact degree. However, Figure 9 shows an example of the degree of that tilt.
Here it also needs to be pointed out that as the already-peened edge exits from under the
cap, it will have been slightly raised so that at first glance it appears that the blade’s back is
being held too low. Lifting the back more (so as to lower the edge) would only accentuate the
effect (of the first mm behind the apex turning upwards). A certain degree of this ‘upward
turn’ is normal and inevitable. Provided the blade’s bevel zone is hugging the surface of the
base as it enters the cap, all will be relatively well. For that reason it is better to keep an eye
on the side where the blade’s edge enters the jig, rather than on the other side, where it
emerges.
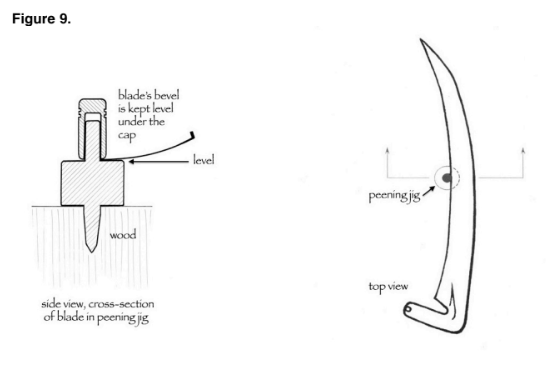
Figure 10 depicts three common errors in how the blade is held to the jig. In ‘A’ the blade
(viewed edge on) is shown horizontally misaligned. In ‘B’ the blade’s back is held too high,
and in ‘C’ too low for the very edge to contact the surface of jig’s base.
c. The frequency of the hammer strikes is synchronized with the speed at which the blade is
moved along to achieve a frequency of around 1 strike per 1 mm (or 10 strikes per 1 cm, or
25 strikes per inch), and the force of the hammer is uniform throughout.
Beginners usually find striking uniformly easier than moving the blade in synchrony with the
strikes. While either pulling or pushing the blade along is technically correct, many people,
ourselves included, find the pulling to be smoother. Also, with this style of peening jig it is
somewhat irrelevant whether one begins at the beard or the point of the blade, and whether
the rib is towards or away from the person during work. We think that facing the edge (with
the blade’s rib farther away from the person) and pulling the blade leftwards is the easiest
way to do it. However, we suggest that other combinations be tried as well in order to
determine what feels most comfortable.
Further hints:
It helps with steadying the blade (and therefore the uniformity of results) if the middle finger
of the hand holding the blade is also touching the base of the jig as peening proceeds.
No specialized hammer is required; any common one weighing at least 500-600g will work.
For “bush” blades, or any blade that has gone too long without peening, a heavier hammer
would be more effective. We consider it better to use a heavier hammer gently than a lighter
one too vigorously. In careful hands, even 1kg is fine.
Note, however, that hammering can be overdone by striking too hard or making too many
passes in succession beyond the blade’s need. Especially if the primary bevel is relatively
thin to begin with, portions of the edge may tear or lose tension. A narrow strip of the edge
can literally be cut off by overzealous strikes with the jig’s second cap!
Thus, for one’s first-ever peening session, it is prudent to make one pass over the blade
rather gently in order to get a feel for steadying the blade, the rhythm of the hammer, and
how the steel reacts to the weight of that specific hammer and force of strikes. Then carefully
check the uniformity of the results. If the change was noticeably less in some areas than the average, make a small mark on the blade’s body precisely in line with those spots.
Then, pay attention to the marks so that it is clear which places to peen again. Conversely, there may
be spots where the blade’s gradual movement was momentarily ceased but the hammer
strikes were not paused. Those places should also be marked (before making another pass) and not re-peened.
Edge treatment following peening with the jig
With the above steps completed, the blade should be well-beveled but not yet actually sharp.
This is because during peening the apex of the edge abrades against the central pin of the
jig, and the blade may thereby be rendered less keen than it had been before. Considering
this inevitable side effect of the otherwise helpful jig, no more pressure than necessary
should be applied to keep the blade’s edge held against the jig’s guiding shaft.
Even in the best scenario more edge finishing (honing), is required right after peening with a
jig than should ever be necessary during any single whetting break in the field. Yet, this
follow up step is notoriously neglected, or even omitted altogether.5
A common synthetic stone (60-80 grit) or a single-cut flat bastard file will accomplish the
initial step of the post jig-peening treatment considerably more quickly and better than most
natural stones. Also, any used “carborundum” bench stone or a piece of mid-to-coarse grit
emery cloth fastened to a small block of wood, or simply wrapped around a stick, can serve
as adequate substitutes for a ‘proper’ stone or file if those are not at hand.
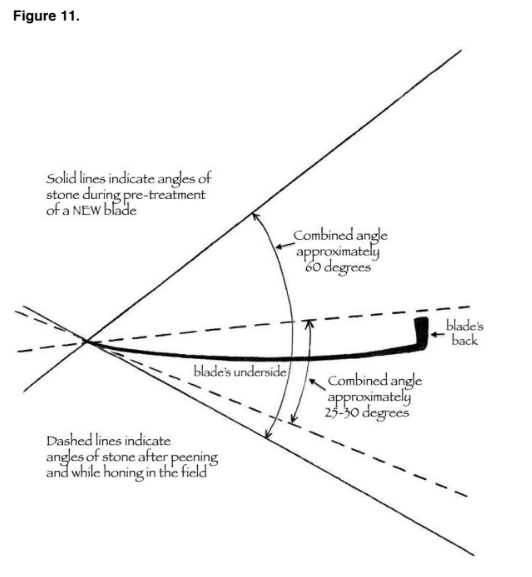
Figure 11 illustrates the approximate angles at which abrasives used for the post peening
treatment are to be held. See “Further Notes on Pre- and Post-Peening Treatment of Scythe
Blade’s Edge” for additional hints.
(5) Over the years, some individuals have written to us, complaining that “the peening jig is no good” because after they used
it, the blade cut worse than it did before… And, as we learned from further dialogue, they either skipped the step we are
now discussing altogether, or used a natural stone for the process – as indeed some instructional videos foolishly (in our
opinion, of course) recommend. Most of the natural stones presently sold by mail-order scythe retailers are of a rather
fine grit and thereby poorly fit for this particular task, because, whatever their other virtues, they remove material too
slowly. On the other hand, synthetic abrasives and the jig were conceived during roughly the same period of history, and
in a way they belong together, at least for the initial portion of the pre-and post-peening treatment. We suggest that people
keep their precious natural stone for honing in the field and for finishing the quick job done by its synthetic version.
As mentioned earlier, we are in favor of experimenting with ways of doing things that are generally not recommended.
(Are rules not made for fools?) In this case, one could finish the edge with a natural stone only, and take it all the way to a
state of no ‘light reflection’ (discussed below). What we think will happen (and can best be seen under adequate
magnification) is that before a jig-peened blade ends up adequately keen, the stone will also begin to round the area just in
from the apex. This roundness – the unwanted consequence of whetting (be it in the field or during post-peening edge
treatment) – reduces ease of penetration, and its manifestation should therefore be postponed as long as possible. So,
unless one intends to create a less penetrating but more durable edge, it may be silly to head for the field with its apex
already slightly rounded.
This post peening treatment is best performed in a comfortable and steady manner before
attaching the blade to the snath. One option is to simply remain in the same sitting position
as during peening, holding the blade’s tang in the left hand, initially with its underside resting
on one’s thighs and the edge pointing outward (away from the body). See Figure 12. Some
people achieve satisfactory results by resting the point of the blade against the peening block
or ground surface (although we find such an approach more awkward, less accurate and
thus less efficient overall).
Regardless of the specific way of holding the blade, and regardless of abrasives used, the
fundamental difference between the pre-treatment of a new blade prior to peening and post-
treatment of a freshly peened blade is the angle at which the stone is held during the
process. Both respective angles are indicated in Figure 11, though they do not need to be
adhered to dogmatically.

The figure above depicts a blade being honed as part of post-peening treatment. A typical
‘boat-shaped’ whetstone is shown in use (as it likely represents the most common of scythe
sharpening stones), but as is discussed more thoroughly further below, stones of many other
shapes, as well as other ways of holding them and directions in which they are moved, can
serve satisfactorily. A stone of this shape is usually applied on its narrow surface. For honing
before the blade is mounted on the snath, it is easier to hold the stone as pictured in this
figure, while still make relatively long strokes and avoiding abrading one’s knuckles on the
blade’s rib; plus, it may be considered safer overall. Additionally, while honing the topside of
the blade, this whetstone’s shape corresponds somewhat to the curvature between the
slightly upturned edge and the rib of the blade; thus, a slightly lower bevel angle can be
achieved by using it on its convex side.
Here is our suggested sequence of steps:
Step 1.
Begin with the blade positioned in the lap, the left hand holding the tang, and the topside of
the blade facing upwards (as in Figure 12). Applying firm pressure, make one or two beard-to-point ‘passes’
from the top side of the blade, each consisting of a series of overlapping strokes, with each stroke covering
approximately 15 cm of the edge’s length. As indicated in
Figure 11, the stone’s angle should follow the direct line between the edge and the blade’s
back “rib” (though it is better to not actually abrade the rib; touching it very lightly for
reference is sufficient). One should be able to feel the burr by gently moving the thumb
across the edge (in the direction from the blade’s rib towards the edge). Wherever it cannot
be felt, another pass with the stone (from the same side, but with focus on those areas)
should follow. At most two such passes should “raise the burr” on the opposite (underneath)
side of the edge.6 If not, one or a combination of shortcomings is taking place:
a) The pressure applied with the stone is not firm enough
b) The stone is either of too fine a grit, or is glazed and thereby lacks effectiveness
c) The pressure with the blade’s edge against the jig’s guiding shaft was excessive
Step 2.
Once the burr can be felt along the complete length of the edge, repeat the process from the
opposite side. The blade, still resting in the lap as before, is simply turned over by the left
hand. Now the underside of the blade is facing the sky and the edge is facing the person
performing the task. Still applying firm pressure and overlapping the strokes, this time pull the
stone towards oneself in a diagonal direction from left to right. This time it should only take
one pass (at very most two) until all of the burr is turned back again, so it can be readily felt
from the blade’s upper side. Another quick pass can be made with a finer stone (one’s
customary field stone, for instance), a knife honing steel, or any other hard and smooth steel
rod. It will push the burr over a bit more thoroughly (than a coarse stone).
Step 3.
We refer to this step as “cutting off the burr”. Although this particular technique is not
common with mowers, it is the most efficient way to remove the majority of the burr.
Now is the time to switch to a finer grit stone (either natural or synthetic). The previous pass
ought to have turned ALL of the burr over – so that the underside of the edge now feels
smooth to the touch, while on the upper side the burr is protruding and can be readily felt.
(6 )To briefly re-clarify the term burr: Given a few “buts”, it can generally be stated that the larger the burr, the sooner it
will bend over or break off under load. While a straight razor-using barber or a craftsman wood carver both strive for
burr-less edges, in the case of scythe blades a certain amount of burr is acceptable and under some conditions – such as
while cutting mature grains, and the thin yet tough species of grasses at mid-day – even desirable. In fact, very few, if
any, scythe blades are ever maintained with no burr at all. The question here is how much and/or what size of burr
should be allowed to remain. Referring to extra burr (that should be removed) we are merely using some arbitrary
definition of burr that would likely break off before its existence can be justified. However, there is no practical way to
define it very accurately, and by “extra” we simply mean majority of the burr that can easily be moved from side to side
with very light touch of the stone and is readily felt by a finger.
Hold the blade again as in Step 1, and place the stone at the blade’s point in its ‘extended’
position (that is, with most of its length protruding over the edge). Pull it simultaneously
towards yourself and towards the beard, at a considerably steeper angle than that at which
the burr was raised. The angle indicated in Figure 11 – for pre-treatment of a new blade – is
approximately correct. With each stroke overlapping the previous one, proceed all the way to
the point of the beard. These strokes can be made using less pressure, but the burr is cut off
most effectively if each stroke does not progress too quickly along the length of the edge.
With strokes that are adequately overlapping, it might take about 12-15 individual strokes for
a “pass” over a 65cm blade. One such pass should suffice.
Step 4.
After the burr has been removed, make one or two more honing passes on each side of the
edge with a finer stone, mimicking the motions from steps 1 and 2, but not trying to raise a
burr. This entails diagonal and overlapping strokes from both sides (but one side at a time, in
this case).
The blade should now be ready for mowing… well, almost. Once it is re-attached to its snath,
and before being taken back to the field, yet another quick honing (as done regularly in the
field), won’t hurt.
With some practice, appropriate stones and firm pressure while applying them, steps 1 to 4,
all together, can be performed in less than one minute.
Freehand peening
“Peening is to the scythe blade as bread is to the mower.”
(Mowers’ saying from Terchova, Slovakia – the origin of the Rozsutec whetstones)
For upwards of two millennia, the geometry of scythe blade edges was maintained with hand
hammers and relatively small pieces of steel that functioned as anvils. Freehand peening
requires greater accuracy with the hammer and more attention to details than does the use of
the jig. However, once a certain degree of competence is reached, the freehand method can
lead to better results than the simpler versions of jigs.
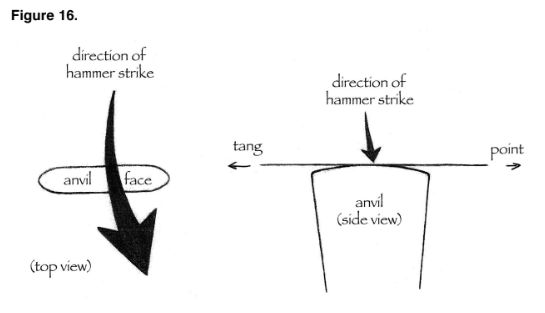
Two basic peening tool pairs have traditionally been used: one is the combination of a cross-
peen hammer along with a flat anvil, and the other is a cross-peen anvil with a flat-faced
hammer. Note, however, that the flat faces of hammers and anvils are usually slightly
convex; in certain languages they are referred to as “wide” or “dull” rather than “flat”.
Conversely, the cross-peen faces are then called “narrow” or “sharp”.
Both of these two peening approaches are still practiced throughout Europe, and it seems rather
impossible to ascertain whether one is decidedly more popular than the other.
However, based (again) on group trials conducted with the new generation of aspiring
mowers, we have concluded that the combination of a flat-faced hammer and cross-peen
anvil is more forgiving of errors and thereby easier for most people to learn.
Before describing the actual process, there are a few popular misconceptions regarding
peening that we wish to address; doing so should clarify certain concepts and make the
practice of peening less of a “hit and miss” endeavor.
It seems that the majority of novice mowers have been led to believe that peening and
thinning are interrelated in such a way that one should always readily see the thinning
manifested. That is, it’s implied that the peened portion of the blade will be visibly wider than
the rest of its (yet to be peened) length. And if not, one can assume that the blade needs
more peening.
One author’s advice on the subject is to draw the bevel outwards 1-2 mm each time a blade
is peened. Well, we feel that 2 mm is a lot of thinning at one time, and most folks still learning
the skill should not be expected to meet such a challenge. Although there are cases when
this may be called for, the differences between those special cases and routine maintenance
need to be clearly pointed out. The three examples that occasionally ‘require’ such radical
treatment are:
a) Some new blades
b) Used blades which were purposefully maintained with a shorter and thicker bevel in order
to better handle tough stemmed “weeds” (especially late in the growing season) but
subsequently (possibly the following spring) that same blade is desired for other work where
a much more thinly shaped (albeit more damage-prone!) bevel is appropriate.
c) Blades that, due to serious edge damage, have had the whole primary bevel completely
removed (generally by a grinder) so that now the edge is as thick as the blade’s main body,
that is (nowadays), close to 1 mm thick. Such a situation calls for the complete re-creating of
a new primary bevel. A competent person can do so with hammer and anvil alone, but we
recommend that initially the bevel thickness be reduced to perhaps 1/2 mm or less with a
grindstone or a file. Then the subsequent peening session can involve up to 2 mm of obvious
thinning – not exactly a task for a beginner…
To consider what is required in the above three examples as a general guideline can be
misleading. For one thing, to obtain that much material from the thickness of an edge that
was already fairly functional (so as to increase its width by even a full 1 mm, never mind 2) may require
hitting farther back than many novices can manage without causing cracks, up-and-down waviness, or the loss of tension.
IF an edge used regularly for cutting more or less the same type of vegetation should indeed
call for such a treatment, a peening session was already delayed far beyond the optimal
frequency. That, unfortunately, is not an uncommon state of affairs. Still, instead of “drawing
out” a bevel even 1 mm during a single peening session, beginners have other options.
As mentioned above (‘c’) a safer approach is to partially reduce the thickness of the bevel
with a file, and only then peen. If a peening jig is available, making the initial pass with its first
cap can help. The resulting groove will not only mark an accurate line to subsequently follow
with the hammer, but also make the job of flattening the material between that groove and
the apex less difficult. Then, attempt to strike no farther than 2 mm in from the apex, and be
satisfied with 1⁄2 mm of visually obvious widening of the bevel. This approach can also be
followed in the cases of ‘a’ and ‘b’ above.
The hard-core traditionalist might scoff at this file/jig/hammer sequence, but that alone is not
a reason to dismiss it. Let’s respect, however, what the old mowers always knew and put into
practice – that peening the regular ‘everyday’ blades frequently is the path to follow.
Step by step process:
1. Preparing the set-up
The guidelines in the jig peening section that emphasize the importance of a solid base and
precise seat-to-anvil height relationship, apply here even more so. Three examples of
traditional set-ups not mentioned earlier are trunks of sizable trees lying on the ground,
leftover stumps which were cut off rather high above ground, but are still sound, and large
rocks that have sat in the same spot for years. In the case of the latter: using a masonry bit,
drill an oversize hole, drive in two softwood wedges and then drive the anvil snugly between
them. Keep in mind that in addition to having a steady base, the anvil itself should be solidly
inserted.
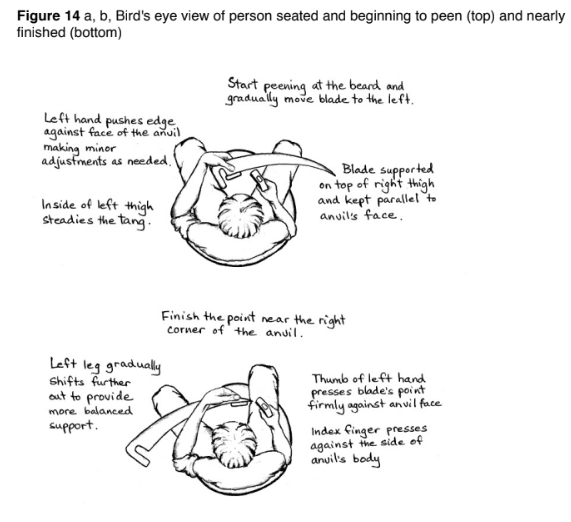
We repeat for emphasis: while peening, it helps if one sits (in relation to the anvil) in such a
way that the left hand and both thighs can easily steady the blade. This, of course, does not
mean that the blade rests across both thighs throughout the whole process. By studying
Figure 14 it should be obvious that at the start the left knee is positioned very close to the
anvil, merely touching the blade’s tang (Figure 14 a) and near the end of the process the
right knee can only touch (but still steady) the blade’s point. (Figure 14 b).
For the sake of this all-important steadiness of the blade during peening, we also
recommend keeping the middle finger of the blade-holding hand in contact with the outer side
of the anvil, while the thumb is pressing the blade firmly against the anvil’s face.
Looking at Figure 14, note the difference between the angle at which the anvil’s (elongated)
face is set in relation to the person’s arm in a and b of the figure. Although both of these are
common enough and neither is necessarily more ‘correct’ than the other, we recommend
the angle illustrated in the top drawing – which puts the face of the anvil closer to
perpendicular to the forearm of the hammer-swinging hand.
2. Enhancing visual clarity of the edge while peening.
In the section on jig peening we emphasized the importance of cleaning all paint and lacquer
from a new blade’s edge, while recognizing that well-maintained and regularly used blades
may have their edges adequately clean for peening. Specifically for the freehand method,
however, a final pre-peening polish of the edge can significantly increase the visual clarity
and aid in accurate placement of the hammer strikes. Among the various means to do so, we
have a favourite abrasive, described in Note 7.7 Although the mowers of old apparently got
along fine without it, we have yet to meet someone who, once having tried this particular
accessory, would want to be without it while peening freehand.
Additional pointers:
• Provided the blade’s edge is otherwise clean (i.e. neither rusty nor covered with the dried-
on plant juices that accumulate on blades used to mow green grass during the dry hours
of the day) only the side facing the hammer needs to receive this polishing treatment.
• While applying the sanding block, use a sequence of diagonal strokes across the bevel
towards the apex, rather than moving it along the edge’s contour. This will prevent the
common slips by which the block sustains cuts from the blade’s edge, substantially
reducing its lifespan.
• After polishing the edge with the sanding block, all the resulting fine ‘dust’ should be
completely wiped off the blade. If this step is skipped, the carbide grit in that dust
may end up between the working surfaces and, being harder than either of them,
leave tiny indentations in the face of hammer and/or anvil.
• During a peening session, periodic re-polishing of the hammer’s face with that same
block is helpful in maintaining visibility of the hammer strokes. With brand-new
blades, however well cleaned one may think they are, this will be found extra helpful,
or even ‘necessary’. The reason for this is that some bits of smeared lacquer are
likely to remain in the groves left behind factory peening, and if so, they will affect
visual clarity by ‘smearing’ the hammer and/or anvil faces.
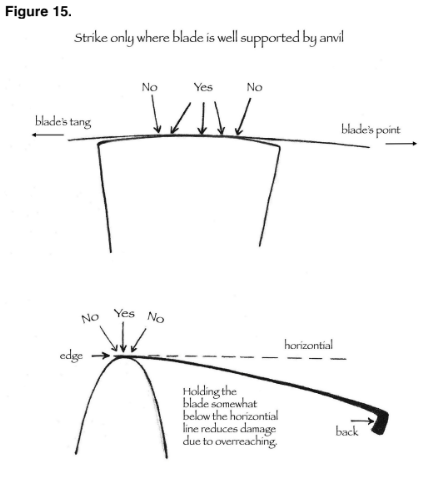
3. Positioning the blade
Using the method we suggest, the blade is placed upon the anvil upside down with the
cutting edge facing the person, as in Figure 14. We think that worrying if the blade is held
“perfectly level” in relation to the anvil’s face is superfluous. The only relationship that DOES matter is the one of adequate
contact between the blade and anvil at the exact spot or very close to where the hammer contacts (the parameter emphasized in Figure 15).
Note, however, that although most of the work takes place at, or very near, the center of the anvil,
we tend to use the area just to the right of the center more. And because we like to thin the
edge as near to the blade’s point as possible (which cannot be very well peened at the anvil
center), for that section of the edge we find it necessary to use the extreme right side of the
anvil’s face.
(7) Around the year 2000 we discovered, much by accident, that the use of a particular abrasive ‘block’ greatly improves
visibility while peening. Its application leaves the edge with a matte finish, against which the marks left by hammer
strikes stand out clearly. This makes it considerably easier to see each successive hammer print than if the edge was
merely clean or polished with common emery. No other abrasive or polishing aid we have tried is comparable in this
regard.
Now widespread in its use among the new generation of mowers, this handy little accessory, referred to as “the
sanding block”, is considered by some to be a necessary part of scythe maintenance, and is sometimes sold as part of a
“peening kit”.
Please note that this is NOT one of the common foam sanding blocks covered with glued-on pieces of emery found in
every hardware store these days. We are referring to a block of a rather solid matrix in which silica carbide grit is
embedded throughout, and which continues to function equally well until the block slowly becomes too small to hold.
Used for this purpose alone, it can last for many years before wearing away to the point of uselessness. Of course, this
little chunk of long lasting abrasive can also be used to keep the rest of the blade free of rust, and the surfaces of peening hammers and anvils polished, as indeed they should be. We have first-hand experience only with the German- made version of this abrasive block – “Sandflex”, from Klingspor, which is available in three grits. For scythe blade maintenance, we recommend the medium grit. But there is at least one other manufacturer who produces a very similar product, available in the UK and possibly elsewhere.
4. Target
Beginners are advised not to hit farther in from the edge than 2mm. Drawing a line exactly
above that zone with a felt pen (and keeping it unmarked by the hammer as peening
progresses) helps with orientation. In fact, 1mm of a peening zone may be enough for many
novices to start with.
5. The ‘diagonal draw’
This section looks at how the striking path of the peening hammer influences the shaping of
the bevel.
Our approach to peening involves striking on a slight diagonal towards the blade’s point,
while the blade is being moved from right to left. (See Figure 16.) Simultaneously, this
method of peening includes a somewhat exaggerated pull of the hammer further downward
immediately upon impact, which can perhaps be visualized with the help of Figure 17.
Despite not being common traditionally, the diagonal striking direction of the peening
hammer reduces the tendency of the steel to buckle or ‘wrinkle’, especially whenever
(intentionally or otherwise) the limits in bevel thinness are being reached. At the same time,
an extra pull downward facilitates the shaping of the bevel.
This technique involves increasing the hammer’s pull downwards, off the face of the anvil just
upon contact. With other words, while applying this technique, the hammer is not pulled back
up immediately at the moment of contact, but instead moves away from the edge on a
somewhat downward direction, ending its path below the face of the anvil (and if the strike is
vigorous, nearly on the person’s right thigh). Just how far downwards it could sometimes be
is shown – approximately and with inevitable real-life variations in mind – in Figure 17.

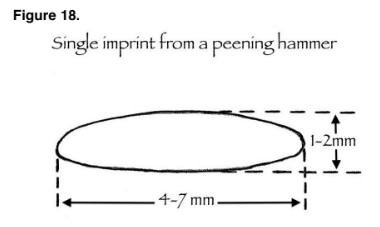
6. The effect of each strike
The exact size and shape of the hammer’s imprint is influenced by a number of factors.
Listed in arbitrary order, these are:
• The weight of the hammer and the force with which it is swung;
• The hardness and thickness of the blade’s bevel;
• The exact shapes of hammer and anvil surfaces, and;
• The pattern in which the hammer strike is guided; the more pronounced is the ‘pull’
upon impact, the larger/wider the imprint will be in the shorter dimension (that is, from
the edge towards the rib) and the more the hammer is pulled diagonally sideways, the
longer will be the imprint. Of course, the extent of both of the ‘pulls’ must be kept within
reason.
The shape of the hammer print illustrated in Figure 18 is one generally good to aim for.
Regarding its size, the smaller dimensions indicated (1mm x 4mm) is what may be expected
from beginners, the larger (2mm x 7mm) from the experienced. This does not mean that
peening should proceed at the rate of 4 to 7mm per hammer strike. The overlap will slow it down to about half, or even
less while beginning to learn. What else specifically affects the size of the imprint is the combination of the blade’s
hardness and the force of the hammer
strikes – something that can best be understood by repeated practice, while paying close
attention. (But see the section on that topic near the end of this chapter.)
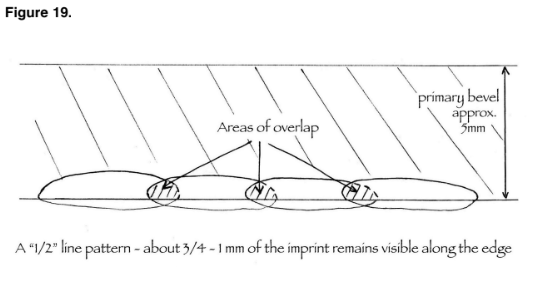
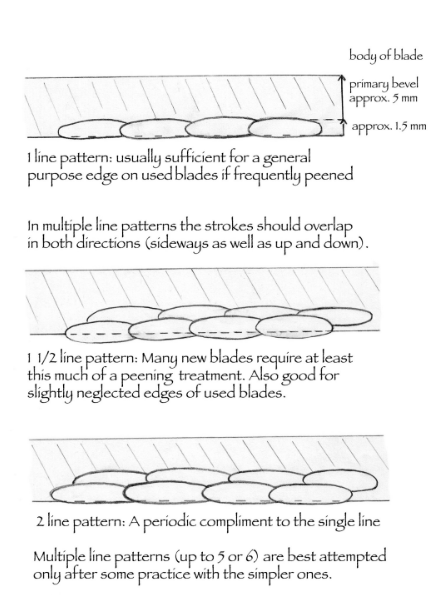
7. The strike patterns
The hammer strikes should be partially overlapped (sideways, as they progress from beard
to point) and, preferably, placed in deliberate patterns consisting of one or more continuous
“lines” (see Figure 19.) If more than one line is placed during one peening session, the lines
themselves should also overlap in the up and down direction and the line farthest from the
edge should be placed first.
8. Frequency of strikes.
We advise a slower rate of hammer strikes per minute than one can see demonstrated in
most of the available peening videos, or than may be common throughout Europe’s
countryside. A steady pace of about 60, but no more than 70 strikes per minute offers
adequate time to note where and how the previous strike contacted and to focus exactly on
the spot to aim for next. This increases accuracy and thereby the quality of the results.
Additional concepts related to peening
This section contains details beyond the level of many other topics in these guidelines, and
may be an overwhelming amount of reading for the average reader. However, they are
included precisely because we consider them important in helping to fill some gaps in the
“how-to” of scythe-related conversations which are gradually involving more international
participation. To do that, we are moved to challenge some of the established theories and
advice now broadly communicated.
Here we are concerned with two subtopics:
1. Further thoughts on what may be the most efficient path of the hammer.
2. Questions pertaining to edge hardness.
1. The path of a peening hammer
Through numerous seasons of many trials and errors, we eventually came to settle on the
peening approach communicated in these pages as our preferred one. Its most
distinguishing feature is the direction of hammer’s path.
The rationale behind this non-traditional, somewhat radical peening style was likely inspired
by Peter reflecting on his former experiences at the forge for the general needs of a draft
horse-powered farm, but the conclusions are based on principles that every practicing
blacksmith and metalworker quickly comes to understand.8
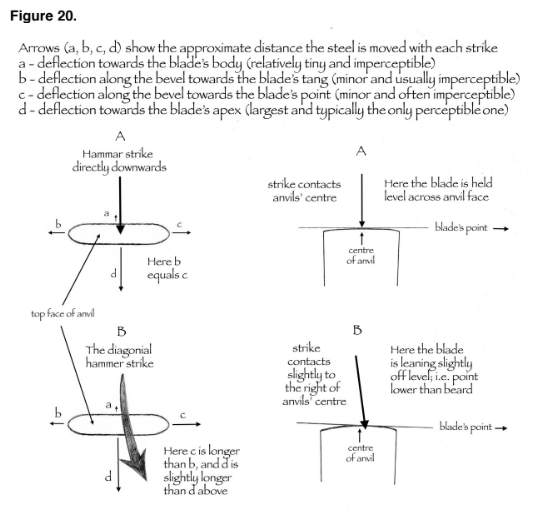
The very same phenomena taking place upon a blacksmith’s anvil (described in Note 8 and
illustrated in Figure 20) – of the steel being moved (though not equally) in all directions – also
happens during the shaping of the scythe blade’s bevel. Figure 20 is a crude representation
of the steel’s relative deflection in the respective directions when hit with a peening hammer
in two different manners. In Figure 20 a) the strike is straight down and in Figure 20 b) it is
diagonal.
(8) In that line of work the cross-peen hammer is mostly used whenever it is desired to move material only in one direction,
but accomplishing that goal depends, besides the shape of hammer’s head, also on the technique applied. For instance, if a
hot rectangular bar of steel of equal thickness throughout were hit with such a hammer near its center and exactly
perpendicular to its length, it would deform an equal amount in both directions perpendicular to the longer dimension of
the hammer’s face. That is often not the objective. If the bar is to be lengthened in one direction only, (as is desired while
peening the edge of a scythe blade) the smith will tilt the hammer’s face slightly off the perpendicular (either toward or
away from himself) and apply force in the direction the material is to be moved. However, in spite of his intent, the steel
will also move a certain (smaller) amount sideways (to the right and left) – something that must be periodically
compensated for, in a separate step, by turning the bar so as to place its narrower side against the anvil’s face and, using the
flat face of the hammer, correcting the irregularity.
One reason peening is not still more demanding of skill and attention than it is, and (given
some practice) more or less leads to the intended results, is because the bevel (unlike the
steel bar example in Note 8) is already thinner near its outermost edge – precisely where we
want the steel to move. Upon impact, steel naturally moves more in the direction of less
resistance, in this case towards the apex. However, it is different with regard to the sideways
direction along the bevel’s length, because to the left and right of the hammer’s impact the
bevel is more or less equally thick. For the purposes of attaining a more penetrating edge we
do not intend to move any steel comprising the bevel lengthwise, of course. Yet every little
deviation of the hammer’s face sideways, or lack of accuracy regarding the blade’s support
upon the anvil, favours either one or the other sideways direction of the steel’s flow. Usually it goes unnoticed, but whenever a
certain threshold is passed the shifting of material to either left or right is precisely what can lead to ‘up-and-down’
waves along the edge (see Chapter 9).
Though to completely prevent a certain amount of such sideways deflection is rather
impossible, we can help direct it to where it causes less trouble. The technique suggested in
these guidelines is geared precisely to that end. What we are doing with the slightly diagonal strike is ‘chasing’
a portion of the steel ahead of the hammer against the not-yet-newly-stretched/thinned material, and on towards
the blade’s point. And what exactly is the point of it? Obviously, we think that it will ‘behave’ better. There are
times when the most obvious demonstration of the phenomenon pertinent to understanding the concept can be seen,
though it requires that at least the first width of the bevel is peened more or less to its
maximum tolerance in thinness. At that point, the edge would readily “run” more than the
common 1⁄2 to 1mm in from the apex, possibly 2mm or more. (For an explanation of the “run”
see “How thin should the edge be”, further on in this chapter.) Then, whenever mis-aims
occur and the overlap of strikes is too great, the steel just behind the last strike (that is, to the
left of the hammer’s last print) will show a little ‘wrinkle’. At first glance such a wrinkle may
appear to be a crack, but it is not. (Cracks can also happen under these circumstances, but it
would be a result of the edge not having been adequately supported from underneath, rather
than too much overlap.) Counterintuitive though it may seem, attempting to “fix” such a
wrinkle with a gentle strike directly on top of it will only cause it to move slightly sideways and
remain there, grinning. How then is it to be ‘repaired’?
Well, it calls for a light tactical touch. We back up with the hammer (without hitting) a couple
of strikes’ worth, and then progress again towards the point, gently and with an exaggerated
sideways pull of the hammer. In this manner we move the steel comprising the wrinkle not
further downward against the anvil’s face, but rather (still on slight diagonal) towards the as
yet untouched portion of the edge. This works well, though requires a bit of practice to get the
amount of force and the degree of hammer’s sideways pull coordinated.
Nevertheless, this discussion is not intended to imply that there is anything inherently
“wrong” with the various traditional approaches to peening. Those methods, differing from
what we practice and suggest, have served mowers for centuries and in countless cases
continue to serve them still. We are merely sharing what seems to us to be an improvement
in efficiency. Sometimes the discrepancy between something like longer versus shorter
hammer’s striking path may not be simply a matter of one opinion as opposed to another.
(See Note 9 for an example of what we mean by this statement.9)
(9) The first time I came across the recommendation of raising the hammer only 3-4 cm above the blade during peening was
18 years ago in Switzerland. Two scythe course instructors representing the Bio-Terra organization showed me an older
pamphlet on scythe blade sharpening, and there it was, along with diagrams! Not new to peening, but with far from enough
practice under my belt, I dared to question it: “Could that advice be somehow fundamentally wrong?” It took me several seasons of further learning, both about peening and aspects of the scythe’s broader history, to eventually conclude that the likely answer to my question was: “No, not really”. Rather, the booklet was intended for a certain region and for a certain time period…
Switzerland, you see, was without doubt a country where a greater variety of blade (and snath) models were once used than
in any other region of equivalent geographical area. Although in a few niches of that same country relatively sturdy models
were preferred, in most others very light blades were used. Back in those days all blades had thinner bodies than their model
‘equivalents’ have them today. In addition, in Switzerland peening hammers with 1000gr. heads were often used – the
heaviest among the standard versions I have seen anywhere. (They are still available from Swiss scythe accessories suppliers,
though the 600g versions seem to be preferred these days.)
Now, it is a fact that thinner metal moves under the hammer easier than does thicker metal, and also that the hammer’s
weight plays an additional, at times substantial, role. Plus, the meticulous old Swiss probably seldom neglected the edges of
their precious blades and kept them in a state where they required only light, though frequent, touch-ups. Put these factors
together, and those old guidelines were likely “just what the doctor ordered” – for that place and period of history. As pointed
out elsewhere in this manuscript, sometimes outdated or region-specific information is passed along without qualification,
and is then applied somewhat ‘universally’, whether or not someone has taken the time to critically evaluate its merit to the
circumstances at hand.
For instance, it so happened that around the same time I saw that old booklet, a gentleman in Germany (one of the authors we
refer to several times in this manuscript) was writing the first actual book on scythe use in that language. New to the subject
but eager to learn, he scoured the countryside in the German speaking countries seeking information, and among other pearls
of scythe wisdom he evidently also came across that old Swiss booklet. The pages of his guidelines now contain some of the
very same old Swiss diagrams, along with the advice that a peening hammer should be lifted 3-4 cm above its target, and it is
repeated in all three of his books, the latest published in 2008. Well, I venture a guess that those who came across that advice
and followed it – while peening the now thicker (and frequently neglected) edges of contemporary scythe blades with the
common 500gr hammer – may have found the process very slow and/or the results disappointing.
2. Demystifying the mystery of edge hardening
Already many centuries ago, scythe users recognized that the edges of their blades became
harder as a result of peening, and also that the harder they were, the longer they retained
their functional sharpness. In the absence of hardness measuring instruments they could not
say exactly how much harder, but for practical purposes what they learned empirically was
enough. Not much has changed since then in this regard; both scythe sellers and users still
keep reiterating that peening makes the edges harder and as such they retain their
sharpness longer, cut better and/or for longer between whetting spells. They still don’t really
know how much harder the edge becomes by being peened, and have no descriptive terms
by which to indicate even approximate differences in edge retention, other than “harder” or
“longer”, respectively. Individuals who utter the related statements are mostly repeating what
they’ve heard stated by the leading information-presenting voices – the “experts” on the
topic.
Various instruments for accurately measuring the hardness of both the blade as a whole and
its respective sections are now available, but those among them that are suitable for
measuring anything so thin as the edge bevel in the peened zone of it are few and far
between; even scythe factories do not have them. (The “Rockwell” scale testing instrument
version – which they all do have – is not well suited for measuring the hardness of material
thinner than a blade’s main body.)
Yet, there are numerous questions that one might ask with respect to peening, such as: Is
there a difference in hardening effects between the various tools or methods used? How
does the force of the hammer’s impact affect the process? Does the increase in hardness
continue indefinitely, and if not, then for how long?
Answers to these and other related questions have not been easy to find. (Even scythe
factories’ technical personnel can’t generally answer them.) In fact, as far we know, the
questions themselves have hardly been asked. Certainly none were brought up in any of the
published books on scythe use. Thus it seems to us that addressing the subject here may be
fitting.
It doesn’t take a metallurgist to know that the softer the steel, the easier it yields to the strikes
of a hammer. Tool users also typically understand that, in general, harder edges will stay
sharp longer. And so it has been said and written by many that some blades are “made of
harder steel than others” and [therefore] “hold their edges better”. Practically everyone writing
on the topic of peening has reiterated that oft-mentioned fact that “peening hardens the
edge”, sometimes adding a layman’s level of explanation of why that is so. “The hammer
‘packs’ the steel” is how an old farmer in Europe might put it. David Tresemer offered a more
sophisticated explanation in The Scythe Book: “In the molecular realignment of cold work,
the steel becomes strain-hardened without loosing its ability to dent under severe stress”.
David had a way with words, and his one statement on this topic comes across as something
worth noting. And noted it has been, and extrapolated upon by others in their various
versions of “why to peen”. Yet neither David’s nor any subsequent version of it we’ve heard
or read so far, really answers the questions presented above. Here we take the opportunity
to add a bit more to the pot and spur on the investigation; some improvement over the
existing fog might be helpful and perhaps not that difficult, at least on the level of a farmer’s
needs. Inadequately qualified (non-metallurgists) as we may be, we attempt doing so by help
of reference to hardness tests that we had commissioned a specialty lab to many years
ago.10 That, and our subsequent continued experimentation at the peening block.
What we learned not only from the tests themselves, but also from conversations with the
director of the lab plus a brief study of some tables found in the books of his extensive
library, can be summed up as follows:
• The compression-caused scythe blade’s edge hardening process begins from the very first serious contact with
the peening hammer and continues to a much lesser extent with subsequent peening sessions – but not for very long.
With other words, that initial hand peening, if somewhat thorough, can bring the hardness fairly close to what it will
ultimately be. The notion that each time we peen, following the first few sessions, we
further harden the edge is a flakey one, unless that particular peening pass includes
also a portion of previously un-peened bevel. In such a case that new addition, and the
new addition alone, is getting harder in the process. (Of course, the distinction
between them quickly becomes impossible to delineate, and would at best be fuzzy.)
(10) The lab’s professional report, along with our commentary to it, has been posted on our website since January 2005. The
report is focused on the actual tests themselves; speculating how the results can be made use of by mowers was not the
investigators’ mandate. That is something we partially covered in the mentioned commentary, but attempt to address more
thoroughly in the discussion below. (It appears that the authors of the how-to publications on scythe use have not been
among those who read that report; at least we do not see any evidence of it reflected within the contents of their subsequent
instruction on peening. Nor have any of the technical sort of questions we have received over the years, been related to the
findings presented in that report.)
• The degree of increase in hardness of cold-worked steel – in this case only the bevel
itself – is directly proportional to the steel alloy’s carbon content, not to what HRc the
scythe factory tempers the (whole) blade.
Perhaps the most frequent advice that may lack some understanding of the related concepts
states that the very last ‘pass’ of each peening session should entail careful hammering of
the outermost 1mm of the bevel – in order to harden the edge.
(11)
As can be seen, all the scythe publications’ authors, except for Tresemer (whose
recommended peening technique did not consist of “passes” as such) advise that last
“compressing” pass. Be it as it may, the science behind that very technique has not been
well explained by those who advocate it, and based on the tests outlined in Note 10, as well
as our own practice, we are prone to question its validity. Namely, we think that by the time of
that last ‘touch up’, adequate edge hardening has already taken place. That would certainly
be the case with a used blade already peened numerous times. Thus we are led to consider the need for that extra
“hardening pass”, suggested in nearly all published guidelines, as yet another scythe-related semi-myth, similar to
“wet grass is easiest to cut” (addressed in Chapter 6). Since the publishing of the latest of the sources quoted in Note 11, that advice
has been passed around among English readers with growing frequency. Its author did not
just come up with it “out of the blue” or, evidently, by his own trials with sophisticated
hardness testing instruments. It may be one example of “country wisdom” generations old,
often region specific, and previously passed along from father to son, but it is by no means
some across-the-board standard. According to in-field observation in several countries, there
are far fewer mowers deliberately practicing this last ‘edge compressing’ peening approach
than those who do.
(11) Lehnert (2005, 2008):
“During the compressing peening strike the hammer is not pulled towards the person’s body but comes down directly
perpendicular to the edge. During the compressing peening strike the metal will not be thinned. This striking technique’s effect is
to ‘pack’ tighter the metal of the edge, with other words, cold-harden it. Often it is suggested that the last pass of a peening
session is performed with this compressing technique in order to increase the hardness of the edge and optimize the edge
retention.” (The version in the author’s 2008 book is practically word by word the same as above.)
Anderson (2008):
“Once the metal at the edge is the desired thinness/sharpness, you make the final pass or passes, with a straight-on, and straight
downward (no pulling) hammer strike. This compresses molecules of the metal and hardens the previously stretched metal. It
gives the blade a very tough, hard and durable cutting edge, If you skip this step, you will need to re-peen sooner, and you will be
more likely to dent your edge, if you unexpectedly hit a tough woody stem, or pebble or something.”
Tomlin (2015):
“The final row of blows is placed on the very edge of the blade. Rather than drawing the hammer towards you, these blows are
made vertically to slightly work-harden the edge, rather than further widening the bevel.”
Miller (2016):
(After two previous passes) “… hammer the blade one more time, this time at the very edge. Have the edge of the blade exactly
at the peak of the anvil. This last hammering hardens the material at the very edge for maximum sharpness and durability.”
As far as anything in print, the advice seems to have initially come from Lehnart’s books. It
was later picked up Anderson, and spread further afield by way of his little peening manual.
Subsequently, Tomlin and Miller advocate the same technique in their respective books.
That said, there is certainly nothing “wrong” with that extra little pass, even if it does not really
fulfill its claimed purpose. What it does accomplish is additional evening-out of the (probable)
inconsistencies of the previous pass. So other than that it takes extra time, it is by no means
useless, and we do not intend to dissuade folks from adding that finishing touch, if they wish.
Plus there is yet another unknown… actually two of them. One of them may be related to a
more esoteric aspect of peening than the contemporary science of metallurgy would easily
wrap its compartmentalized head around.12 The other reason is more rational and closer to the slant of the rest of this discussion.
It is true that we have never had tests commissioned specifically to determine the effect of
that final “hardening” hammer pass on the outermost 1⁄2 – 1mm of the edge. With that
information still missing, it can rightly be argued that there could be a further increase in
hardness. Even so, we question the wisdom of being so, hmm… ‘hardness-greedy’. As one
could read in that lab report, merely one thorough hand peening session took the hardness
of the worked bevel from the factory’s initial 44/46 HRc to 53 HRc! Now, may we ask: just
how much harder do scythe users really want their edges??
On a related note, Anderson (in his peening manual) emphasizes that the peening hammer
and anvil “must be harder than the blade”. Yes, that would certainly be helpful, though is not
always the case. For instance, due to German government’s safety regulations with respect
to striking tools, the Pickard hammers and anvils Anderson sells leave the factory door no
harder than 54 HRc, which doesn’t leave much of a difference in hardness between the
peening tools and the blades’ 53 HRc… Of course, during peening, the faces of hammer and
anvil will, just like the blade’s bevel, eventually become harder. But how much harder,
exactly? With questions such as these in mind, we share further reflections in Note 13.
(12) The only written material we have come across which includes more than a word or two of this alchemy-like explanation, is
in three of the books detailing the philosophy and works of an eccentric Austrian forester, philosopher and inventor, the late
Victor Schauberger (a contemporary of Rudolf Steiner). One of the sources is Living Water (originally published in Sweden,
later translated into German and English). The other two are Living Energies and The Fertile Earth, each containing a wealth
of information on Schauberger’s theories, translated and compiled by Callum Coats, bless his heart. It would have been an
extra treat if those two authors were at all familiar with the actual use of scythes, though as far we can tell, that was not the
case. Nevertheless, they bring to attention a rarely mentioned reason for peening, or let’s say an additional one, that may well
be much older than the time of Schauberger. As is probably common knowledge, alchemy was, centuries ago, far from rare in
the region we now call Europe, and metallurgy was its prime field of play. What all happened deep inside its atomic structure
when first iron and later steel was hammered, was likely understood in terms quite foreign to our present minds.
Schauberger may have grasped it better and merely ‘interpreted’ it on behalf of his contemporaries in the clearer, more
modern science-like terms. He evidently approved of peening of scythe blades and advocated the practice; it certainly fit like
a glove with the rest of his philosophy so far as natural processes are concerned. The interpretation of his understanding (by
Callum Coats) in brief, is as follows:
“By hammering a scythe or sickle opposing charges are created in the metal, which are subsequently discharged via minute
serrations as the scythe is swung through cool and dew-laden grass at a low angle. … Elsewhere it has already been explained
that the radiation intensity is strongest in the morning and results in the peak-production of oxygen. … In this way the grass is
cauterized by an animalistic current that flows from the point of the scythe toward the handle, resulting in the immediate closure
of the wound… As a result of these phenomena, fields cut by properly designed ad expertly hammer-sharpened scythes will
maintain their productivity with little use of fertilizer…”
Now, it is possible that the technique of those old alchemy-practicing scythe-hammering men did include that last little “edge
compressing” pass. Perhaps Schauberger noticed it or perhaps he did not, or perhaps he mentions it somewhere in his
voluminous papers (he did not write books) and his interpreters missed the importance of it, and did not pass it on. Who knows? Furthermore, the ‘surface’ concept of “edge compressing” may have remained in little enclaves of scythe’s old homes,
but the alchemical reasons gradually ceased to be communicated along with it. So now (who knows how many generations
later) we receive some diluted version of the why and how of the practice – something not happening for the first, or last time
in history… And diluted it is, because without the stipulations communicated by Schauberger (protection of the peened blade
from the sun, mowing before sun up, etc.) the edge compressing exercise loses its magic.
(13) Is it not common knowledge among tool users that the hardening of edges can be taken too far and that harder edges are
more difficult to sharpen? And are many beginners not having difficulties getting their edges well honed? How useful is high
edge retention if the blade’s owner already has difficulty in first creating the potentially well-performing edge?
There are plenty of tools, scythe blades among them, which their manufacturers could have tempered to a higher HRc, but
didn’t. Certainly not for the purpose of making them easier to sharpen, but (in the hands of those new to sharpening edge
tools) that is a “fringe benefit” of their concern with damage resistance. On that theme, Anderson states: “If you skip this
(extra-hardening ‘compressing’) step… you will be more likely to dent your edge, if you unexpectedly hit a tough woody stem, or
pebble or something.”
The pertinent question tool user might here ask is “which of the two ‘evils’ possibly faced upon encountering a tough target is
the lesser one – a dent or a crack?” Chapter 9 (Edge Repairs) should help settle that question. However, it is already a long
established fact that harder edges are more prone to crumble/chip/break off than those less hard. The latter – under the
same challenge – might dent instead (provided, of course, that factors such as edge geometry, steel and workmanship quality,
etc., are on par).
Many axes, chisels and knives are good common examples of how edge hardness has long been considered holistically, first
by their makers and subsequently by the informed among their users. It is, for instance, well known that the Japanese
(typically harder) versions of the above trio are not always the best choice for the average Western hands. For the benefit of
novices on the tool using scene: As a culture, the Japanese tend to be not only naturally more careful but also more
determined to perform a task to perfection, than is the average Westerner. The careful aspect of their ways enables them, for
instance, to make better use of a woodworking chisel with an edge tempered to HRc 62 than would be the case with (again!)
the average Westerner. The Japanese would be not only less likely to crumble it in tough knotty wood, but are also more
patient to put the tool through 5-6 progressively finer grits of stone while sharpening it, and often still do so by hand.
The aforementioned tests clearly showed that even one thorough peening session can take
the original factory hardness several notches higher on the Rc scale than it was when it left
the factory door. Just exactly how much of an increase on that scale and how much harder
depends on the carbon content of the steel the blade was made of – not to what degree the
maker decided to temper the final product before sale. The differences between blades
available on today’s market are, in this respect, so minor as to be mostly disregarded. Rest
assured that even those among them which upon initial peening are identified as “soft”, and
hence declared “cheap” or “no good” can, after but a few peening sessions, be as ‘hard’ as
they really need to be for working purposes. This is not to imply that there are no significant
differences in blade quality, or that it does not matter how hard/well-tempered are the actual
bodies of all those blades when they leave the factory. There are certainly differences on
both of these counts, and factories each have their own reasons to heat-treat their products
as they do, but that is not pertinent to the topic at hand. What we think is pertinent for scythe
users to understand, consider and apply during edge maintenance, is that the hardening
process resulting from peening does not continue indefinitely. In rather short order the edge
will reach the maximum hardness its carbon content pre-dictates, and then generally will
remain as such until it is worn away by the subsequent honings. Why do we believe this to
be pertinent to understand and consider?
Firstly, the increase in hardness caused by the peening hammer makes subsequent shaping
of the bevel more difficult – something that for the duration of a scythe blades’ years long
service is simply an unavoidable aspect of the edge maintenance equation. However,
knowing that this is so, a person involved in the peening process can take advantage,
whenever possible, of the times when the steel is still lacking its eventual hardness. That
would be mostly in cases of brand new blades with overly thick factory edges (very common
these days) or in the aftermath of a more serious repair when a significant portion of the
bevel was removed and needs restoring (discussed at some length in Chapter 9).
Secondly, some unnecessary hammering with the specific intent “to harden the edge” yet
further, can be spared…
On the other hand, the inevitable increase in hardness following peening has long been an
ongoing consideration in our own edge maintenance. Thus whenever we begin to peen a
blade that has not yet been peened by hand, we take the opportunity to move the steel as
much as possible with the very first hammer strikes. To an observer, these may, on average,
appear more serious regarding their pull as well as force applied than should be necessary;
some might even consider them outright ‘dangerous’ (edge damaging) but a qualification is in
order: Depending on the task at hand, the force behind the hammer ought to vary
considerably. In descending order of strength applied (with the nuances left out) here is our
approximate guide:
An example less classic but closer to home: How many owners of the well known “Buck” knives, made by a USA company
(whose advertising motto is “famous for holding its edge”) have a relatively easy time sharpening them – provided their tools
for that purpose are on the level of stones in the tool kit of the average scythe user? (With other words no sanding belts and
diamond hones.) On the other hand, scores of other old and equally popular knife brands such as the American “Old Hickory”
or the French “Opinel” are more user-friendly with regard to sharpening.
On our homestead we also prefer the hardness of the average among old American axes (typically in the range of HRc 45)
followed by the German “Oxhead” (a little harder, perhaps 50 HRc, but still fine) to the HRc 58 Swedish “Granfors Bruks”. For
those same reasons – with an eye towards ‘resilience’ – would we rather our scythe blades’ edges not be extra hard.
• Whenever a completely new bevel is being created from the actual body of the blade.
In such a case, and with contemporary “grass” blades, we are expecting to shape steel
ranging from 0.9 to 1mm in thickness, occasionally even more. As discussed in
Chapter 9, this can be done without first reducing the thickness by grinding or filing,
but needless to say, gentle taps would accomplish nearly nothing in that case…
• Nearly all brand new blades (exceptions listed below). Many of them really should
have the first pass started further away from the edge than beginners are advised to
attempt, but even in the 2mm zone the extra hammer momentum can help.
• The average used blades with edges already variously neglected. This is, of course, a
category outside of the ‘still soft’ edge, but we list it here to provide some reference to
the overall strike intensity. In some cases, if the person handling the hammer does not
want to “take all day” to do an adequate job, it may be necessary to increase the force
of the strikes even beyond that needed for a (likely thicker-edged) brand new blade.
• Blades in a condition approximating those above, but ones of older production (say
pre-early 80s and further back) because, on average, their bodies are thinner. And, in
as much as thinner blades are more pleasure to use, they are also more prone to lose
tension in the body (not just the bevel) if handled too roughly with the hammer.
• New blades with more honestly “ready to use” edges (see Note 14 for specifics). This
is the exception to the second group above, and they do not need much force behind
the strikes until at least the first 1/2 to 1 mm of their factory bevel has been worn away.
Now to tie up this subsection of edge-shaping, we briefly address a couple of other
hardness-related statements which have been loosely thrown around in the overall spoken or
written scythe use information package. For instance, while some warn novices not to buy
those “cheap, soft” blades, the German scythe books’ author turns the reason for that
warning right upside down when he states: “It is not recommended to begin the peening
practice on the so-called “low cost/economy scythe blades”. These are often too thick near
the edge and also of too hard a metal. Starting the peening practice on one of such blades,
will lead to the proverbial breaking of one’s teeth”.
One of the issues confusing the topic is the prevalence of statements along the lines of
“some blades are made of harder steel (than others)”. This technically inaccurate semi-truth
may have been begun long ago by the makers’ own promotional efforts, and that by way of
labels or hot stamps accompanying their honestly harder products.(14)
All in all though, the encouraging aspect of peening that we want to point out is that there
appears to be a certain amount of grace ever present in association with the art of peening. It
is a plain fact that most of us mortals are unlikely to execute the task with utmost perfection.
Yet, in spite of our various errors, the majority of blades end up somewhat functional. Should
it all be written off to mere luck? Or could it be the doing of St. Florian – the patron saint of
scythe-smiths – ever hoping that the creations of his ‘flock’ will be useful and appreciated?
We may never know…
How thin should the edge be?
Among mowers there are numerous perspectives – some of them based on experience,
many on hearsay or the reading of (usually vague) instructions – as to what constitutes an
appropriately thin edge. Using terms like “razor sharp” or “paper thin” may allude to a
distinction between this cutting tool and most others, but does not really clarify the issue.
“Paper thin” is the sillier metaphor of the two (even though paper is made in a wide range of thickness and textures);
we surmise that plenty of novices taking that advice to heart have gone overboard on the thinning of their blades.
(14) To begin with, while procuring raw material from a steel mill, scythe factories do not order either “harder” or “softer”
steel. Rather, from a wide range usually available, they choose a certain alloy, the composition of which meets their needs.
The carbon content is the single most deciding element, and also the one that either limits or expands the range of actual
hardness the tool made from it can eventually be tempered to. Up until perhaps 3-4 decades ago a few companies in
Germany and Austria did use, in limited quantities, also raw material with around 1% carbon and from it the so-called
“Hardstahl” blades were made. It was generally known that such blades, though they held a better/longer lasting edge, were
also considerably harder to peen and thus not recommended to those lacking in the necessary skill. Other than used
leftovers of the true “Hardstahl” blades, their production is now over, and only the labels to that effect remain on the
market… The tool alloys used by the scythe industry these days are the same as is generally employed for making of many
other tools, and they range between 0.7 and 0.8 carbon content. From any of such alloys a scythe blade can be made that
fulfills the desired range of the initial factory-set hardness of ‘Continental’ blades produced in Europe and in Turkey. That
range, today, is between 42 and 46 Rockwell hardness. Still not so many years ago the average used to be somewhat higher,
although in view of the disappearance of former peening skills, the lowering of it has probably been the one good direction
of recent developments within the industry.
To repeat: given the carbon content of the material from which it was made, all of these blades will, if peened, reach a
hardness high enough for its intended use.
What probably confuses a lot of folks who may purchase those “economy” blades is the fact that a portion of those that for
well over two decades have been widely available in many European chain stores are from China. And while the material
they are made of is likely on the lower end of quality, having played with some new and used samples we do not perceive
them to be of an especially low carbon alloy. Rather, the issue is that there is a notable inconsistency in the hardness as they
are when purchased – and this is what throws off all those hasty one-shot “hard”/”soft” evaluations. The differences are
probably due to the sloppiness of the tempering at the factory, but given appropriate beveling treatment by the new owner,
the edges of single specimen do seem to ‘even out’ and can be actually functional. Another significant portion of Europe’s
“economy” blade supplies are made in Turkey. These are more consistent regarding their temper (HRc) and likely to be
declared as “too soft”, again, when purchased (unless their sometimes overly thick bevels skew the beginner’s evaluation).
After two peening sessions their edges will become quite on par in hardness with the average of the authentic European
production from Austria, Italy and Slovenia. Eastern Europe is full of blades from Russia, but nobody trying them out is likely
to declare those “too soft”. Their factory hardness, at about 48 HRc, is above anything presently made or imported into
mainland Europe.
Regarding “razor sharp”, we doubt that many of the scythe blades with this exalted prefix are
really fit to shave hair off their owners’ arms (never mind the face – the traditional task of a
razor) before they head for the meadow… or any time thereafter. In any case, unlike the
shaving razor, whose cutting task is solely to sever human hair, scythes are used for the
cutting of material all of which is not only considerably thicker but varies greatly in resistance
to the cut. Many stands of “grass” include species of vascular plants ranging all across the
spectrum of toughness, a portion of which would have the edge of the classical straight razor
promptly crumble upon attempting to “shave” them.
Furthermore, there is a considerable difference of understanding among novice scythe users
as to what constitutes “grass”, “weeds” or “bushes”. Hence designating one scythe blade a
“grass” blade and another a “bush” blade is only so accurate so far as edge geometry is
concerned. The meaningful difference between this tool’s somewhat arbitrary classes or
‘types’ lies in the overall strength of their whole body. The edge itself is ‘user-made’ on a
rather continuous basis and can be prepared for a task quite opposite to that for which the
body it is part of was made in the factory.
To put this in a more concrete way: A “grass” blade can have its edge fittingly shaped for the
cutting of bushes of a certain diameter, and the edge of any “bush” blade can be made so
thin as to cut grass with an ease that would put the average new “grass” blade swung these
days to shame. And (by more than just “hearsay”) we are led to think that inappropriately
shaped edges are notoriously common, and/or used for inappropriate tasks. Thus, while
some people need to apply more force than should be necessary to cut an average meadow
or a lawn, others quickly damage their much too thin (for that very job) edges working in
areas containing saplings and over-mature “weeds”.
Ultimately, only experience in cutting wide variety of plant matter, and doing so with different
blades and/or variously-shaped edges can lead a person to a deeper understanding of what
‘properly thin’ means with respect to this versatile tool.
Now, with the cautionary notes covered, we can proceed to offer some actual guidelines:
While to our knowledge, there are no gauges available expressly for the purpose of
conveniently measuring the “correct” thickness of a scythe blade bevel’s outermost portion,
there is a suitable substitute close at hand. Traditionally, the mowers’ own thumbnail has
long been used for that very purpose.
The expression “a well-peened scythe blade edge must run over the thumbnail” (commonly
used in German and Slavic languages, plus likely many more) roughly sums up the method.
“Running” in this case means that the outermost portion of the edge shows a small wave or
deflection when the thumbnail is carefully (albeit with firm pressure) pressed against the
edge, slowly moving along with a slight sideways rocking motion. Traditionally, such an edge
is referred to as “one that runs”.
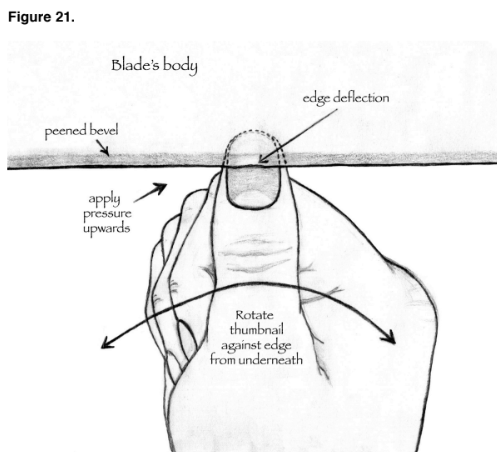
It is a convenient ‘measuring’ method because the thumb is (usually) at the job site. For the
safety-conscious, a fine to mid-grit whetstone can be used in place of the thumbnail, even if
some nuance may be lost. In either case it is important to have adequate lighting in order to
readily observe the deflection, which may (and often should) be only very slight.
The additional decision a mower must make is exactly how much depth of the bevel should
deflect under thumbnail pressure, and under exactly how much pressure. This is usually not
spelled out in the old mowers’ maxims, and when posing that question to many experienced
men, we have received a puzzled look, or at best a vague answer of “not too much”, on both
counts. Though the extent of the pressure would be difficult to somehow set in stone, the
depth of bevel is measurable and should be easier to agree on. From a combination of much
questioning, along with our actual experience, we have concluded that two mm of “run” may
be considered the widest advisable. That is also the standard in many European peening
competitions, though by no means one that every participant manages to attain. Keep in
mind that such an edge is well suited only for terrain free of stones and tough stems. Some
old European farmers do peen their blades that thin, but they are the ones who, as opposed
to the majority, know what they are doing, both in terms of how to arrive at such an edge, and
how to subsequently use it.
The more common standard is one mm (of a “running” edge); suitable for places where one
can hope the blade won’t encounter rocks or old dry sapling stubs hidden in the grass.
One half mm we consider enough width of “run” for novices – both regarding what they can
safely accomplish with the hammer and how competent they are in judging the challenges of
an anticipated mowing task. For the deliberate cutting of somewhat woody material it is safer
not to thin the edge that much. While performing decidedly tough “bush” blade-type work, it is
better to have an edge that does not yield to thumbnail pressure at all, but still with the
outermost one mm relatively flat, not rounded. (And, yes, even “bush” blades’ performance
can be considerably enhanced by peening!)
In all cases above, the blade should readily respond to the whetstone and perform well when
put to the respective tasks for which it was shaped.
Frequency of Peening
Peening should be repeated after approximately every four hours of sustained mowing, or
even more frequently if used for cutting in demanding circumstances (a lawn during the heat
of the day, for instance). According to some guidelines, this would be excessive. However,
throughout Europe, roughly four hours was traditionally the most common length of time
between peening sessions, and one that our own experience also confirms to be
advantageous.
Of course, the time it takes for the edge to acquire the degree of roundness that calls for re-
peening can vary widely. (See Chapter 6 for a more extensive discussion on this theme.) The
differences in frequency of whetting, how exactly it is performed and what kind of stone is
used, all confound any attempt at some consistent formula for a proper time span between
peening. The range from 2 to 6 hours of use between peening sessions is one with which to
experiment.
All things considered, we think that it may be better to err on the side of a little too often
rather than not often enough. Besides, “El ejercicio hace al maestro” – is how the old
Spanish mowers would likely put it…
In addition to all the above, we venture a guess that if one would think of peening as simply
“flattening” (a thin strip of steel) rather than “drawing out the scythe blade’s edge”, it might
not seem so daunting a task. Consequently, this ‘touch-up’ would perhaps be performed
much more often, that is, soon after the mower notices that honing in the field becomes less
effective and the blade pulls harder, even if no stems are still left uncut.
Then, with relatively little time invested, a single line of light hammer strikes in order to flatten
the rounded apex can be placed just along the edge (see Figure 21; the ‘half’ or ‘one line’
patterns). Followed by the post peening treatment outlined below, this should restore the
blade’s cutting edge for another efficient spell in the field.
Here it ought to be re-emphasized that a well-beveled edge and ‘functional sharpness’
(arrived at by additional honing) are not necessarily synonymous. To arrive at ‘functional
sharpness’ quicker than is common, another bit of attention is in order…
The post-peening treatment.
As pointed out in “Post treatment of a jig-peened blade”, we consider it also a good habit to
hone a newly freehand-peened blade before it is put back onto the snath. This step is not
traditional, although some scythe-using cultures have sayings to the effect that “[once a
blade is re-peened] only after the fifth honing does it again cut at its best”. It is sometimes
even said that the number is ten, not five! Why it should be so, or how that number could be
lowered, is never explained, nor, it seems, seriously considered.
The unequivocal fact is that most people are unlikely to do a perfectly uniform job of peening
(as can be done by the best of scythe factories’ machines and skillful operators). There will
likely be some high and low spots, even if imperceptible at a glance. One way to make the
non-uniformity visible is to lightly apply the flat side of a stone on more or less the same
angle as used during work in the field, but sideways along the edge. (A synthetic stone,
being more “aggressive” than a fine-grit natural one, makes the effect easier to see.) Then
look closely. For those with less-than-perfect eyesight, a loupe would be helpful.
We congratulate those who, while conducting such a test, do actually obtain a perfectly even
shine across the whole length of a freshly peened edge; they are among the rare ‘masters of
the trade’. Their blades consequently do not need the additional post-peening treatment
suggested herein, in order to function as well as a newly peened blade actually can. For the
rest of us (meaning the vast majority) until the minor but ‘inevitable’ high spots are sufficiently
abraded, they will prevent the whetstone from contacting the lowest spots completely. Thus,
initially, and for a gradually diminishing period, tiny portions of the edge will not actually be
properly honed. How much of an issue this may be depends on how uneven a peening job
was performed, how coarse a whetstone is used in the field, and with what degree of skill.
The process we advocate (honing more thoroughly with the blade still off the snath) enables
one to “skip ahead” and begin mowing with the blade as sharp as it may otherwise be only
after several in-field honings. As we see it, this is not a question of extra time, but rather time
taken sooner rather than later. Once it becomes routine, it should take literally less than a
minute.
While performing this step, the stone should be applied on the angle approximating the one
each respective individual uses in the field, NOT as during pre-peening treatment (examples
of both angles are shown in Figure 11). As with a jig-peened blade, a convenient moment to
perform this post-peening honing is while still in the same sitting position at the peening
block, holding the blade by the tang in the left hand and resting it across the thighs. While in
this comfortable and steady position, the stone to edge angle is likely to be more consistent.
Alternatively, the blade can be honed with the point pressed into the edge of the block while
kneeling or standing and holding the tang to steady it, although we prefer the sitting position.
Further notes on pre-and post-peening treatment of scythe blade’s edge (written with fledgling edge tool users in mind)
Disregarding for a moment the thickness of the bevel as a measure of sharpness, a well-
honed edge on any tool is so thin at its very apex that it provides inadequate surface area to
visibly reflect light, when viewed edge-on. At a certain stage between that sharpness and
obvious dullness it begins to reflect a bit of light here and there in spots where minute
amounts of steel either broke off or were pushed sideways. As long as those spots are not
very numerous, the tool may still perform relatively well for uses that do not require a really
keen edge.
Of course, many common tools continue being used in such a condition. In most households,
it would be very easy to find a kitchen knife with an edge that readily reflects light along its
entire length; a condition that, technically, puts it into the ‘decidedly dull’ category. Though no
self-respecting chef would be caught with such a knife in hand, scores of homemakers may
be content to saw or hack their way through stuff for a long time before re-sharpening (or
discarding) the semi-useless tool. So it is with weekend campers and their hatchets,
mechanics and their pocketknives, and so on. In our “Age of Machines”, a complete list of
dull tools at work would be very long indeed.
However, the purpose of this guide is to inspire higher standards. One of the first steps in
that direction is learning to recognize a dull edge, initially by staring at it. Elsewhere in these
guidelines we offer tips on how to feel dullness in action, but that approach, though ultimately
most accurate, is also more subjective. Described below is one of the methods to very
quickly assess the edge at least on the elemental level, and it applies to many other tools
besides scythes.
With the blade still off the snath, as it would be immediately after peening, the need for some
post-peening-treatment can be recognized at a glance by examining it as follows: position
the blade’s edge towards a source of good light and move it slightly back and forth until an
angle is found from where the light reflection on the apex of the edge can be best observed.
If this is done following jig peening, most of its length will likely show various intensities of
reflection. At no time during use should the edge reflect more light than can be seen
following peening with the jig!
Clearly, some follow-up treatment is necessary. As mentioned earlier, a fine-cut file is
sometimes used, and may indeed be more expedient as the initial ‘whetting’ tool for those
using the peening jig. We shall not expand here on the art of filing, but instead focus on the
use of stones, because abrasive stones of various kinds are the ultimate means towards
more refined edges.
Some general principles for those completely new to sharpening edge tools:
Regarding the direction in which sharpening stones (of all sorts, but excluding files) are
moved across a tool’s edge in order to remove material, there are three basic approaches
(see Figure 22)
1. Straight –
a) From the tool’s back towards the edge OR
b) From edge towards the tool’s back, in both cases moving somewhat along the edge so
that the straight line is on a slight diagonal.
2. Back and forth – incorporating simultaneously both movement directions referred to in ‘1’
above.
3. Circular – where the stone is moved in a ‘looping’ pattern, starting on one end of the blade
and progressing toward the other.
Please note that any of these approaches can effectively remove the superfluous bits of steel
from a tool’s edge. They each have ardent supporters, and are sometimes presented as “the”
way to do it. The fact is, any of these cultural variations can work satisfactorily. If one tool
sharpened with a certain pattern of strokes functions better than another sharpened
according to a different pattern, the disparity is probably due to the differences in skill and
understanding of the person who guided the stone rather than result of a particular pattern
employed.
A few additional pointers (refer to Figure 22, below):
1. If the stone is used only in the straight pattern, but as in variation ‘A’ (from back towards
the edge), more “burr” will be produced, and will later need to be, for the most part, removed.
Of all directional approaches this straight pattern may be more demanding of a person’s skill
to perform a flat stroke with the stone. As discussed more at length in Chapter 6, the
common natural tendency is to increase the stone-to-blade angle at the end of the whetting
stroke, thus unintentionally rounding off the edge.
Moving the stone as in variation ‘B’, from edge towards the blade’s rib/back, will leave the
least amount of burr of any directional method and be slightly less prone to round off the
edge, but causes greatest wear on the stone.
2. The back and forth movement (‘C’ in Figure 22) represents an approach somewhere
between the two straight patterns above, in all respects. By “back and forth”, in this case, we
mean “to and fro”, on one side of the tool at a time. (Within the scythe circle’s jargon, the
term “back and forth”, with regard to honing, usually refers to individual strokes of the stone
being applied alternately on each side of the blade, as commonly done while working in the
field.)
‘1’ and ‘2’ can (and usually do) both involve a certain amount of sideways movement, which,
if combined with the primary perpendicular direction of the stroke, results in a diagonal line
between the back and the edge. A bird’s eye view of the stone’s movement (assuming the
blade is held as we recommend for pre- and post-peening treatment) would show a “zig-zag”
pattern, moving from the heel of a scythe blade towards its point.
3. The circular pattern of a stone’s movement (‘D’ in Figure 22), more popular in Scandinavia
than mainland Europe, may be considered a good compromise in all respects discussed
above.
More on Pre- and Post-Peening Edge Treatment
(Applicable whenever honing a blade while it is off the snath.)
Illustrated in Figure 22 is a blade as if positioned across one’s lap – our favoured way to do
this. The left hand holds the tang, while the edge is facing away from the person’s body (i.e.
we are looking at the topside of the blade).
Besides showing alternative directions of movement, A, B, C and D represent different
shapes of stones, all of which are fit for the job.
A – a typical ‘boat shaped’ scythe whetstone, used on its edge.
B – the same as in ‘A’, used on its broad side.
C – a common bench stone.
D – a circular Scandinavian “ax stone”.
Arrows indicate directions of movement:
The solid arrow represents a stroke (one half of the to-and-from movement) contacting the
edge.
The broken arrow represents a return stroke, not contacting the edge. (This is the stone’s
‘empty’ return to starting position).
Dotted arrows indicate that the stones are moving along the edge lengthwise, simultaneously
with the back-to-edge and edge-to-back strokes.
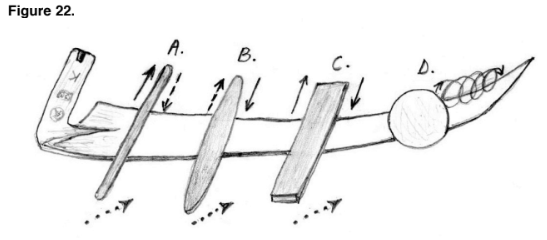
Preferably, individual strokes are as long as the length of the stone comfortably and/or safely
allows.
All non-circular stones illustrated here can be used for any of the patterns, but the circular
stone is not well suited for the straight strokes indicated in A, B or C.
While performing the zig-zag pattern shown in ‘C’, each pull stroke finishes farther along the
blade than where the preceding push stroke began.
For honing a scythe blade at frequent intervals during mowing, the “straight” (but always from
the back towards the edge and somewhat diagonal) stroke is the most expedient, and for
that reason also the most common.
Apart from the stone’s direction, the other important consideration is the angle at which the
stone should be moved across the edge. The ‘rules’ vary, but as with all aspects of
sharpening, they are subject to the laws of physics. In the case of edge tools, the lower the
bevel’s angle the easier will be the resulting edge’s penetration, but the greater its
vulnerability whenever tough material is encountered. It can certainly aid the process of
sharpening if due thought is given to this concept. The topic of honing angles is further
addressed in Chapter 6.

