Figure 23. Attaching a blade to a snath (assuming the snath’s knob hole was not pre-drilled)

Figure 23 illustrates the basic steps of attaching a blade to a snath. The process outlined is
adequate for some blade and snath combinations – that is, those more or less already a
good match for each other, for the mower, and the situations in which they will be used.15
After Steps 1 to 4 are completed, it can be assumed that the blade is securely attached to
the snath. Please note that securely attached and well-fitted are not necessarily
synonymous. If the process outlined in Figure 23 is to also result in a well-fitted scythe, the
desired angle relationships (discussed below) need to be confirmed, and, if necessary,
corrected.
While ‘harmonizing’ a scythe, one needs to take into consideration the fact that scythe blades
are not all made the same. Numerous characteristics influence a blade’s function (such as
the body’s thickness or its overall curvature), but here we specifically focus on the unique,
three-dimensional position of each blade’s tang, in relation to the rest of the blade’s body.
Once a blade is attached to a snath, each of these angles (between the tang and the body of
the blade) affects the ‘behavior’ of the scythe at work.
The Challenges of a Good Fit
Historically, scythes usually did not leave their respective places of origin quite ready to use16
(and despite labels to that effect, for the most part they still don’t). Apart from first needing to
have their edge prepared for work – either by the new owner, or a skilled man in the village –
simply attaching the blade to a snath of local design and handing it to any prospective mower
was not a good practice. A truly good fit was achieved when all the nuances, such as an
individual mowers’ height, the nature of the forage in that particular geographical niche, and
the topography, (level terrain versus slopes) were taken into consideration, and necessary adjustments made.
Sometimes that included the help of a village blacksmith who heated the tang and then set it “right”.
(15) In Figure 23 it is assumed that the snath was bought without a pre-drilled seat for the tang’s knob. That is not always the
case; many models of wooden snaths sold nowadays have the knob holes already pre-drilled. Though this may sometimes be
convenient, it can also prove to be a nuisance. For one thing, some of the holes are made unnecessarily large in order to
accommodate the (likewise needlessly large) knobs of certain blades. In our view, the blades made in Italy have had, for more
than three decades, the most snath-friendly knobs. The rest have been all over the map, with most of them being too large.
Secondly, the lengths of tangs do vary. If, for instance, a snath’s bottom end was pre-drilled for a blade which was made in
Austria, that hole will be a bit too close to the end of the snath to accommodate an Italian or Turkish-made blade very well.
The latter two have somewhat longer tangs, therefore the seats for their respective knobs should be drilled slightly farther
away from the end of the snath). “Bush” and “grass” blade models of the same maker (the Schröckenfux factory of Austria as
one example) sometimes have tangs of different lengths, with the “bush” being slightly longer. In that case, if such a pair of
blades is to be used on the same snath, the hole for the knob should be made to accommodate the blade with the longer tang
(i.e. the “bush” blade). Doing so would assure both blades’ secure attachment. Frequently, this is not what happens…
As can be seen from numerous photos of scythes in recent years, on the Internet and elsewhere, plenty of folks seem to pay
no heed to this detail. Although a scythe can still function with the blade’s neck protruding beyond its ideal place, we would
not refer to it as securely attached. Figure 23 shows where the hole is to be placed in relation to that particular blade’s tang.(16) The snath was often made locally and did not feature the seat for the knob already in place. The blades usually came from
afar, but were purchased from a local store, not pre-sharpened. It probably was not much before the 1950s when the concept
of “mahfertig” (“ready to use”) was embraced by some companies in Austria and Germany, with the level of precision and
completeness regarding factory-peening taking a great leap forward.
During the centuries when the scythe featured as one of the most essential agricultural tools
in Europe, the principles of snath and blade fitting were likely understood by countless of its
users. Unfortunately, those principles were very rarely explained in print. And of those few
printed attempts we know of in English or German, none have communicated clearly what in
the past many a country boy would learn, gradually, as he worked alongside his experienced
father. (If readers from other cultures are aware of such material we would much appreciate
being enlightened.)
As did the mowers of old, we think that care ought to be taken with the nuances, preferably
right from the start, before discouragement and/or bad mowing habits creep in. Yet with the
times of scythe mechanics in every village now over, this is not an easy task. Randomly
purchased scythes might (adjustment-wise) be more or less functional without additional
attention, or they might not be. Considering global services as a whole, the chances are
relatively low.
Among the mail order scythe sources (where in some cases more attention is paid to the
fine-tuning concept than in common shops) the probability of a really harmonious fit is
somewhat better, but still far from ideal. In recent years considerable thought and writing on
the topic by individuals from several countries, as well as actual technical service at the
industry level (primarily in the case of the Schröckenfux company in Austria) has gone into
helping the mail order merchants do a better job of it all, but commercial availability of a
“perfectly matched” snath/blade combination – one suitable for everyone’s needs – is still
wishful thinking, and will likely remain so. For instance, the blades with relatively wide hafting
angles suitable for mowing conditions on Alpine meadows matched with either of the
currently popular models of snaths may prove a poor choice for someone in a region of lush,
dense growth and/or extra tough grasses. Unfortunately, ‘details’ such as this are often
shoved under the rug…
The variety of snath designs and blade models available beyond the mail order sources
further compound the complexity of it all. In addition, new mowers often do not even
recognize that anything is amiss. If the scythe does not meet their expectations in
performance they don’t know what exactly may be causing the trouble, or what to do about it.
In view of the above, and the fact that in many places knowledgeable scythe friends are rare,
the individual’s ability to understand a good fit is next in importance to the ability to maintain
a good edge. Occasionally, it may actually be on par with sharpening, because even an
adequately sharp blade (but one otherwise seriously out of tune) can behave somewhat like
an untamed animal…
Fine-tuning the blade, snath, user and mowing task.
Sharpness of the blade aside, three angle-related principles play a key role in the satisfactory
performance of a scythe. The proper adjustment of those three angles is affected (and can
be hindered!) by how the blade’s tang was initially hot-set in the factory in relation to the
other specific characteristics of each model (such as all of the blade body’s overall
curvatures, the width/flare of its beard and, up to a point, also the blade’s length). The fine-
tuning of these angles is a serious issue confronting the new generation of enthusiasts, but
has not been adequately addressed in any of the “how-to” scythe literature to date.
To begin with, as long as a particular blade is not yet attached to a snath, it would be foolish
to declare its tang angles either “wrong” or “right”. Their actual suitability (or lack thereof) only
comes into being once the blade is attached to its handle, and the height of the mower who
is to use the unit is also considered. Further perspective (and possibly challenge) is gained
when a given terrain and nature of the material to be cut with that particular scythe enter the
equation as well. In any case, we hope that our attempt at clarifying the underlying concepts
will help.
Loosely translated from the Austrian scythe industry’s terminology, those three critical
characteristics of a blade model are its “Haft”, “Lay”, and “Tilt”. We define them below in
terms of the particular two-dimensional angles they describe. Put together, they form a
complete picture of the three-dimensional position of a blade’s tang. We refer to the
orientation of these angles when the blade is lying on any flat surface, or the ground as it
would during mowing.
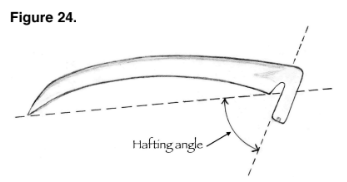
1. The Haft (“Einschlag”, in German) – is determined by the angle formed at the
intersection of a line from the blade’s point to the point of its beard with another line
along the length of the tang. (See Figure 24, further below) Extended farther, the line of
the tang essentially becomes the shaft of the snath, to which it runs more or less
parallel. Once the blade is attached to the snath, the relationship between these two
lines determines what the English-speaking scythe users refer to as the “Hafting Angle”.
2. The Steepness (“Aufschlag”) – is determined by the angle the tang of a still unattached
blade makes with the ground or other flat surface. (See Figure 25.) While in actual use,
this angle affects what, in English, we’ve come to refer to as the blade’s “Lay”.

3. The Tilt (“Neigung”) – is determined by the angle at which the plane of the top surface
of the tang was set in the factory. An imaginary line extension of that plane can either
intersect some spot along the blade’s body or be aimed over the blade’s point. Figure 25
illustrates some of the variations between different models. They commonly range from
almost parallel with the blade’s body (as in ‘a’) to tilting ‘inwards’ to various degrees (as
in ‘b’ and ‘’c’). The tang’s tilt affects the scythe’s “Horizontal Balance” (but again, comes
into play only once a blade is attached to its snath).
Although seasoned mowers could – once a blade was attached to a snath and put to use –
recognize the actual in-field effect of the three angles outlined above, they have traditionally
not been discussed in terms of specific numbers of degrees. (17)
(17) Based on our learning to date, it seems that the vast majority of scythe users, both past and present, would hardly know
how to guess a new blades’ overall function on a snath of certain design (unless it was obviously different from what they
were used to seeing) before they actually attached it and took a few trial strokes. Up to a point, guessing the likely in-field
effect of the tang’s steepness may come easily to some novices. It usually requires a more trained eye to anticipate how the
blade, still unattached, will haft just by looking at the way the tang was positioned by its maker in relation to the rest of blade’s
body. The last of the three primary features – the ‘sideways tilt’ of the tang (and the Horizontal Balance it affects) is even
more elusive. For one thing, both of the pertinent terms are seldom mentioned, and among the few who (at least partially)
address these concepts, there is a lack of consistent terminology. It is thus not surprising that most users never even consider
For practical purposes, however, the effect of those angles can be determined in various
ways – the subject of the material below.

1. The Hafting Angle
Basic Concept:
Watching a competent person at work with a scythe, it appears as though the blade is strictly
slicing, rather than chopping (sometimes referred to as “hacking”) the grass. It is actually a
bit more complicated; Slicing and chopping represent the two ends of a spectrum, and scythe
blades functioning at their best do also engage in some “chopping”.
the ‘sideways tilt’ prior to attaching a newly purchased blade. If subsequently the blade has the tendency to dig its point into
the earth, or conversely, strains the mower’s wrist while cutting tall and heavy grass, the blade may declared to be “no good”,
without the person’s understanding why exactly it misbehaves… Those who work with a lot of blades of different models, are
interested in details and pay attention will eventually acquire an eye for perceiving the subtleties. And there are differences
in all three of those angles – not only between blades of different models, but sometimes also of the same model of the same
batch made on the same day – a fact simply ‘shoved under the rug’, because to conduct business that way is easier… But those
differences can, occasionally in not so subtle a manner, negatively affect the scythe’s function. As mentioned elsewhere, to
notice the subtleties AND take them into account while matching blades to snaths and to their future users, was traditionally
the role of the ‘scythe mechanics’. Regretfully, the duties of those once plentiful helpers regarding fitting challenges, can
nowhere near be substituted by the numerous mail order scythe sellers…
To determine what personal ratio of slicing and chopping may be most desirable in
respective field conditions, a mower ought to understand that:
• The more slicing action there is, the less resistance each stroke encounters, but the
number of stems severed will be smaller
• The more chopping action there is, the larger is the area (and number of stems) the
blade can potentially cover and cut at a stroke, but the work will require more effort
It should furthermore be clear that the ratio between these two modes of action is affected by
a combination of:
• The (hafting) angle at which the blade is attached to its snath
• The exact pattern in which it is guided while at work.
Of course, a scythe blade should mostly slice. In other words, its Hafting Angle (along with
how exactly the blade is guided) should be closer in effect to a ‘pure slice’ than to a ‘pure
chop’.
Now, while a particular combination of blade and snath has an inherently limited adjustability,
the mower can further (either momentarily or in a sustained manner) affect the slice to chop
ratio by how exactly he/she guides the blade through its stroke. In unexpected situations –
for instance, while coming upon a particularly thick and/or tangled patch (for which the
current hafting adjustment may not be well-suited) – it is the instinctive reaction of every
seasoned mower to narrow the width of their stroke and/or reduce the advance and/or aim
the blade’s edge at what essentially will be a more acute hafting angle.
Conversely, there are situations when a quick “chop” or two is most appropriate (keeping in
mind that we are not talking about a purely chopping stroke). Narrowing or widening one’s
stance (which typically affects the width of the stroke) is another strategy often employed in
field conditions where the growth or terrain varies. At its best, such on-the-spot
compensation is what the most skilled mowers have always done, routinely.
However, the need for continuous compensation is undesirable; it will unnecessarily tax the
mower’s body and thereby reduce efficient performance. And, the most direct way to reduce
the compensating is to pay due attention to the fitting issues.
To sum up: Hafting a scythe “correctly” refers to finding a favourable compromise between
the two simultaneous modes of action – slicing and chopping – so that most stems
are cut with the least overall effort during a sustained spell of mowing.
Keep in mind that the drawing below is merely a simplistic representation of the concept
discussed here.

While referring to hafting angles in the common vocabulary of English-speaking scythe
users, we typically, and often interchangeably, use the terms “open” and “closed”, or “wide”
and “narrow”, both being synonymous with larger hafting angles and smaller ones,
respectively.
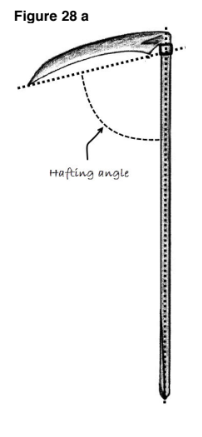
Figure 28 a is essentially a duplicate of Figure 23, with the snath added in order to help
clarify the concept. The Hafting Angle of a scythe is often “measured” or described by the
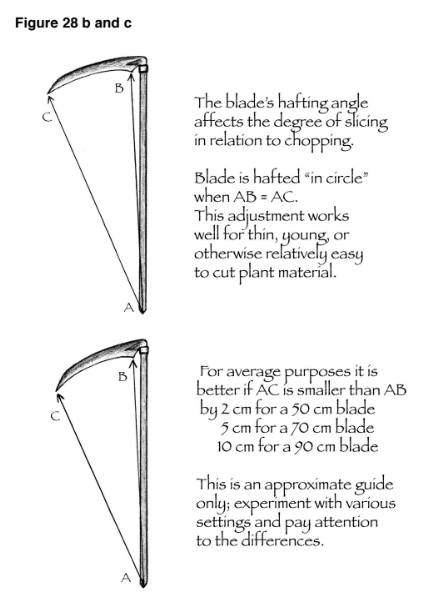
difference (or lack thereof) between the length of lines AB and AC in Figure 28 b & c. If AB
equals AC the blade is hafted “in circle”.
The “in circle” setting is the most open hafting angle generally used. It is not applicable
universally, but common in regions where the grass does not grow extremely thick and/or
where the traditional stroke pattern is more circular (and usually also narrower) than we
recommend in the guidelines on mowing techniques below. The blade models made
specifically for those regions have their tangs set in the factory with this adjustment in mind,
and thus with some of them it is not possible (without some alterations) to achieve a
significantly more closed hafting angle.
The usefulness of a relatively open hafting angle (such as the “in circle” adjustment provides)
increases in proportion to a person’s mowing experience and ability to adequately sharpen
the blade. We suggest that beginners initially use such a setting only with short blades and/or
in relatively sparse stands. In places with dense or tangled growth, it would be better to
reduce (‘close’) the hafting angle to a setting where AB is shorter than AC by about 4 to 5 cm
for a 65cm blade (less for a shorter blade, more for a longer one) as in Figure 28 c.
The difference between AB and AC can be determined with a measuring tape, a light
wooden pole, or a piece of string long enough to reach from the upper end of the snath (or
even just the base of the lower grip) to the beard of the blade. Whether AB and AC are
measured from the end of the snath, the upper grip, or the lower (only) grip doesn’t really
matter. In all cases the difference between AB and AC can be used as the reference to begin
with. Then the initial setting should be tried in the field and subsequently refined so the
blade’s action suits the user’s personal stroke pattern as well as the nature of the stand to be
cut.
One common method for measuring AB and AC is as follows:
1. Set the upper end of the snath on the ground against a tree or wall of a building. If the
snath has an upper grip extending across the top, some means of elevated support – a rock,
a block of wood, ones own foot, etc. – is needed to prevent the end of the grip hitting the
ground before adequate blade rotation is reached, which would distort the measurement.
2. Using the corner of the blade’s beard as a marker, scratch a small horizontal line onto the
wood.
3. Keeping the snath’s end in exactly the same position, rotate the scythe to the right until the
blade’s point is vertically aligned with the reference mark, and note the vertical difference.
In the field, the mower’s knee or foot can be used as a pivot point around which to rotate the
scythe and any reference point (a distinctive blade of grass, a clover blossom, etc.) as the
marker with which to visually align – first the corner of the beard and then, after rotation to
the right – the point of the blade. Because walls or trees are not available everywhere, we
recommend that people learn this, or other regional variations of aid-independent methods of
measuring this difference.
What if – by simply moving the blade all the way forward (or back) within the confines of the
ring – the desired angle is not readily achievable? Well, as with other fine-tuning issues,
there are numerous options. This poses another question: how many of them can be dealt
with in this text?18 For our purposes, if the job does not require an electric welder, an
acetylene torch, skill at a forge or the making of better-fitting snath, we consider it “simple”
and cover it later in this chapter. The rest will be addressed in Part 2.
Hafting adjustment-related warning:
During work, the strain of cutting sometimes causes the blade to shift backward within the
attachment ring, provided, of course, there is space available. This effectively opens the hafting angle,
and thereby increases the resistance to each stroke. It does not take much of
a backward shift at the blade’s neck to move the point upwards several centimeters!
Experienced mowers quickly notice the additional force required to propel the blade;
beginners often don’t. The blade then provides a lengthy lever, (with the spot where the tang
meets the ring as the fulcrum) prying against the side of the knob’s seat, possibly splintering
it apart. In extreme cases, breakage may also occur at the blade’s neck. Unfortunately, many
blades and snaths have been damaged precisely because the blade slipped within the ring –
and the energetic but unaware mower continued swinging it as before.
(18)As writers/editors of tool-using guidelines, we are confronted with an ongoing dilemma: How much information is too
much? Is it fair to leave out some useful hints just because the combined material may overwhelm the average reader? We do
not know the answer; our attempt is merely to act with integrity while also pushing the bar a bit higher…
In any case, after much deliberation we concluded that it may be more reader-friendly to keep the relatively simple
alterations – those possibly implementable by most of the new scythe-using folks – separate from those which require more
capabilities and willingness to work with wood and/or steel than may be the average today. Still, the line between the simple
and the more complex alterations remains arbitrary.
To avoid the above scenario:
a) Every time before mowing check the Hafting Angle and verify that the setscrews of the
ring are tight. (“Tight” needn’t be overdone; “nicely snug” will do.)
b) Occasionally re-check the angle during work in the field.
These precautions are especially pertinent with a new wooden snath, the bottom end of
which has not yet been compressed by exposure to the alternating effect of getting wet and
drying out again, and the repeated tightening of the ring. The wood structure, which is
porous, naturally expands when moisture enters it, but in this case it encounters the
unyielding confines of the steel ring. Consequently, the outermost wood fibers are crushed.
Once the bottom of the snath dries again, its dimensions will be slightly smaller. If the slack is
subsequently not taken up (by tightening the ring) the blade is less securely held and prone
to move backwards – thereby increasing (opening) the Hafting Angle – and we arrive at the
potentially destructive scenario described above.
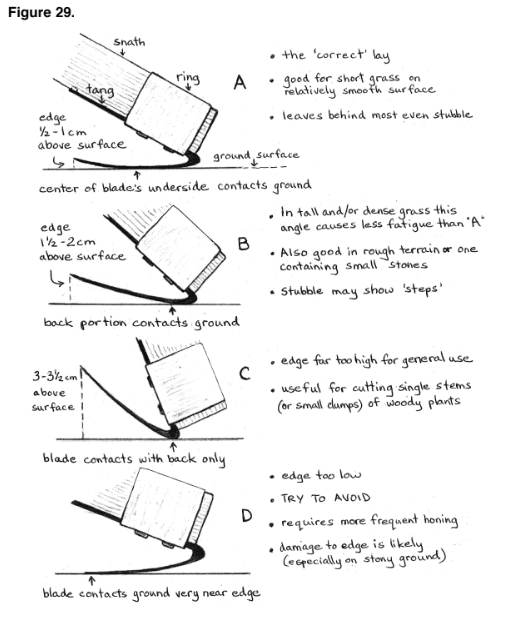
2. The Lay
The Lay of the blade relative to the ground surface affects the angle at which the edge meets
the stems. Figure 29 illustrates the Lay as it pertains to some of the various cutting
situations.
The initial test of the blade’s lay should, preferably, be conducted on a terrain approximating
the expected gradient (sloped or level) where the scythe is to be primarily used.
With the hafting angle already set (at least in an approximate manner) hold the scythe in the
working position. Using Figure 29 as a guide, note if the edge to ground relationship is more
or less correct for the respective mowing situation.
The edge is often found to be “too low” (29 d) in the following instances:
a) When very short people purchase some version of the “Austrian” scythe.
b) Some of the available “bush” blade models (which typically have very steep tangs) are
used with many of the common versions of two-grip snaths.
c) For the mowing of ditches.
d) A scythe functioning well in fairly level terrain is used for mowing steep slopes.
Horizontal Balance
Among the three blade/snath adjustments discussed herein, the final touch is the achieving
of ‘Horizontal Balance’. The basic concept can be expressed as follows: A horizontally well-
balanced scythe has its blade attached to the snath in a user-friendly manner.
Because this balance is not strictly essential to mowing, it is more easily missed (or ignored)
than a skewed Hafting Angle or inappropriate Lay, and thus poorly balanced scythes abound.
Traditionally, when an experienced mower referred to a scythe as “well-balanced”, it would
be one which, when merely held by its grips in mowing position, felt as though it would be
nice to use. Admittedly, “nice” is a subjective way to express a state of harmony without
being more specific. Yet such terminology was often sufficient for members of a culture
steeped in tool use. “Balanced” may be equally vague, but it too required no further
explanation, back then.
Today the situation is vastly different and more words are needed while discussing certain
scythe-related concepts, Horizontal Balance definitely among them. Adding the prefix
“horizontal” to contemporary scythe jargon was our attempt, a number of years ago, to help
clarify the issue (without much success to date). Though the concept is centuries old, the
term was, so far as we know, not previously used.
Now, to extrapolate, “scythe balance” has always referred to a state of adjustment in which
the blade easily, nearly automatically,
(19) positions itself with its beard and its point more or
less equidistant to the ground. In other words, it would be horizontally aligned. This tendency
ought to readily manifest either with the blade slightly above the ground surface and not yet
engaged in grass, or while mowing an easy-to-cut stand. Of course, re-positioning the
balance of any blade that does not meet the theoretical specifications outlined thus far, and
then confirming improvement in the field, is recommended.
There is more to be said on this topic, but first we want to slightly alter our definition of
Horizontal Balance expressed earlier: A horizontally balanced scythe has its blade
attached to the snath in a wrist-friendly manner. With other words, when held so that the
hands/wrists are in their most comfortable position, the blade’s point has no tendency to
drop towards the ground below the horizontal, nor is it ‘floating’ significantly above the level of its beard.
(19) Of course, blades do not position themselves ‘automatically’, and remain that way. Rather, it is the mower’s way of holding
the grips that determines the blade’s position and maintains it as desired. And while there are other design features that
contribute to the overall balance of any given scythe, the blade/grip relationship is a major one.
If, for instance, the blade’s point hangs too low while the unit is held as expected, no seasoned mower would call the scythe
“well-balanced”. In fact, it is generally preferred that the point floats somewhat above the horizontal, because this makes not
only the point, but also the whole blade, feel lighter. Such an arrangement also goes a long way toward reducing the blade’s
tendency to ‘nose dive’ (the point being driven into the ground) – something frequently experienced by novices, especially if
they are using long blades. The floating effect can be overdone, however, and often enough it has been…
Our additions of “wrist-friendly” and (to a lesser degree) “comfortable” confront some
generations-long traditions. As already mentioned, we surmise that in the past many working
men readily disregarded ergonomic principles of tool design; in this case, they were strong
enough to wield a light tool like the scythe with relative ease, thus a ‘wrist-unfriendly’ scythe
was little cause for concern, or so it seems.
In any case, the concept of “wrist comfort” has been (consciously or not) disregarded in a
whole slew of snath designs, both old and new. Consequently, there were (and still are)
plenty of scythes in use today where the generally desired ‘light point’ of the blade comes at
some cost to the wrist.(20)
In general, certain traditions and habits temper innovation. Sometimes that is a good thing, of
course. On the pragmatic level, with regard to the topic at hand, the traditions mentioned
earlier present a challenge during the process of helping certain individuals to fine-tune the
Horizontal Balance of their scythe. For instance, a common response – especially if
someone’s personal scythe (one lacking ergonomic grips) is perceived to be criticized –
might go like this: “Oh, some people like it one way and some another way; for me this is just
right”. Well, the physiology of the human body is only so different between one person and
another. There are particular ways that joints have evolved to move, and postures in which
they are designed to be part of – even if our modern lifestyles lead us into a variety of
pathological postural and movement habits.(21)
(20) To this group belong the majority of those snath models that (relative to the blade’s cutting direction) have the grips facing
the mower. They come in two variants – those with the grips attached directly to the snath shaft, and those that have a stem
to which the lower grip itself is attached. Of those with the grips attached directly to the snath, the most widespread, globally,
is the s-curve metal snath with grips that can be placed so as to face either forward or back, plus slide up and down the shaft
(therefore somewhat adjustable). Invented more than half a century ago, it has been produced (most frequently of steel, but
also of aluminum and fiberglass) in many countries and in many slight variations of the shaft’s curvature. It probably owes its
popularity primarily to the low cost of production and secondarily because it gives the impression of grace and of offering a
very personal fit. It certainly is cheap. On the wholesale market some versions can be purchased for a mere $5 or less, ring
included. As for adjustability, it is an example of a still-masked part-deceit…
To the latter variant (those with a stem to which the lower grip is attached) belong all those 2-grip wooden snath models
with grips attached at 90 degrees to the shaft or to the stem. On this continent, one version is the Green River Tools snath
designed by David Tresemer (later copied by Smith & Hawken), long out of production but still scattered around the
American countryside. The other two examples, known by the online scythe shopping clientele, are ALL snaths made by the
Marugg and Scythe Supply companies. Europe is also full of similar designs, whether made in Austria, Germany, Switzerland,
or elsewhere. Our hints on refining the horizontal balance will be of only so much value to anyone using one of these snaths,
because we consider a less than 90-degree angle of the grip-to stem attachment a rather essential feature of an ergonomic
scythe.
On the other hand, most of the models with the (usually slightly curved) grips pointing upwards and forward can more easily
escape the grip-affected ‘horizontal balance’ pitfalls.
(21) As an unrelated example of the same phenomenon, consider how a large segment of modern people typically walk with
their feet somewhat splayed (i.e., with toes pointing outwards) often one more than the other. When bringing up this
physiologically unfriendly manner of locomotion, one might be met with a claim that “it feels comfortable”. It may indeed, but only because it has become a habit to walk in a way that sooner or later will give rise to ankle, knee or hip problems – with the
medical establishment kept busy replacing joints…
It is similar with mowers and their personal scythe’s specific design; they’ve grown accustomed to (or are selling) a certain
snath model and subsequently claim to like it very well (or that it is “the best to be had”, or nowadays, that it is “ergonomic”).
When a scythe is merely held in ones’ hands, not yet engaged in grass, a wider range of
positions will feel comfortable on the wrists than is the case while actually mowing (especially
certain mowing actions). In other words, while idle, the wrists can be held at a variety of
angles that may “feel fine.” Yet, some resistance to the stroke is inevitable, and thus while
mowing, the margins of what still feels comfortable are narrowed, sometimes significantly so.
Two kinds of resistance come into play: One is caused by the friction between the blade and
the stems it cuts, generally equal throughout the entire stroke. The sharper the edge, the less
of this resistance is experienced. The other is the actual weight of forage that is moved
sideways into the windrow, which increases as the stroke progresses from right to left.
The most direct, and often eye-opening, way to experience the effect of this resistance on the
range of wrist positions is to find a stand of tall, dense forage and give the tool a try. For
good measure, conduct this experiment just after a heavy rain; added moisture increases the
weight to be moved and speeds up the learning process. It is especially during such
scenarios that a significant portion of the so-called “ergonomic” scythes may rather quickly
reveal themselves as tools not so easily wielded. If then, a really well designed scythe was
put into the hands of the same person following the initial spell of mowing, and the trial
continued, no more words would be necessary. Of course, this is not a broadly
implementable solution because truly ergonomic scythes are not readily available, and most
individuals are unlikely to be treated to a similarly comparative test.
We are not suggesting that snath design is the only cause for the possibly notable contrast in
mowing experiences. Many other factors (chiefly the condition of edge, the blade’s
adjustment and how well the actual mowing movement is performed) affect the experience.
Those factors aside, however, the next thing perceptive mowers may notice is how the strain
on their wrist is reducing both enjoyment and efficiency when using this tool. Stronger than
average individuals may well last longer swinging such a scythe than the majority, but most
people’s joints eventually yield to abuse.
Two features of common snath designs are often responsible for possible strain on the wrist:
a) The length of the ‘stem’ of the lower grip, on snath models in which the grips point
towards the user.
b) The angle at which the grip (the portion that is actually held in hand) is attached to its
‘stem’ (also referred to as the “grip’s extension”).
The influence of the stem length itself upon the mowing experience is somewhat out of the
context of the discussion of Horizontal Balance (and, again, will be covered in Part 2). The
grip angles, on the other hand, are a different story.
Earlier we stated that the blade’s horizontal position is affected by the sideways tilt of its
tang – one of the three model-specific features (see Figure 26). Now, we add that the ‘tilt of
the grip’ also plays a role in how the blade is carried through its stroke, or rather, how
comfortably ones’ hand can keep it in the horizontally-desired position. And, even without
fully understanding how it comes into play, there are ways for a novice to determine if the
scythe they just purchased could use some horizontal balance tweaking, or a snath they
purchased or self-made for a specific blade could use a different grip…
For those who do not yet understand by experience what exact wrist position allows for the
most force to be exerted without punishment to one’s joints, here is a suggestion:
Without a blade mounted, secure a weight to the bottom end of the snath – a weight that a
person doing the test can move sideways, but with some difficulty. It could be a block of
wood or a rock, a small car tire, etc., tied to the end of the snath. (It will not be lifted, only
pushed sideways.) Imitate the grass-cutting stroke, and compare how the wrist feels in
different positions, making sure to move the weight all the way to the left (where the cutting
stroke would actually end while mowing in the field). It should not take long before the person
performing such a test should be able to tell at exactly what wrist angle the weight can be
moved most easily. Well, THAT is the very angle to fix in one’s mind/body, before moving on
to the next stage of the trial:
Now, with the blade firmly attached to the snath, hold the scythe in what was observed
(remembered from the weight pushing trial) to be its most comfortable wrist position, and
then mimic the complete motion of mowing, barely touching the ground surface with the
blade’s belly. It is not really necessary to actually be cutting grass yet; doing so will be the
point at which all the pieces come together.
As during the weight trial, the importance of mimicking the entire cutting stroke lies in the fact
that the wrist position can, and most often does, change throughout the stroke. How much it
changes depends on the style of the snath (the placement and shape of its grips, to be more
specific) and whether the blade is relatively flat (lengthwise) or has a more highly elevated
point. The change is most notable near the end of the cutting stroke, and is most pronounced
in the case of the snaths with grips facing the person and/or with the typical alpine models of
the “Austrian” blades.(22)
(22) The “typical Alpine models” are those traditionally (and still today) used in much of Austria, Switzerland, Northern Italy,
Southern Germany and, to a lesser extent, elsewhere. Many of those models have their points elevated higher than is
characteristic of blades in other parts of Europe, Scandinavia or the Near/Middle East. The so-called “Austrian” blades – a moniker attached, somewhat erroneously, by the English-speaking scythe crowd to blades other than the “American” or
“English” blades – were often made in this manner. In recent years someone began to refer to them as blades “with a rocker”,
and the term is now used by others in the ‘scythe circles’. However, we have long referred to them as “blades with highly
elevated points”. Those very models, as a rule, also have more concave bodies between the rib and the edge than was (and is)
the average for “European” scythe blades.
While moving the scythe as outlined above, if the blade’s point shows a tendency to aim
downward, the scythe is what we refer to as ‘nose (or point) heavy’. Countless mowers have
learned how to more or less successfully use scythes exhibiting this flaw; it merely requires
paying extra attention to keeping the point always just slightly above the ground surface.
Until the body is trained to comply with the needs of such an arrangement, each stroke will
require a certain amount of concentration, because our joints instinctively tend to position
themselves towards their respective comfort zones. Mowing with a ‘nose-heavy’ set up, the
top of the wrist would rather be slightly more extended – but if allowed to do so, the point
may dig into the ground…
On the other end of the spectrum, the point can be ‘too light’ or ‘float’ too much (to use our
terminology). The challenge is similar; extra attention will be needed to keep it down enough
to make sure that the stubble’s length does not increase towards the extreme left portion of
the stroke (a typical signature of novice mowers). In this case, especially, the mower will
learn to extend the top of their wrist beyond what is physiologically good for it, out of
necessity. The wrist extension increases gradually throughout the stroke and will be most
pronounced near the end, exactly when most weight has to be pushed and the force required
to do so is at its peak.
In both instances outlined above we are talking of the difference between ergonomic
principles applied to tool design and the option of compensating when operating a certain
‘un-ergonomic’ tool. A person agreeing, however unconsciously, to adjust to the tool (rather
than fine-tune/adjust the tool to their body) typically puts up with some discomfort and trains
their wrist to work in the required position. Some people learn how to do so very quickly
because their attitude to work in general overrides the need for bodily comfort. Others take a
long time, meanwhile blaming the “bad” blade and/or snath. The majority of the new
generation of users of the so-called “Austrian” scythe, it seems, do not even think about any
of this, because it has been – as stated earlier – one of the issues generally shoved under
the rug…
Correcting some of the most common snath/blade ‘mis-fits’
1. Altering the Hafting Angle.
Without resorting to heat to change the angle of the tang, the hafting angle of a scythe can
be affected in several ways (or a combination of them):
• Obtaining a wider ring
This may be the simplest solution but is applicable only in instances where the present
ring (the one which does not allow for the blade’s desired position) is relatively narrow,
say 32-35mm, and a 40 mm wide ring is readily available. Anything wider than 40mm
is rare on the commercial scene, by the way. Of course, a ring of the desired size can
be self-made.
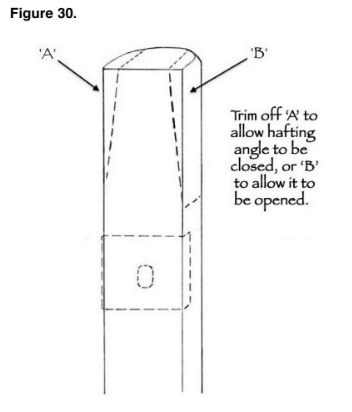
• Trimming up to 4mm of wood off either side of the snath’s lower end. (See Figure 30.)
Trim the back (opposite the direction in which the blade points, indicated as ‘a’) if the
hafting angle needs to be decreased, OR from the other side (indicated as ‘b’) if the
desired effect is to increase the hafting angle.
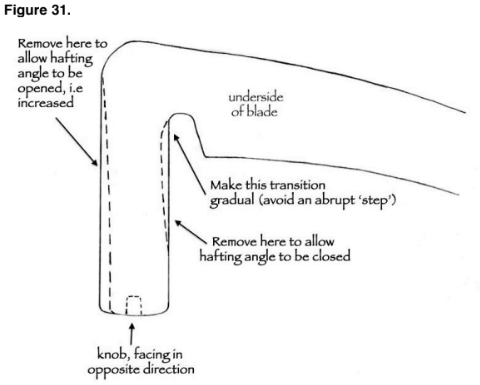
• Filing a small amount (up to 2mm) off either side of the tang in a gradual taper so that
within the confines of the ring the blade can be moved farther toward the desired side
(backwards to increase the hafting angle, forward to reduce it. (As in Figure 31.) Doing
so will, of course, weaken the tang, but if reasonable care is exercised during
subsequent use, the reduction of strength may be acceptable in some cases. In
addition to the three options discussed above, the removal of material from one side of
the tang’s knob is also an option if a more open hafting angle is desire – this time by
filing away the half closer to the blade’s point. More on this below.
• Altering the placement of the seat for the tang’s knob This option is applicable to cases
where the hafting angle needs to be decreased. Moving the ‘seat’ for the knob farther
back will drop the blade’s point, thereby decreasing (closing) the hafting angle.
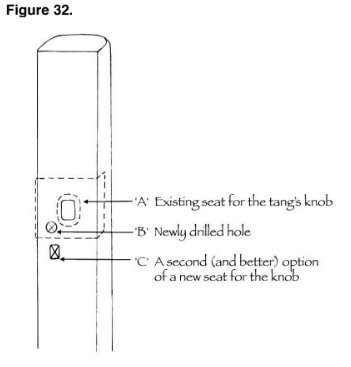
Progress of steps to take (refer to Figure 32):
If one’s present snath features a small reinforcing accessory called a “snath saver” a shortcut
can be taken by
1. Ignoring the existence of the initial seat (indicated as ‘a’)
2. Drilling a 4-5 mm hole (indicated as ‘b’)
3. Reducing the blade’s knob (with a file or an electric grinder) to a size to fit that hole.
Sometimes this alone is an adequate solution.
A more complete job consists of:
1. Removing the “snath saver” (by pulling out the four little nails or filling off their heads and
later pulling out the remnants with nail pulling pliers).
2. Then whittling a piece of wood that fits snugly into the present hole (indicated as ‘a’) and
gluing it in.
3. Making another small rectangular seat farther back from the blade’s travel direction. In
addition, it may be worth sacrificing 2-3 cm of the snath’s functional length and placing the
new seat – ‘c’ in the illustration – farther away from the snath’s end than the previous one.
Please note that new knob seats do not need to be as large as they often are made.
Instead of making the hole likewise so large that it unnecessarily threatens the integrity of
the snath, a better course is to file away a portion of the knob, so that it is much smaller
(especially narrower) than the knobs on numerous makes of blades as they come from
the factory. In addition, material can be removed from one side only, in which case it
should be where it will further affect a shift in the desired direction (i.e. from the side
closer to the point in order to increase the hafting angle; from the opposite side to
decrease it.)
A knob 4mm by 4mm, or even less wide, is strong enough to keep a blade in place; as such,
it will alleviate the need for an extra large hole to be made in the wood, weakening the snath.
We trust that attentive readers by now understand that option four (altering the placement of
the seat for the tang’s knob) is not one to pursue if the hafting angle is already too small,
because moving the ‘seat’ farther forward (as it would need to be in order to open/widen the
hafting angle) would jeopardize the snath’s strength at that critical place.
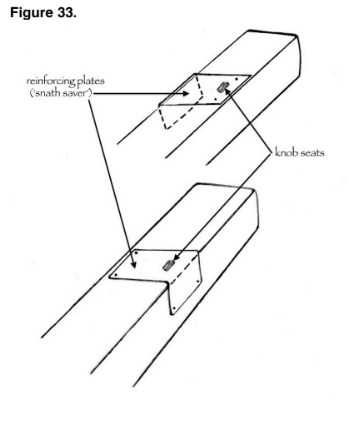
However, a self-made “snath saver” of at least 2mm thick steel, is strong enough in itself to
resist normal pressure against the knob without requiring the support of the wood. This
approach offers another layer of possible alterations, because the knob’s seat can, if needed,
be placed closer to the side to which the blade points than it could be if only wood or the
common “snath savers” were to provide the necessary support. And, a reinforcing plate of
this sort does not need to have three accurately fitting sides; two are enough. For North
Americans, one example of commonly available material is a piece of 1/8’’ thick 1×1’’ angle
iron (Figure 33.) (Making holes in a piece of steel of that thickness requires somewhat more
skill with tools than most of the suggestions in this chapter.)
While any one of the options presented thus far may take care of only a small portion of a
certain hafting challenge, a combination of some (or all of them) can add up.
To be more specific; with options one to three, approximately 2 cm of an up or down re-
location at the blade’s point is easily obtainable, with 5 cm the limit. That may not seem like
much, but the difference can certainly be felt in the blade’s action. Option four can produce
more significant results. For instance, re-positioning the center of the knob 8mm backwards
can drop the point of 75 cm blade approximately 10 cm. Combining the suggested
approaches can lead to a significant change in how satisfactorily a blade is hafted on a
particular snath.
While any of these methods, or even all of them together may not completely solve the
possible hafting angle dilemma in any one case, considering the relative simplicity in
implementing them, they are worth trying.
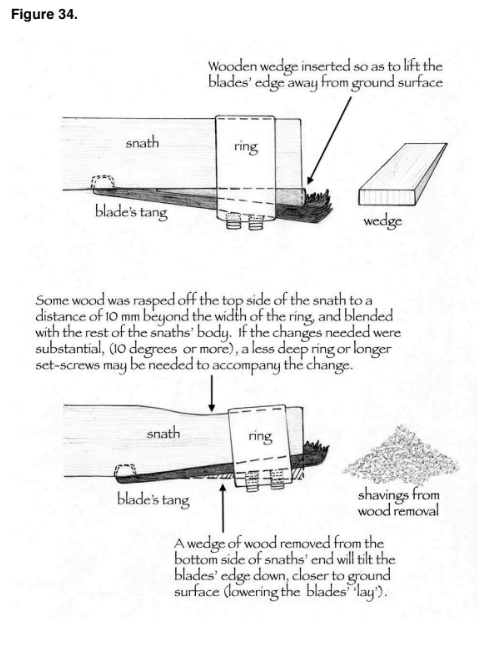
2. Altering the Lay:
In cases where the edge is too low (Figure 29 d), adding a tapered wedge of an appropriate
size into the space between the tang and the bottom side of the snath’s end (See Figure 34
a) can effectively lift the edge off the ground surface by up to about 10-12 degrees. Brief
experimentation with a scythe that was previously considered adequate often reveals that it
is even better (i.e. cuts easier / with less resistance) with a wedge of appropriate size
inserted and the edge thereby lifted. The difference this adjustment can make is particularly
noticeable in a dense and tall stand of forage.
We therefore recommend that wooden wedges of 5 and 10 mm at the thicker end, tapering to
1 mm or less over the length of 6-7 cm, become part of everyone’s scythe maintenance
accessories. A selection of 4, 6, 8, 10 and 12 mm (in thickness) would be even better.
If the edge is too high (Figure 29 c), and the snath is made of wood, remove a wedge-shaped
piece from its bottom end as in Figure 39 b. After a line is first drawn on each side of the
snath, the wood can be carefully sawn off with a fine-toothed saw. For most people, exactly
how much should be taken off will be initially a matter of guesswork. A safer approach
involves gradual experimentation, that is, increasing the taper in stages (by means of a rasp,
drawknife or a hatchet) and testing the results by re-attaching the blade and mowing with it
for a spell before deciding whether to remove more wood.
If the wood removal is to be substantial, here are some hints:
• At least 2 cm thickness of wood should be left at the very end of the snath.
• Re-shaping of the topside of the snath in the area of the ring’s ‘seat’ may be necessary
to prevent the ring from slipping forward as it is being tightened. A rasp is the most
convenient tool for this step, but it can be done with a good jackknife.
• A shorter ring or longer set screws may be needed to securely hold the blade against
what now will be a piece of wood of smaller dimension.
Keep in mind that while working on undulating terrain where the “ideal” lay of the blade is
continually challenged, the edge-to-surface relationship can be additionally fine-tuned by
appropriate lifting or dropping of the hands/elbows/arms/shoulders. This is another example
of on the spot improvisation, often necessary and always wise to consider. (23)
3. Correcting the Horizontal Balance
It is rather straightforward to shift the blade’s point either up or down. The three options are:
1. Use of sideways-tapered wedges. This is the simplest option (also possible with metal
snaths) and is recommended as the first step in all cases, in order to ascertain the exact
degree of change desired, should one choose to follow with either option two or three.
2. Tapering the snath’s bottom end sideways. (Of course, this approach is only possible with
wooden snaths.)
3. Altering the tilt of the blade’s tang. This can be accomplished either in the cold state (albeit
only with some blades and only to a certain degree) or by application of adequate heat. (Both
to be discussed in Part 2.)
Figure 35 illustrates option 1 – the inserting of wedges of suitable size. From there, it can be
deduced how option 2 is to be implemented. That is, if – after settling the desired balance of
the blade by temporary aid of the wedge – one decides to dispense with the wedge, then
removing the appropriate amount of wood (roughly equivalent to the size / shape of the
wedge) from the snath’s bottom end is the next step to take. However, there is something
else to keep in mind: rasping off more than a small amount of the material will involve
covering the area including the seat for the tang’s knob. This can sometimes have an effect
on the hafting angle, because the seat may end up being shifted sideways. If the shift is
significant it will be equivalent to the strategy employed in Figure 32. That can turn out to be
desirable, or not…
To communicate all the details potentially involved in the fine-tuning of scythes is beyond the
scope of these guidelines. Further alterations that may possibly be necessary to alleviate
sustained bodily adjustments on the part of the mower, beyond what can be accomplished by
means of wedges, will be discussed more extensively in Part 2.
(23) In view of this fact alone (never mind the rest of the potential difficulties with the lay) a ‘perfectly adjusted’ scythe, as some
retailers claim to provide – without specifying whether it is for a flat lawn, a steep mountain meadow, or anything in between
– is an ignorant claim at best.


