The basics
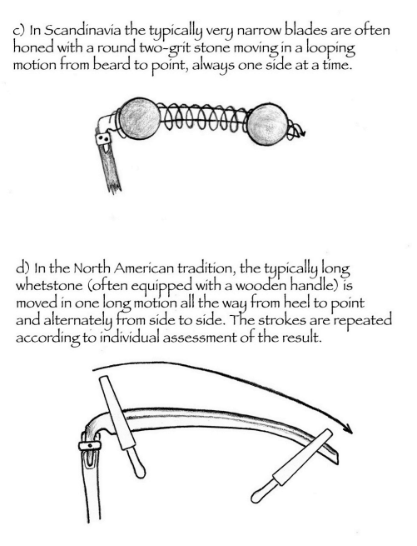
As the diversity of techniques among old agrarian cultures attests, scythes can be honed in a
multitude of ways, and with a wide variety of whetstones. What matters is that after going
through the motions, the cutting edge is adequately restored, which is to say that the
improvement in sharpness after each whetting session in the field should be immediately felt
upon taking the very next stroke.
Our intent in the following discussion is not to identify whether the effect of honing is long
lasting or not, and why that may be so (as was already addressed in Chapter 4). Here the
objective is to help determine which honing techniques assure that there is a difference. If
not, it may be that the particular stone’s abrasiveness is inadequate for that particular edge
condition, or that (relative to its abrasiveness) the stone is not applied with enough pressure
against the edge, and/or that the stone is moved too slowly. All of these factors could be
responsible in any one case of unsatisfactory results, or it may be just one of them. We
encourage individuals to experiment under their specific circumstances (the combination of
available equipment and the particular mowing task), while keeping the following in mind:
1. The finest grit stones are, for the most part, only suitable for edges that were first
adequately shaped (by peening or otherwise) and are therefore often not the best as the
only whetstone for beginners.
2. Only relatively coarse whetstones can be applied with a very light touch and still
adequately restore the blade’s edge.
3. Applying firm, or even very firm, pressure with a fine to mid-grit stone can make a notable
difference in many situations of edge and field conditions.
4. The speed of the honing stroke does contribute to abrasion (though should not come at
the cost of compromised stone-to-edge angles).
What remains to be considered is at exactly what angle the stone should be held in relation
to the blade’s bevel. Our position on the matter can be summed up as follows:
The whetstone’s angle – from both sides of the blade – should be as low as possible, as
long as the stone still touches the edge at the outermost end of the bevel.
But is this enough of a guideline, without putting an actual number of degrees to that angle?
Possibly not, though speculating on the topic further does get complicated.
The challenge of keeping stone-to-edge angles within an acceptable range
It has often been said that “the scythe blade is a single-beveled tool” – an assertion generally
made in reference to all scythe blades. Without further qualification, we consider that
statement somewhat of an unhelpful popular myth. Why unhelpful? Because it doesn’t take
into account the fact that practically all scythe blades, once in use, feature along their edges
more than one bevel. Tempering that statement by adding that “beveled” refers to the
primary bevel, would take it out of deep water and leave room for the fact that there is more
to the issue of bevels than meets the casual eye. But for now let’s take a little detour into a
related subject.
Some tools, such as many chisels, plane blades, drawknives, side axes, scissors, etc., can
more accurately be referred to as single-beveled, because it is relatively easy to maintain
their one (primary) bevel at exactly the chosen angle, while the opposite side is maintained
completely flat. Even then, many individual specimens from among the tool groups
mentioned are – by some of their users – intentionally made double-beveled (with one
primary and one secondary bevel, both from one side). Additionally, yet another secondary
bevel of a very low angle is sometimes, intentionally or otherwise, created on the bottom
side. Of course, all of the resulting variations in edge geometry affect the functionality of the
tool. One difference between those characteristically single-beveled tools and scythe blades
is that the former are typically honed (or can be) in a more accuracy-friendly set-up and, if
desired, with the aid of various jigs. Provided the owner understands the related concepts
and is careful enough in implementing them, some of those tools can readily be maintained
with three bevels (even four would be possible!), and each with whatever angle degree
desired. This is not so with scythe blades, especially once they are attached to their snaths
and taken to the field where they require frequent re-honing.
For a relatively short period of time, a newly re-shaped (whether by hammer or grinder) blade
can perhaps be described as “single beveled” and begin the workday as such. As the day
and the whetting sessions progress, the whetstone begins to create tiny secondary bevels
along the edge. Although typically unacknowledged they nevertheless affect the blade’s
cutting action, sometimes a little, sometimes a lot. Ignoring them does not reduce their
effects.
The “American” blades deserve special mention here because they are usually referred to as
“flat” (and sometimes with the degrading surname “stamped”). Well, most of them are not
stamped, nor are any of them flat in the sense that a whetstone can be moved against their
underside fully contacting the cross-section of the body. The reinforcing rib, seen as a sort of
‘trough’ from the top but protruding downwards, will effectively prevent any such attempt,
unless only about 3 cm of the blade’s body’s width is considered an adequate angle guide
and surface to slide the stone against. That, of course, is not how the men of previous
generations whetted their American blades. Instead, as the result of the angle they held their whetstones
(and suppose it was the lowest possible) they began to slowly create two secondary bevels on their blade’s
edges starting from the time of the first re-honing in the field, and those secondary bevels were inevitably
steeper than whatever primary bevel the mower initially ground onto his blade.
A partial exception to both of the above cases are the Scandinavian blade models because
they are truly flat on the underside, and it is possible to maintain that side without a bevel, at
least for a much longer time. Theoretically, that time can be extended into infinity, especially
if they are field-honed in the manner often used in the Nordic countries with the round
“Scandinavian” stone – one side at a time. So if it was indeed necessary to bevel-categorize,
these blades could rightly be referred to as “single-beveled”. However, if a switch is made
from the (usually circular) honing of one side at a time to the back-and-forth strokes of an
elongated stone, even the flat underside eventually acquires a shallow secondary bevel; in
the case of the “single-beveled” tool group, it is referred to as a “back bevel”.
These guidelines, however, focus on the “Continental” blades, of which very few are truly flat
in their body’s cross-section, and shaping their bevels – be it with the hammer or later with
the stone in the field – evades any neat, defining terminology. That may be one reason why
across the European landscape it is uncommon to hear someone calling a scythe blade
“single-beveled”. In fact, the bevel concept is rarely mentioned. Rather, the scythe blade has
an edge, the outermost portion of which is regularly peened to various widths and
thicknesses by different individuals and for different purposes, using a variety of techniques.
In some languages the peened zone itself has a name of its own, but implies nothing
concerning bevels. Beyond that, there is a multitude of ways to keep the cutting edge
satisfactorily sharp without discussing bevels per se.
In addition, we hope to spare someone the headache of trying to figure out how to whet their
“Austrian” blade from the bottom side so that 6 mm of its body will be “brightened up with the
whetting” (as advised by Tresemer) – while still keeping their stone contacting the outermost
portion of the bevel while honing…
To reiterate: during use and whetting, most scythe blades eventually end up with two
additional secondary bevels – one from each side. Depending on the applied angle of the
whetstone that created them, they can be variously wide (i.e. shallow) or pronounced (steep).
In a way, they are temporary and each new peening or grinding session eliminates them (or
intends to). How thoroughly they are removed, depends on how well each respective person
performs the peening/grinding. In most cases a small portion of the secondary bevels
remains, a portion so very small that it often goes unnoticed. (Look through a good loupe to
see if the hammer prints on your freshly peened blade reach all the way to the last fraction of
a mm to the apex.) Not that it matters much; the peening hopefully lowered the ‘shoulders’
(i.e. evened out the transition zone between the secondary bevel and the rest of the primary
bevel) thereby making the edge more penetrating. But then from the very next strokes of the
whetstone on, those secondary bevels are, however imperceptibly, once again being formed.
The flip side of all this is that it also does not really matter whether the scythe blade is
referred to as single, double or triple-beveled. As it has for centuries, it will continue to
function relative to how well its user can sharpen it. The issue is addressed here for two
reasons: Firstly, because it has been touched upon by others, most notably in the oldest-still-
in-print English standby text (1981) on the use of the “Austrian” scythe. Secondly, because
we believe that there is value in trying to understand what is happening down there at the
zone of micro-bevels.
Presently the most frequent recommendation regarding the “correct” stone-to-edge angle
across the topside of the blade is along the (imaginary) line connecting the edge and the top
of the blade’s back. While not universally applicable, that is more or less a good approximate
guide. Still, it refers to the ‘easy’ side.
Regarding the angles from the underside, far less is specified in print, in spite of the fact that
everyone writing on the subject surely knows that this is where novice mowers are more
likely to flounder. Here the one reference point (which the blade’s back provides from the
topside) is missing altogether. So while the whetstone may begin its pass with its lower
(hand-held) end touching the edge, the upper end is in mid-air with plenty of room for
deviations as it moves along. The question then is: at what angle should the stone be
moved? At this point we suggest reading Note 24 24 – a summary of guidelines regarding honing angles published to date.
The principle “rule” regarding honing angles we stated earlier (“… as low as possible as long
as the stone still touches the edge at the outermost end of the bevel”) does not really
contradict the essence of the combined advice offered in Note 24, it merely adds what we
consider an important detail. Nevertheless, although there is probably a general consensus
among the voices contributing to discussions on this very topic, all actual advice, including
our version of a honing angle “rule”, still covers only the theoretical side of the concern. In
practice, those “as low as possible” angles can vary substantially – from both sides. Apart
from the mower’s skill to perform the honing as intended, any or all of the following three
variables may contribute to the actual in-field disparities.
a) The degree of concavity and the width of the respective blade model’s body.
b) The degree of concavity each person incorporates into the bevel while peening it.
c) The degree of ‘edge rounding’ taking place during honing sessions.
(24) Surprising to beginners as it may be, this ‘correct honing angles’ is another of those hazy how-to topics on which too little
clarity exists. In addition, the use of technical terms varies enough with the respective authors to compound the existing
discrepancies and resulting confusion. At least if we were novices searching for dependable information, and compared all
that is presently offered on the theme, it certainly would have us confused!
Here is the summary of pertinent excerpts from those five previously referred-to texts:
1. Tresemer, (1981) offers the following:
From the topside: “Here the stone is guided by the rib which stands out along the back of the blade”
From the underside: “Hold the stone against the blade so that across the back side of the blade the angle of stone to blade is zero
degrees. You should see the first 1⁄4 inch of the edge brighten up with the whetting”.
2. Lehnart 2000, 2005, 2008,
“To hone, hold the whetstone parallel to the edge. If you instead move the whetstone on an angle to the edge you will hone-off the
Dangel”. ‘Dangel’, in German, refers to the peened portion of the bevel. (2000)
“During honing the mowing-created deformation of the edge should not be honed-off, but instead only re-sharpened and lined up.
This is possible by guiding the stone ‘flatly’ (parallel) along the edge under firm pressure, in short curved strokes, alternately
from upper and underside of the blade. The most frequent mistake of whetting is the moving of the stone on too steep an angle to
the edge – the result of which is all too quick honing-off of the “Dangel”. (2005)
“Hold the whetstone always so that it is parallel to the edge”. (2008)
Though the blade’s sides (with possible differences as to the stone’s angles) are not specified in any of the three books, the
advice is presumably referring to both of them. Or is it? One thing that stands out is that angles as such are ‘undesirable’ and
that “flatness” (”parallel-ness”) of the stone is what one is to strive for.
3. Anderson (2008):
(Following peening): “Final honing: Hold the blade by the tang, and place the tip in a stump. Brace the hand holding the tang
against your body, with the cutting edge facing away from you. Hone from beard to tip, with a wet whetstone. If you are a
beginner start with a soft stone, then follow with the Rozsutec or Doppelbock stone. Remove the burr only with the Rozsutec or
Doppelbock. Use the shape of the whetstone to feel for the correct angle that you need to hone the edge. Too steep, and you will
dull the edge; too shallow and you will not be doing much of anything. Use a fairly light touch, and let the stone do the work.
Experienced peeners can skip this step, and just quickly hone the blade like they do in the field.”
4. Tomlin (2016)
From the topside: “On this side you’ll use the rib to set the angle of the whetstone which makes it fairly easy to get right”.
From the bottom side (which Tomlin calls the “bottom face”): “[The purpose of honing from underside] is just to straighten out
the burr [created from the opposite side]” … On this face… you will be looking to see the angle where the stone just touches the
very edge of the blade. Place the narrow face of the stone on the blade … Keep in mind the idea of straightening the burr right at
the edge which will help you visualize the action”… “…you will be relying on having learned to find the correct contact between
edge and stone while using the kneeling method.” (Described earlier in the text.)
5. Miller (2016):
“It is crucial that you hold the whetstone at an angle that approximates the shape of the edge. The blade is single beveled, so the
whetstone should be parallel to the blade along the underside and at a slight angle (the angle of the bevel) along the topside”. “If
the top of the whetstone is touching the chine of the blade (here, going by the accompanying drawing, he is referring to the
topside), you are starting too high… and a whetstone will not be lying at an appropriate angle”. “Pay close attention to the angle
of the whetstone at the point, since the blade is so narrow there that it can be difficult to approximate the angle of the bevel.”
All these bits of instructions may well represent certain portions of a good theory, but (even if they were comprehensively
explained) implementing some of them in practice is another matter…
Here Tomlin comes closest to offering a concrete hint regarding how to settle on the stone’s ideal angle (and subsequently its
movement) from the underside. Wisely, without specifying number of degrees, he nevertheless tells the readers how they can
obtain at least a visual image of the angle they should attempt to maintain as the stone is in the process of doing its job. It may
have been helpful to add that the exact angle will vary in each individual case of blade model/user, but he did provide more
useful information in this regard than the other authors all put together. What both Lehnard and Miller bring onto the table
contradicts the standard topside’s “rib/back-to-edge” recommendation. That does not make it “wrong”, of course. And
although the vast majority of European mowers do not use that technique, the recommendation has merit, in cases of some
blade models. (Briefly addressed further below.)
In Chapter 4 (Figure 11) we suggested the angle to be 25-30 degrees (a common one on
many other edge tools). Below we use that same diagram again as Figure 36, and, to avoid
confusion, with only the field-honing angle indicated.
While drawing that diagram, we hoped everyone would notice the included “approximate”. As
it is – in view of the combined advice now summarized in Note 24 – that number may seem
too high to some. Keep in mind that 25-30 degrees refers to a combined angle, not one from
either side individually, and that each of the single sides’ angle is not necessarily arrived at
by dividing the combined angle by two. Of course, even if not very conveniently or accurately,
they can be individually measured. But a visual image taken in one’s head to the field may be
more useful than numbers arrived at by means of some kitchen table measurements, and
such an image is not difficult to obtain. Tomlin briefly explains how to do that, and in addition
his book features at least two photographs that in this case become “a picture worth a
thousand words”. We second his suggestion, except that rather than obtaining that image in
the field with a blade attached to its snath, we prefer a table or bench as a support, initially. (25)

(25) The blade can be rested upside down on a table, which puts its working underside facing upwards and more or less
horizontal with the plane of the tabletop. Then, while one hand steadies it by the tang, the other hand positions a whetstone
across the middle of the blade’s back. On most average Alpine blade models, the stone will look to be making ‘full’ contact
with the blade body’s center over a distance of approximately 4-5 mm, no more. Begin to slowly tilt the stone toward the
blade’s primary bevel, and observe how wide a portion of the bevel the stone is actually contacting at any one moment; it will
not be more than 2-3mm in the majority of cases. Then tilt the stone still further, until the stone just contacts the outermost
end of bevel.
“Just contacts” means that the tiny space between the apex and the stone closes completely. A source of light from the
opposite direction assists in seeing when exactly the stone has been tilted just far enough to close that very small space. At
this point, as it just contacts the outermost point of the bevel (which is the lowest angle to use) the stones’ outer end may be
significantly farther from the blade’s back than one might initially guess it ought to be when trying to keep their stone at a
“low angle” while honing in the field.
However, either approach can provide adequate visual perspective on how “low” the stone’s
angle can actually be in order to sufficiently contact the apex. In both cases it would be found
that the stones’ outer end may be significantly further from the blade’s back than one might
initially expect while attempting the low angle recommendation.
In any case, fixing that distance in mind and asking a scythe-friendly friend to do the same,
may be the next best step. He/she can then, while field honing takes place, face
perpendicularly to the mower’s stance, and make periodic ‘voice corrections’ as needed.
Those who hone their blades in the field with blade’s point in a post, tree or the ground (see
“Positioning the scythe during honing”, below), do not need such a helper. But during the
actual honing the angle can at best be adhered to only approximately because no normal
person would take the time needed to actually watch when exactly the stone touches the
outermost end of the bevel while executing each stroke. Relying on the visual memory of the
stone’s top end from the blade’s back is about as close as we can get to that angle in any
practical way.
With practice and attentiveness it eventually becomes a matter of simply feeling for the
outermost end of the bevel ‘through’ the stone; as soon as that point of contact is felt, one
strives to keep the stone at that angle throughout the entire honing stroke. This is true
regardless of the honing method employed.
In view of the now widely promoted instructional guidelines that (rather simplistically) state:
“…the whetstone should be held flat against the back of the blade”, we add a bit more food
for thought regarding how the shape of the bevel can influence the actual stone to apex
angles.
If technical accuracy mattered, truly flat bevels on the ‘Continental’ blades are rare. Those
that come closest are initially made in the scythe factories, and even that is not the norm. On
such bevels the stone could contact a larger portion of their width from the underside, though
usually not quite all of it. (And we are taking into account that far fewer than half of the bevels
of blades made by the various factories are 5-6 mm wide these days.) As for the stone
contacting the bevel from the topside “flatly”, and then using that contact to determine the
overall angle/direction of the stone? That may be something to merely illustrate by way of
diagrams drawn onto the pages of a book, but not realistically implementable in the field.
Once hand peening begins, and is repeated, the bevel is prone to take on all manner of
shapes, many of them with at least a slight but sometimes quite pronounced hollow. (We are
not talking of ‘pronounced’ anywhere near that illustrated in Lehnart’s books under the term
“Hohldangel”, nor Miller’s nearly identical “curved edge” on page 64 of The Scything
Handbook.) That in turn changes the possible number of millimeters of the bevel the stone
can actually contact from either side, and on exactly what angle it is best tilted in order to still
contact the apex.
As for the advice that the bevel should be maintained ‘flat’, there is another perspective on
the matter…(26)
Certainly the sort of bevel described in Note 26 absolutely does not allow the whetstone to be
laid against it ‘flatly’, from either side. Its ‘hollowness’ also increases/steepens the angle at
which the outermost end of the bevel is touched by the stone – something that (in the
excerpts quoted in Note 24) Lehnart, Miller and to lesser extent Anderson tell us is a bad
thing because it will all too quickly remove the desired “dangle”…
A partial way out of this predicament could be by following Lehnart’s and Miller’s suggestion
and (on the blade’s topside) begin the stone’s downward honing pass below the back/rib.
That does slightly lower the actual honing angle, and could also somewhat compensate for
the compounded effect of the model-specific ‘hollowness’ or concavity of certain blades’
bodies, plus the owner-made hollow along the bevel. However, it is not something most
mowers using the average narrow (50mm) blades are prone to do, mainly because it is a bit
awkward to execute and slower overall because the stone’s stroke will (unless pulled
significantly more sideways) be inevitably shortened. Still, there are occasions where it can
be, and traditionally has been, applied to advantage. (27)
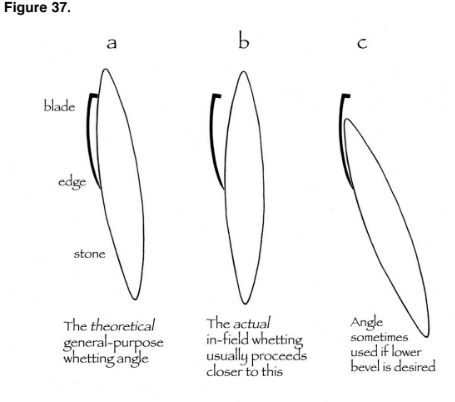
We stated that 18 years ago while writing The Scythe Must Dance, and in Figure 9 of that
manuscript drew a representation of the Lehnart/Miller-advocated whetstone position (at
least from the topside of the blade). However, we later came to realize that our seemingly
straightforward diagram was actually flawed. Namely, the descriptions accompanying its sub-
figures ‘a’ and ‘b’ called for questioning, and subsequent correction. In line with the popular
notions of the day, the one for the sub-figure ‘a’ claimed the stone angle as drawn to be one
for “general purpose” mowing. Well, popular notions sometimes represent no more than
theories, and this is one example. How useful are purely theoretical bits of advice in a
supposedly practical guide? Slightly refined, that diagram is now included here as Figure 37.
(26) For instance, an old Austrian standard of the ideal bevel shape states that on a really well peened blade one should be able
to put a drop of water (or a bit of spit) at the point of its beard, and then by slightly tipping the blade towards its point that
water should roll along the bevel all the way to the point without spilling over the edge. That is not a joke; we know by
experience that it does work. But a bevel functioning somewhat like a trough for that droplet to travel in obviously cannot
really be ‘flat’. Instead, it actually needs to have more of a hollow than one is likely to find on an average hand-peened blade
these days. The peened zone also needs to be somewhat wider than is common, say 3mm or more. The Alpine competitions’
participants like it at least twice that wide, and the trough-like shape is desired by many of them. The fact is that it would be
exceedingly difficult to hand-peen a bevel 6 mm wide, do it to the desired thickness overall, avoid up-and-down deflection
(waves) and not have it at the same time end up with a variously hollow profile. If any of the ‘flat-beveled’ folks actually try it
and come to a different conclusion, please let us know. Given enough evidence / consensus on certain details, a correction of
this text can always be made. 27 The few examples of blade models that, in our view, may benefit by being honed with the stone beginning its path below the
blade’s back/rib are those that are extra wide and/or have more concavity in their bodies cross-section. Of such blades there
are practically none still being produced. A few variations of the ‘typically Basque’ model, favoured by them also in
competitions, may be the exception, and of course, the leftover blades of old production are still in circulation, mostly in
countries like Portugal, Spain, France and to a lesser extent elsewhere.
During the whetstone’s movement across the blade’s topside, most seasoned mowers do not
actually touch its back/rib back with their stone. At this point we want to extrapolate a little.
We do not know why those old mowers would, to various degrees, disobey that most
frequently stated golden rule of a whetting angle (“from the blade’s back to its edge”) but they
do. We are quite certain that if someone wandered throughout the European countryside
during hay-making season and took photographs of “mowers whetting their blades” (albeit
from the angle where the lines of the moving stone in relationship to the blade’s back can be
clearly seen) and later analyze the collection, he/she would confirm this. With other words,
notwithstanding the sometimes large variations, cross-culturally the most frequent whetting
angle approximates the one shown in Figure 37 ‘b’ closer than the one in 37 ‘a’.
Therefore – given lack of substantial evidence to the contrary – we declare that
representation to be more or less one of the “norm” (while keeping in mind the all important
qualifying little word “approximate”). Consequently, the original captions in that figure needed
to be altered…and that is what we did.
Now, we realize that so far the only decidedly optimistic hint was this brief statement: “With
practice and attentiveness it eventually becomes a matter of simply feeling for the outermost
end of the bevel ‘through’ the stone…” With other words, the whole discussion above has
provided nothing like dummy-proof formulae to field whetting. If anything, it may have spun
many readers’ heads. Well, they have our sympathies, and we hope to make up for it with
the condensed version of this book.
For now, we continue with the last subtopic, and it may be one more straightforward and
immanently useful. The following section emphasizes the importance of keeping the stone’s
path as straight as possible during honing, both from the top and underside. What bears
emphasizing is that during honing – from both top and underside – the movement of the
stone should be as straight as possible.
As many readers already know, making perfectly straight lines does not come naturally to the
human hand. Freehand tool sharpening, whether with stones or files, often suffers in quality
for this reason alone. Honing a scythe blade in the field is a prime example. Unintentionally
moving the whetstone in slight curves – even though the person guiding it perceives the
movement of the stone between the points of reference to be “straight” – happens even while
honing the topside of the blade, where, at least theoretically, there are two definite points of
reference.28
Like it or not, in both cases (of topside and underside) the stone often begins to leave that
theoretically straight line as soon as a portion of it moves past the apex. As pointed out in
Chapter 4, this unintentional ‘rolling’ of the stone is really, really common, and not only with
beginners. How ‘detrimental’/undesirable that may be depends on the degree of the roll, and
for what sort of cutting that very blade is intended to be used. Though it may not be common
to find someone who intentionally steepens the honing angle in this manner, for blades used
in rough terrain (as many are) a mild rounding of the apex gives the edge more damage
resistance. Of course, this sort of edge ‘toughness’ comes at the cost of ease of penetration;
thus blades used for lawn mowing, competitions or just plain haymaking in stone-free
meadows would certainly be better without it. The key question here is how much rounding is
one willing to accept as “inevitable”, and is that choice being made consciously?
(28) We say “theoretically” because very few seasoned mowers, though their stone comes close, would actually have it contact
the blades’ back while honing in the field. Secondly, the backs of all blades are not equally high and are really not calculated to
be a certain height in order to provide the “correct” stone to edge angle. With a few former exceptions – such as the North
German “high back” models – each factory makes the backs in their own standard edition on all models other than the heavy
bona-fide bush blades. The differences between respective makes may only be a couple of millimeters (representing 20% or
so of the total) but – along with differences in the width of the blade’s body – the actual stone-to-edge angle can be altered by
them. So, even though ‘rib-to-edge’ may be the most frequent recommendation as to the “correct” angle, it should, again, be
considered only an approximate guide.
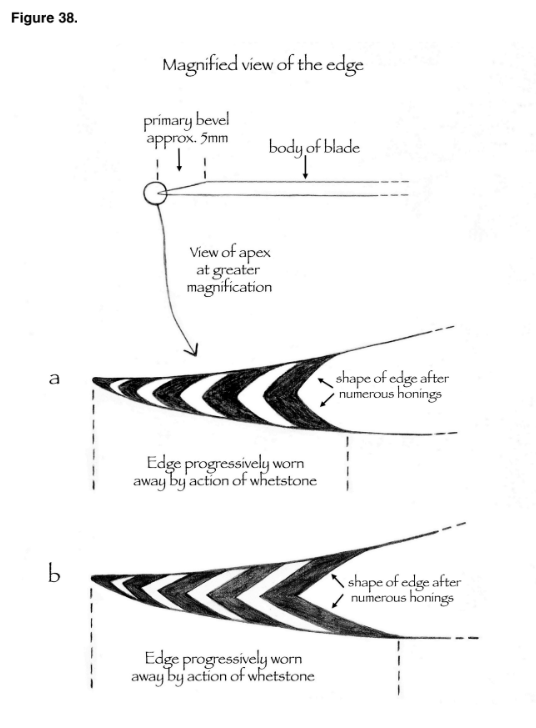
Figure 38 (29) (on the following page) is our attempt at a visual representation of what actually
happens right there near the apex – a gradual change through repeated honing sessions. It
addresses an aspect of scythe blade sharpening which has not been adequately discussed,
yet one that could substantially contribute to learning how to better sharpen most edge tools,
scythes included.
While considering the details of that drawing, please keep the following qualifications in mind:
If viewed at a significantly magnified level, the very apex (of any ‘sharp’ tool) is never that
pointed. But because tool users often think that it is, we drew it according to the established
image. 🙂
What you see here is again, a simplistic representation of but one of many, many variations
of what the owner-made secondary bevels of a scythe blade actually may look like and how it
progressively changes. The differences between them are more the result of how straight a
person can move the stone, rather than differences between this or that angle-related
sharpening guidelines followed.
Figure 38b shows one variation which is likely to take place with blades of those who can
indeed move the stone in a straighter line than most; these are also the folks whose periodic
honing sessions are more effective. Their blades also need less frequent peening and stay
“sharper” for longer between honings. With that in mind, it should be plain that it is best to
avoid letting the stone ‘dip down’ as soon as a portion of it has moved past the edge. This
hand-rolling tendency is possibly foremost among the reasons for the lack of desired results
while whetting in the field, causing more trouble than a deviation one way or another from the
theoretical “ideal” honing angle. Given attention and practice, that aimed-for line will become
straighter in time.
All in all, we still think that the subtopic of honing angles merits further discussion among
individuals interested in subtleties – and those subtleties then further communicated.
(29) We borrowed this one from our 2001 manuscript. Back then we thought it was the single most important diagram we
included in it; we still think so, although its effect on the overall understanding of scythe sharpening seems not to have been
what we had hoped for. But it seems to fit into this section very well, so we present it again along with its newly sketched
little companion.
Positioning the scythe during honing
Of the various ways of whetting the blade in the field, not all are equally easy to learn.30
Moreover, none of them can honestly be declared to be “cut-proof”.
What makes some more ‘learner-friendly’ than others is the degree to which they allow the
mower to hone in a comfortable position, and adequately steady the blade. One of the
examples approaching these parameters is the method in which the blade’s point is pressed
against some solid object such as a tree or a fence post (while the snath’s end is resting on
the ground and the mower is standing more or less upright). Alternatively, the blade’s point is
steadied against the ground while the person is either kneeling or bending over. In both of
these cases the blade can be steadied without a wobble – certainly a plus. It is also claimed,
and rightly so, that the angle at which the stone is applied is most clearly seen and thus
easily adjusted because the person can be looking down the length of the blade
(perpendicular to the movement of the stone) – another plus. We do not, however, use this
approach ourselves nor, for reasons outlined below, consider it highly recommended.
For one thing, we have spent countless hours mowing in places where – in view of the
needed frequency of honing – walking the distance to the nearest tree or a fence post every
few minutes would seem preposterous. As for steadying the blade with its point in the ground
and then either bending over to reach it with the stone, or kneeling down, we have several
concerns. One is that bending into the position needed to hone that way is not as
comfortable as standing upright. Secondly, much, if not most, of our mowing is done with
dew still on the grass, and while both kneeling and ending up with wet pants may not be a
big deal, is it necessary? Thirdly, it takes longer; alone by the time a person kneels down and
gets up again (never mind the honing itself) someone using the standing position might
already be swinging their blade through grass again. But our biggest objection to honing with
the blade’s point being pushed into the mown stubble (somewhat less so with a tree or a
post) is that the point will inevitably miss its share of the stone. And though some people
claim that the edge section near the point does not need to be very sharp since “it does not
do much cutting”, we beg to differ. In fact, we typically overlap the honing strokes more near
the point, plus apply a bit more pressure…
For these reasons we advocate another approach to field honing, one that has been
practiced in many regions of Europe and the Near East for likely as long as any of the others.
It is an approach that in recent years has also become popular with many novice mowers
internationally. It involves having the blade positioned in front of oneself, with the point aimed
(30) However common across much of Europe is the honing method in which the blade is held up in the air pointing to the left
(i.e. its topside facing the person) it is not one among those most easily learned. Nor is the method widespread in Spain (and
possibly elsewhere on the Iberian Peninsula) where the blade’s edge is facing upwards while the scythe is (seemingly
precariously) supported on the person’s thigh.
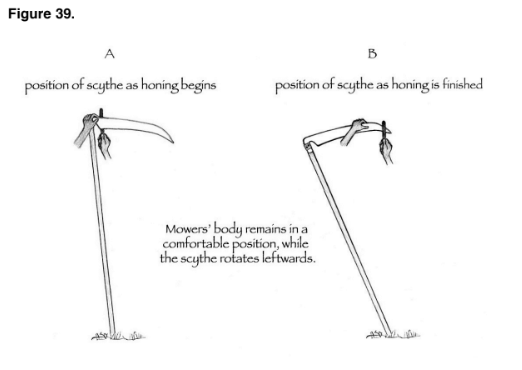
to the right. The person is then looking at the underside of the blade (and the screws holding
the attachment ring) as illustrated in Figure 39. The upper end of the snath should be placed
on the ground in such a way (in terms of distance from the feet) that the resulting blade angle
allows one to carry out the whetting in a wrist-friendly manner, meaning that the wrist does
not need to be bent either up or down too far out of its comfort zone. Where exactly that
place may be is affected by the style of the snath, the pattern of the blade and the terrain one
stands in. (Please note that we do not recommend the practice of “standing on the upper
grip” as a way to steady the unit during honing because doing so often compromises the
most wrist-friendly angle between the stone and the blade.)
As could be expected, of this basic technique there are regional and individual variations
regarding how the blade itself is steadied and honing proceeds. In one such variation the left
arm rests across the back rib, where it remains from start to finish. In another (possibly the
most common traditionally), the left hand holds the blade, initially by its heel, and during the
process moves forward once or twice in order to provide steadier support against the action
of the stone. In both of these cases the stone-holding hand moves (in variously wide passes)
from left to right as the complete length of the blade is covered.
Nearly 20 years ago we came up with an additional touch to this principle approach. One of
its virtues is that the stone-holding hand and arm remain in a physiologically comfortable
position – directly in front and in line with the shoulder joint, with the elbow relaxed and
pointing downwards. Instead of the left hand following the length of the edge, it is the blade
that gradually moves (leftwards) as honing progresses and ‘presents itself’ so to speak to the
natural (accuracy-enhancing) position of the stone. At the start, while the beard and the first
few centimeters of the edge are honed, the left hand holds the blade firmly at its heel (Figure
39 a). Then, by what may appear to be a ‘creeping’ of the fingers and thumb forward along
the rib, the blade is gradually allowed to slide backwards – while the hand holding the stone
remains ‘in place’, so to speak. Without periodic pauses for re-gripping, the left hand is
always supporting the blade just slightly behind where the stone is contacting the edge,
thereby providing steadying support against the pressure of the stone exactly where it is
needed. In this manner, regardless of its length, the blade can’t really wobble to and fro, as is
often the case with some (though not all) methods of honing.
During honing the snath does not need to begin (nor can it remain) in a vertical position,
because for the blade to slide backwards easily (somewhat by its own weight) the snath
needs to be leaning at least slightly to the left. In the process the whole scythe pivots
gradually leftward. If the blade is, for example, 90 cm long (and especially if the snath is a
long one of the ‘Eastern’ type and/or the mower is standing on a steep slope) the snath may
end up tilted as low as 45 degrees, or even less, towards the ground. (Figure 39 b does not
show such an extreme tilt because the drawn blade is short, and the invisible person is
standing on a flat surface.)
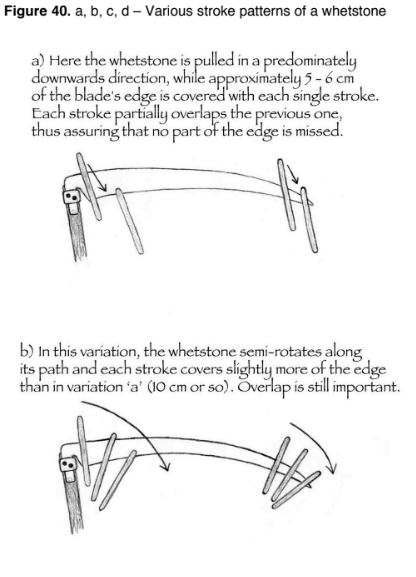
In most traditions, the direction that the stone travels during each honing stroke could be
described as a combination of movement parallel to the edge, and perpendicular to it. Exactly
how much of the blade’s length is covered with each downward movement of the stone is a
matter of personal preference and/or regional tradition. It can vary from a very short forward
progression consisting of numerous strokes to covering the whole distance in one
movement. The latter variation is common only in areas where relatively long whetstones
were used, often equipped with handles as in North America, and in parts of Europe where
the even longer “Streichholz” (a wooden stick covered with baked-on synthetic abrasive) is
still popular.
Not all directional patterns of the stone recommended during post-peening treatment
(Chapter 4) are well suited for actual work in the field. Once the blade is attached to the
snath, the whetstone, as a rule, is moved from the rib towards the edge. Of the examples
illustrated in Figure 40, we recommend options ‘a’ or ‘b’ (in that order). In the options ‘c’ and
‘d’, the scythe may need to be positioned differently than shown in Figure 39.
Typically, individual stone strokes alternate between the upper and underside of the blade.
This classical back-and-forth motion not only has a nice flow, it is also faster than honing one
side at a time, and seems to produce a slightly better cutting edge. A case can be made for
beginners honing one side at a time, because it is easier to focus on the consistency of the
angle that way, and it is better to hone the blade ‘accurately’ rather than insist on the
traditional switching back and forth. While honing one side at a time it is also easier to apply
less pressure against the blade’s underside, though that can be done while alternating the
strokes as well. Beginners may benefit by having a friend standing at their side, turned
perpendicular to them, to watch for and help correct the (probable) deviations from the
desired angle as the stone progresses from beard to point.
Figure 40. a, b, c, d – Various stroke patterns of a whetstone
Cleaning the blade before re-honing in the field
Before each honing the blade should be wiped clean of all grass and grit, because such
matter tends to be pulled towards the edge as honing proceeds and can inhibit the
functioning of the whetstone. Although the cleaning can be done with a bare hand, picking up
a large handful of mown grass and using it as a rag is the most common way to do it.
Enough is picked up so it can be folded over the back of the blade and squeezed against
both sides of the blade’s body. Then, one sweeping motion along the rib, from the neck
towards the point, is usually enough to wipe off the bulk of the material. A second pass might
be necessary, especially while mowing in wet conditions, to ensure that no bits of grass
remain. We usually make yet a third pass along the very bevel itself, not so much to clean it
even more thoroughly but to check for any damage the edge may have suffered since the
last honing session. This has merit especially while mowing in rocky terrain or in places
where dry stubs of previously cut saplings may be found in the grass. For this third pass, the
abovementioned ‘grass rag’ would be counterproductive, and any really cut-proof gloves
nearly useless.31 To explain how this seemingly ‘dangerous’ technique is performed: the
thumb and either the index or middle finger are placed against opposite sides of the bevel,
pressed together lightly and then moved along from beard to point. Should a small dent or a
‘schrup’ be detected, it can be dealt with, even if partially, right then and there (Chapter 9).
(Again!) The question of “how often?”
“Dawn is still afar, only the stars are growing less distinct… Patches of mist lie on the
meadows. The dew on the grass wets the mowers’ torn shoes… They put their scythes
down, fill their whetstone holders with water, drink, whet their scythes and the farmer marks
the border…. Seventeen mowers… start swinging their scythes at the same time… Every
twenty steps the scythes have to be whetted.”
From Ignac Koprivec’s 1939 novel, as quoted in Whetstone Holders by Inja Smerdel; refer to
credit in opening to Chapter 4.)
Once at work, the blade needs to be whetted rather frequently. If the level of performance
matters, frequently might mean approximately every 5 minutes, on average. This is not one
of the ‘radical’ concepts we had already communicated. Rather, it seems to be an uncommon
example of consensus among old mowers right across most of Continental Europe and the
Near/Middle East. The quote we open this subtopic with – a historical account of one region’s
tradition with respect to honing frequency – states “every twenty steps”. The author was, of
course, not writing a scythe use instructional manual. But he was rather accurate here.(32)
(31) While on the topic of gloves, we want to point out that a scythe held in gloved hands is definitely a modern phenomenon.
One would probably have to wear out several pairs of shoes walking the European countryside to find an old mower wearing
gloves. And if one were found (who has not been learning about this tool by watching YouTube videos) he could rightly be
considered an anomaly.
(32) A ‘step’ is not what some novices these days think of as the ‘shuffle’ a person takes along with each stroke. A step usually
means about three feet, or 90 cm. So 20 steps equals about 18 meters. Those mowers likely used blades 75+ cm in length, and
probably advanced at roughly 15 cm with each swing, possibly more. Their swings (typically narrower than what we suggest
in these guidelines for a ‘field’ stroke) may have taken two and a half seconds each – and all that computes to approximately 5
minutes worth of swinging for each twenty steps. Keep in mind that these estimates are mere guesses. However, they confirm
our in-field experience and we trust that they come close.
Even so, adhering to centuries old traditions is not a must, with aspects of it possibly
undesirable. Using the account from Slovenia (played out in countless similar scenarios) as
an example, it is not difficult to see how a strict protocol inevitably “punishes” a certain
portion of the group:
Among those seventeen mowers, some no doubt had their blades peened better than the
average, and some less so. The former few could no doubt keep going (especially so early in
the morning) for more than twenty steps, while those with least wide/thin bevels may have
had to strain beyond their personal preference in order to keep up with the group’s given
standard.
With the above in mind it may be easy to see why the frequency of honing is another one of
those questions that cannot justly be answered in a straightforward manner. We could
simplify the dilemma and repeat what has been said elsewhere: “whenever the blade ceases
to cut, it is time to re-hone”. Or, to be somewhat more explicit, we could add “well” or “easily”
after the word “cut”, and leave it at that. Another alternative is to state an actual time period,
as we had done eighteen years ago.
In The Scythe Must Dance we suggested approximately every 5 minutes, on average. Back
then (in the aftermath of Tresemer’s “15 minutes” as the only widely read specifics on the
topic in English) it seemed a radical concept, and some new scythe teachers then chose to
split the difference by suggesting every 10 minutes. Still, everyone can settle this issue for
him/herself; it may require some attention, but really is not difficult. An attentive mower will
notice that at some point between when the blade was last honed and several minutes later,
the cutting begins to require more effort. While this could possibly be said of nearly every
successive stroke following a honing session, we have in mind a more noticeable change –
one that takes place within a spell of less than a minute. To someone watching from a
distance, the change (and the need to re-hone) may be imperceptible, because the grass is
still being cut with no apparent misses. What is missing, or at least beginning to decline, is a
favourable ratio of energy expended to grass cut – and this the person operating the tool can
feel in the body.
At this point, one may continue mowing for a while, or pause for a moment to hone the blade.
Given practice, someone who pays attention to details will be able to identify that point of
rather sudden diminishing of performance within half a dozen strokes. THAT, in our view, is
the time to re-hone.
Admittedly, the period of time after honing and before its effect begins to noticeably diminish
can vary considerably, hence the seeming discrepancy between estimates made by those
who have written on the topic, but failed to qualify the guidelines. Here we attempt to be more
specific. The ‘ideal’ frequency of honing is usually affected by a combination of factors.
Though not necessarily in the order listed, these play the most influential role:
a) The time of day that mowing is performed
b) The species of plants comprising the sward, and their maturity
c) The condition of the edge, as far as its geometry is concerned
d) The skill of the person performing the honing
e) The qualities of the blade, such as the specific steel alloy and tempering process
employed by the manufacturer
Among the factors listed above the effects of ‘a’ can be most easily tested, because the
change in conditions over the course of the day and how it influences the need for honing
can be observed in a straightforward and dependable manner even by a beginner.
To outline one scenario suitable for a useful learning process:
Select a hayfield already past the early flowering stage, but one not yet so mature or
weathered as to challenge a scythe blade unduly. The absence of rocks and other obstacles
is highly desirable.
Get up very early, and begin mowing at daybreak. If the blade was well peened just prior to
these tests you may be able to take 150 strokes or more before a notable reduction of ease
in mowing, at which point the blade should be re-honed. You can probably keep going at this
rate for an hour or more with only a gradually increasing, but not very significant need to re-
hone more often than initially. Just before sun-up the interval might decrease to 100-120
strokes. However, soon after the first rays of sun touch the un-mown portion of the field,
there will be a notable difference within a relatively short spell of time. You may rather quickly
get down to honing at 60 stroke intervals, and by mid- morning or so it may be each 40
strokes, or even less (especially if the field contains some silica-rich species of grass).
Admittedly, the shape of the outermost 1⁄2 mm of the edge has by then changed (see Figure
38) and, being now a bit more rounded at the apex, no longer “takes an edge” as it did first
thing in the morning. Yet most of that reduced efficiency cannot be accounted for solely by
the fact that at some point between daybreak and 9:00am that blade would have benefited
by being lightly re-peened. The major reason for the more frequent need to re-hone, in this
scenario, is the changing condition of the plant texture, or, to be more specific, its diminishing
internal moisture content as the day progresses.
From the moment the air temperature begins to rise (which during the summer is usually
shortly after daybreak) the plants begin, at first very slowly, their daily water-laden exhalation.
Their cells – which previously were as full of water as the American Empire is full of hot air –
begin to shrivel. To use perhaps a less contentious metaphor, they gradually acquire a jacket
of a tougher consistency. Imagine a full Spanish-style leather wineskin (or a balloon, if that’s
easier) and an empty one: which punctures easier? The difference is akin to the difference in
ease of cutting (and frequency in honing) for the person who rolls out of bed early and the
one who doesn’t. The change, you see, is only very gradual initially, but the magic of the
sun’s rays speeds up the warming in an easily noticeable leap. For that reason, in all cultures
where the daily output of a man swinging a scythe really mattered, mowers were at the edge
of the meadow when they could barely see enough to follow the contour of the sward to be
mown…
However, the oft-repeated country wisdom that “grass cuts easiest when wet” is a semi-myth.
Yes, roughly in sync with the easier time for cutting, the outer portion of the plants is usually
covered with dew. But surface wetness per se makes relatively little difference – a fact that is
also fairly easy to confirm. Here is how:
Find a dense lawn or a field that, due to its species’ composition, is not easy to cut. Go out
there sometime in the early afternoon just after a heavy shower has passed, when the grass
will be thoroughly wet, more so than it would be early in the morning with the average dew.
Mow for a long enough period to determine how many strokes it takes until that point of
diminishing energy return (and the need to re-hone) arrives. Take a stopwatch or count the
strokes. Depending on personal style, one back and forth movement takes 2 to 3 seconds.
Then – without re-peening that blade – take it to the same place the following morning at
daybreak, and continue mowing. Again count the strokes, and note the difference… For those
still needing to be convinced: there are some mornings when rain is due to fall in a few
hours, and no noticeable dew is present on the grass at daybreak. Choose a morning like
that for the second phase of the above test. We rest our case.
Similar farm-style (but still somewhat comprehensive) experiments can be conducted
regarding the differences in mowing ease due to plant maturity, relative resistance of certain
species to a steel edge, or the differences between blade patterns and makes. Considering
all of these variables (never mind the geometry of the blade’s bevel) we feel that it can be
misleading to set the honing frequency “in stone”.
A note on whetstones
Our expressed partiality regarding some aspects of scythe use notwithstanding, these
guidelines do not intend to promote any particular pattern of blades, style of snaths or types
of whetstones. In Part 2 we may be more specific, and other individuals can add notes on
various preferences, including the when and why of them. Here we take the neutral route and
attempt to play the role of referee.
The existence of two camps regarding the theme of natural versus synthetic whetstones
probably dates back to when the first of the latter began to be available, and (albeit with less
intensity) continues to date. As with many things there are two sides to a story, and it would
be hard to realistically dispute that there are times when a synthetic stone has an advantage
over a natural one and vise versa.
For instance, because the coarse grit (usually synthetic) stones remove material more
quickly they are better for post-peening honing (especially after the jig). For the same reason
such stones are, by and large, also preferable for honing neglected edges. And why
synthetic stones have taken a decided lead in popularity, worldwide, is because low quality
edges on all sorts of tools have become far more common than was the case in the past.
Additional incentive, of course, is the cost of their production, which, due to increased
mechanization of the industry (in relation to the quarry equivalent) has continued to
decrease. As well, there is the side effect of globalization and its relentless outsourcing, with
China’s, India’s, Mexico’s, etc., multitudes of low-paid labourers producing synthetic
whetstones for pennies apiece.
Unfortunately, many of the cheap modern stones contain a considerably higher percentage
of filler in relation to the actual abrasive material than was the case in the past, when some
so-called “carborundums” were both efficient for steel removal and relatively long lasting.
Additionally, synthetic whetstones finer than 100 grit are hard to find these days, with 60 grit
being perhaps more common than anything else. (The “Silikar” is one of the exceptions.)
However, learning to function more or less happily with synthetic sharpening stones may –
for many people around the globe – already be a rather inescapable part of reality. And,
considering how cheaply some of them can be purchased in many local hardware stores, it
may be worthwhile to obtain several, of different brands, and experiment with their individual
virtues or lack thereof. One will find, for instance, that some wear out twice as fast as others
while doing less sharpening in the process. Others wear more quickly when used wet than
dry, etc.
On that note, we should mention that some synthetic stones function just fine while dry, and
for the purposes of preparing a new blade for use and post-peening edge treatment we
prefer them to using the water-dependent versions. Why? The slurry created along the edge
makes the detection of unevenness and adequate ‘raising of the burr’ more difficult for those
unaccustomed to the sharpening process in general. It is also less messy overall.
The above is by no means intended as a promotion of synthetics over their natural
counterparts. Good natural whetstones are certainly to be treasured, especially as we are
faced with the fact that economic trends seriously threaten the survival of the few enterprises
that still dig in the ground for a source of good natural whetstones. Therefore, we
wholeheartedly encourage all new attempts at offsetting the trend of fewer functioning stone

