As a result of confrontation with tougher material than that for which its edge has been
prepared, and/or a flawed mowing technique, scythe blades sustain a range of damage,
which can be roughly classified as ‘minor’ or ‘major’. What we consider minor damage
happens to nearly everyone; major damage, for the most part, is the side effect of
carelessness. Examples of major damage are the loss of tension over more than a small part
of the body, significant buckling (usually 10 cm or so back from the point), outright breakage
(either at the neck or somewhere along the blade’s length) and deep tears that call for
treatment outside the range of a file. Repairing most of these may be beyond the average
mower’s ability; however, the topic will eventually be addressed in Part 2. 36
Here we cover primarily the minor category, typically occurring within the blade’s bevel zone.
We differentiate between four sorts of them, three of which are dents, cracks and small
tears. The fourth is less easily named and any single term assigned to it is a compromise.
Until someone comes up with a more suitable name to describe it, we shall in these
guidelines simply refer to it by its nickname within our family, which is “schrupped up edge”.
Schrupped, you ask?
The repair of minor damage is relatively simple and ought to become a routine part of everyone’s
maintenance repertoire – whether by using these guidelines, or someone else’s.
What can be done with cracks or tears long enough to reach beyond the depth of the bevel
and into the blades’ body itself is beyond the scope of this guide (Part 1); the hints on that
topic added below are meant as a temporary measure.
(36) We dare state that a scythe blade is nearly indestructible; whatever damage it might suffer during uses for which it is
designed, somebody, somewhere, could restore it to a state of either full or relative functionality. Yes, those somebodies may
not be easy to find these days, but they still exist. Thus we suggest that diagnoses along the lines of “damaged beyond repair”
(offered in some scythe-using guidelines) not be taken too seriously, and the blade in question not relegated to the scrap
heap. More information on how to heal these severely wounded but still valuable blades will be presented in due time.
Well, we reason that having a name that does not imply anything specific may be better than one that does, but is not
accurately descriptive. The other three kinds of common damage which we discuss have obvious characteristics and we
suggest specific approaches while repairing them. ‘Schrupped edges’, on the other hand, can appear in countless variations.
Some of them contain small cracks and missing pieces, some are slightly dented (with or without cracks) while others may
involve only a seriously dulled apex with no other cracks or dents. What also differentiates them from the former three is that
they can vary from 3 mm to several centimeters in length. Similarly to a series of small cracks, a ‘schrupped up edge’ can
happen all at once, or be a cumulative effect of several mishaps while unnoticed or ignored in the interim. What all the
variations of schrupped edge share within the context of these guidelines is the repair treatment.
Still, we are open to changing that odd name to something else. Simply “nick” – an old established term from edge tool users’
lexicon – may seem to be an easy substitute. We have used that term for years in reference to axes, chisels or knives, before
ever picking up a scythe. So, here on the homestead, we may say “I nicked my ax; need to fix it [before continuing the job]”.
The nicks that usually happen to edges of those tools are the result of a thinly shaped bevel meeting a hard knot, or from
running the edge against an unsuspected nail or a staple in an old piece of lumber or fence post. However, although these
nicks happen for principally similar reasons, they are often not the same as a scythe blade’s “schrupped up” edge. A ‘nick’ on
the face of an ax may only be a millimeter or two (widthwise) of a compressed apex – something that could be ignored, and
the job continued, or (preferably) fixed promptly. Sometimes there will be a piece of the edge missing, and it may be very
small, or (in the case of axes and subzero temperatures) alarmingly large – whereupon we might regretfully report “I took a
chunk out of my ax”.
The same kinds of damage can happen also to a scythe blade, but “schrupped” edge includes the aforementioned additional
variations of them, so alone “nick” just doesn’t seem to cut it. An “extended nick” would be closer. At times something like
“mangled” edge would actually be fitting…
Figure 44. Various types of edge damage. (Please note that the sequence of the examples
in the diagram is arbitrary; any of the damage can take place anywhere along the length of
the edge.)

If a scythe is used frequently, and especially in diverse terrain, minor damage is practically
unavoidable; everyone will sooner or later face an edge that calls for some repair. The extent
of the damage can vary considerably, and will be directly proportional to:
a) The thinness of the primary bevel, and
b) The force behind the mowing stroke.
Considering ‘a’ it ought to be clear that excessive thinning of the bevel will increase both the
incidence of minor damage, and its extent, whenever it happens.
A reader may now ask: “What exactly is ‘excessive’?” That is a pertinent question, but not an
easy one to answer. We briefly addressed this topic in Chapter 4, and provided several
examples of appropriate bevel thickness for different in-field situations. However, as stated
there, those are approximate guidelines; only extensive experience in mowing and repairing
damaged edges will lead to sufficient understanding of the basic concepts involved.
We recommend that before very thinly beveled blades are swung with abandon, some
practice with sturdier edges take place. In addition, learning about the relative toughness of
different plants and how they change over the course of the season can help to avoid a lot of
edge-related troubles. It would also help if one becomes familiar with the terrain before the
actual mowing season. Systematically removing potentially damaging obstacles, such as
rocks and the dry stubs of previously cut saplings (using loppers, not scythe blades)
significantly improves the efficiency and the enjoyment of the subsequent mowing.
Concerning ‘b’ (the force behind the mowing stroke) it would be difficult to overemphasize the
value of learning to mow gently, using the minimum force necessary. That, of course,
requires a keen edge, a well-adjusted blade, and due attention to mowing technique. An
appropriately thin bevel (across its whole depth, not only the narrower zone frequently
peened) also has a significant effect on how much force is necessary for an easy cut. And so
we are faced with a seeming contradiction: Thinner bevels are more prone to damage, but
they also allow for gentler mowing, which in turn decreases the incidence and extent of
damage.
The bottom line, however, is that if scythe blades were always maintained adequately sharp,
the person using them would be more likely to learn to apply only a convivial amount of force,
adequate for general application. That level of force should not be enough to cause breakage
of snaths or blades, not even if the devil himself were to sneakily plant an iron rod at the mid-
point of someone’s stroke.(38) By virtue of experience, one can arrive at a point where, for instance,
if a hard stump or a rock simply stops the blade cold, the force behind the stroke
can be withdrawn in a split second, with the blade suffering only easily repairable edge
damage. This is a matter of the body gaining a sort of instinctual sensitivity rather than a
conscious reaction. Indeed, the body can sometimes learn faster than the mind, and
developing it does not necessarily call for years of experience.
(38) We share the opinion of our Danish friend Niels Johansson who is fond of saying that a scythe in action can be held so
lightly that if the blade hits a solid obstacle, the tool will “just fly out of your hands”. Well, that is Niels’ version of extremely
light touch. Exact wording aside, we agree. What his take on the matter implies (though does not spell out) is that besides
learning to hold the scythe lightly and not to swing it in a wild and careless manner, the ancient Eastern concept of “mindful presence” may well be more valuable as a damage-preventative than perhaps any other single factor (maintaining a thicker
bevel, obtaining a stronger blade or snath etc.) An aware mower may notice ahead of time some of the obstacles that are
either best avoided or dealt with by a quick adjustment of technique. In addition, whenever damage is sustained, that person
is more likely to feel the difference in blade’s performance promptly, and will stop and tend to the repair.
Edge repair tool kit
1. A flat 15-20 cm (preferably fine/single cut) file. A half-round version would be even better,
but is usually more expensive per length/size, and not necessary.
2. A whetstone or two (coarse and fine grit).
3. A hammer, preferably with one “flat” (i.e. generally slightly convex) face.
4. A solid chunk of steel with a relatively flat surface of at least a few square cm in size.
A possible addition to the basic list above is the “straightener” – a tool hardly mentioned in
contemporary references (at least in English) but one intended specifically for temporary
edge aligning in the field.
(39) Its virtues notwithstanding, this tool is useless in actually
removing cracks and tears. For that job, a file is the tool of choice.
So if someone’s new “complete outfit” does not include a file (and the household is devoid of
one) one ought to be acquired; for edge repairs we consider it nearly indispensable. Although
a coarse synthetic stone can remove steel just as well, a good file is considerably faster –
provided that file is not too worn and is suitably hard for the edge of the blade it is to be used
upon. Experience tells us that with a stone as the only tool, some folks are likely to run out of patience
before they have removed enough steel in order to subsequently proceed with what
we consider a ‘proper’ repair. Hence, a good flat file is a worthy investment, as is learning
how to use one. (Files are made to cut on the push stroke only; disregarding this fact – as is
not uncommon these days – will significantly shorten their useful lifespan).
(39) In some rocky regions of Europe, the mowers would carry, as part of their daily working attire, what was essentially a
tapered steel rod of 5-10 mm diameter and as long as a whetstone, or slightly longer. It was either hung from the belt or,
more often, attached to the stone holder (which in those areas would feature an additional hole or a wire loop). While
mowing in rough terrain, a pass over the edge with the straightener would precede honing with the whetstone. The
straightener would help realign small dents and nicks and save the whetstone from needless abrasion. Back then, you see, a
fine whetstone was a far more precious thing for a man to own than it is now. So, in essence, those old mowers partially
‘repaired’ the edge before each whetting.
Though the traditional straighteners were usually tapered, sometimes they were four-sided or featured a twisted profile; a
common butcher’s steel or, for that matter, an old rusty 20 cm spike would accomplish a similar purpose. On our homestead
we do not carry one along into the field, partially because the majority of our hayfields are – after years of picking rocks –
relatively free of them. And when we do mow along the edges of woods, in gullies etc., we proceed with due caution, plus are
never too far away from the stationary peening/repair station. However, while mowing in rough terrain a distance from the
home base, carrying a straightener is a good idea.
Barring the absence of the sort of file we recommend above, any other file (smaller, larger,
coarser, or finer) is better than postponing the repair. If one’s present synthetic stone cuts
steel more quickly than some worn-out file on hand, then the stone is the tool to use. A piece
of coarse emery cloth wrapped around a stick can also serve the purpose.
The “solid chunk of steel” (in the list above) is for the straightening of dents. Narrow-faced
anvils (as we recommend for freehand peening) are not well suited to this task, at least not in
the hands of those unaccustomed to shaping metals with a hammer. The “poll” (back end) of
a single-bitted ax or “splitting maul”, the face of a sledge hammer, or countless other steel
surfaces can serve as an anvil for the repair of dents. Even the base of the peening jig can
be used, although the guiding shaft in the center is a bit awkward to maneuver around.
The practice of edge repairs
(40)
A certain amount of advice contrary to some of the fundamentals communicated in this
manuscript regarding edge repairs has already been presented in print (for a brief summary,
see Note 41). Therefore, we feel it fitting to address some of those discrepancies prior to adding more conflicting suggestions.
(40) Given that this manual keeps emphasizing the merit of applying as little force while mowing as possible (and admonishing
others for being rather heavy handed) the reader may rightly ask how is it that we have much to say on the topic of damage
repairs when we, supposedly, use scythes with due care. Is the advice here based on actual experience, or are we just
plagiarizing some unknown source? That is a reasonable question. The fact is we would not have had the opportunity to
repair edges containing the range of damages discussed herein if all we had to go by were mishaps that happened to us. Over
the last 15 years or so, we have been fortunate to gradually acquire a respectable collection of variously damaged blades,
whether from factories which had them returned by wholesalers, or those returned to Scytheworks or us directly during the
few years when we also retailed scythes via mail order. Additionally, we have been privileged to observe how a factory goes
about repairing edges of blades brought in by local farmers – a service they typically provide at no charge. Do these
references make edge repair “experts” out of us? Not by a long shot! Still, even as we continue to learn more we believe we
have a thing or two to share.
41 The aforementioned German author Bernhard Lehnart has this to say on the topic of edge repairs:
“The damages to the edge, such as “Risse” (cracks/tears) and “Sharten” (somewhat equivalent to our “schrupped” edge)
influence the cutting ability and make the easy mowing with the scythe more difficult. Peening is the only way to correct such
damages. “Risse” and “Scharten” can be taken care of by peening. “Risse” and “Scharten” that reach 5 mm or more into the blade
are, as a rule, not repairable. It is precisely in the small cracks where the stems can become lodged and thus hinder mowing
momentum. Not infrequently does this lead to the lengthening of cracks/tears into the blade’s body, with consequences of it
breaking. In such a case the blade is no longer usable”. (Our translation of the German original.)
One issue we have here is with the use of terms. Lehnart’s “Risse” and “Scharten” come from their use by German-speaking
scythe users, who in the common daily jargon tend to lump all of the various edge damages into only two kinds, and refer to
them by those two terms. Moreover, Lehnart appears to suggest that they both be treated the same. Well, in our view, alone
the sub-class of “cracks and tears” exhibits some characteristics that are not the same, consequently calling for different
considerations and (sometimes) quite a different approach. Thus we find it fitting to split the German “Risse” into two
categories – that is, cracks and tears. And, what we call schrupped edge (which often is without actual tears or cracks, though does sometimes start with them present) represents also a category of its own. So do ‘dents’, which – on their own – appear
to not happen to German scythe users, while interestingly, David Tresemer (in The Scythe Book) spoke of edge damages as if
they were all primarily dents. His entire recipe for fixing edge damage is merely: “by repeatedly tapping around the edges of a
dent, you bring the blade to its original shape”.
Steve Tomlin (in Learn to Scythe) addresses dents and cracks, suggests a different treatment for each, but does not
differentiate between cracks and tears. Ian Miller (in The Scything Handbook), uses yet another set of terms and seems to
suggest that all edge damage be treated the same way. In his words: “Striking something that isn’t grass with a blade that is
sharpened for grass often leads to damages of some sort: bends, cracks, nicks. Some nicks are repairable through peening; some
are not. The deeper the nick (length/width is not much of an issue), the less likely it can be repaired, with a depth of 5 mm being
the maximum repairable depth. Nicks deeper than 5 mm can render a blade largely unusable, as grass will get stuck in the nicks.”
Miller continues with advice on how to repair the “nicks” (though not the bends or cracks specifically). His recipe is more or
less a copy of Mr. Lehnart’s, including the phobia of damage more than 5mm deep.
Of the four authors, only Tomlin suggests that a file is employed during edge repairs.
So, again, we wonder how can those novices who engage in a broader search in the pursuit of learning make sense of all this?
To begin with, we think that it can be misleading to declare peening as a “way to repair” most
of the various kinds of edge damage. In spite of the impression a novice might take from
reading such advice, no amount of cold hammering, however skilled, can reconnect the
broken bonds of steel structure, such as in cases of cracks or tears along the blade’s edge.
In addition, peening over cracks while “repairing” them is likely to spread/deepen them
farther. For that reason we consider it a backwards approach to first ‘peen’ (read: attempt re-
shaping with the hammer) a section of an edge containing cracks, tears or missing small
pieces (to be imminently repaired), and only then file off the excess bits of steel protruding to
each side of the damaged spot. There are both technical and traditional facts to support the
sequence we suggest instead.
We also do not think of the hammer strikes during the various repairs as “peening” per se,
and instead reserve that term for the shaping of the bevel in the course of routine
sharpening, or recreating a completely new bevel along the whole length (after removing the
previous one entirely).
Repairing dents
A “dent” is a small section of steel bent away from the overall line of the edge, but otherwise
intact (without an associated crack or tear). See Figure 44 e. Average dents are the least
serious type of edge damage, and thus easiest to repair. Some can be dealt with temporarily
in the field, without the more convenient repair tools, provided two suitable rocks (both
smooth and hard) can be found; one to be used as a hammer and the other as an anvil.
A small dent can be partially repaired (bent back) with a straightener or whetstone. To do so,
hold the blade as recommended for in-field honing (Figure 39). Place the stone firmly against
the protruding dent while at the same time applying pressure in the opposite direction with
the thumb against the stone. Exactly how much the dent can be realigned with the rest of the
edge depends on the amount of pressure applied in relation to the thickness of the bevel.
Following such an in-field repair, that very section of the edge ought to be ‘intensely re-
honed’ (meaning more thoroughly than it would receive during a regular honing).
In any case, it would be foolish to continue mowing without making any attempt to realign an
obvious dent, thus abrading a good stone against the out-of-line (and sometimes roughened)
edge while honing. Besides the stone-wear issue, a blade with a portion of its edge out of
order is more likely to be swung with excessive force, in turn leading to more potential
mishaps.
The vast majority of dents are bent upwards, because the edge is (or should be) aimed
slightly away from the ground surface while cutting. Thus, an obstacle would most likely
impact the edge on its underside, and bend it farther upwards. There are exceptions, of
course, such as when one is using a chopping “golf-swing” motion and the edge hits a woody
sapling stub on the downward swing. If the edge gets partially ‘stuck’ in a target too tough for
it to cut all the way through, the person guiding the blade tends to momentarily lower their
hands, in which case the resulting dent may also be accompanied by a crack, or a series of
them.
Another example of a downward dent can occur while trimming alongside a woven wire
fence, when the point of the blade catches a vertical strand. Such a mishap will result in
damage that could be called ‘elongated dent’. It is usually not very deep but may extend over
a significant portion of the blade’s length, with the edge’s apex seriously dulled in that
section. Depending on the thickness of the bevel and/or the force behind the stroke, this
elongated dent can become a “schrupped” edge, featuring cracks or tears. (In any case,
consider it an instant awareness gauge at work: the longer such a dent is, the less attentive
was the person guiding the blade…)
To properly straighten the most common (upward) dents, the blade is best turned upside
down (as we recommend for peening on the narrow anvil) and rested firmly against some
relatively smooth and flat surface. If need be, even a dense, dry piece of hardwood can
function as an anvil in this case. Then, the dent is lightly tapped, initially by aiming the
hammer at the zone between the edge’s apex and the innermost extent of the dent (the
crease where it begins to follow a different angle than the rest of the edge). Then continue
outwards, gently. On the other hand, quite sizable (though not wide) dents can be
straightened with not much more than one firm tap – provided it is placed in the right spot
and the amount of force applied is appropriate.
For straightening downward dents the blade is, of course, placed the opposite way – with its
underside against the base.
After the actual straightening, a few strokes with a file or a coarse synthetic stone are useful
to even out any irregularities along the edge of the former dent zone. If small pieces were
broken out and the edge in that area is visibly uneven, then the protrusions should be filed
off, as described below. The final touch is a light re-shaping along the width of that dent
and/or actual file-affected area, either right then or during the following peening session.
Repairing cracks
“Cracks” are hairline breaks in the steel, perpendicular to the edge. They usually do not
extend past the width of the bevel itself, and can occur either singly, or in a series in close
proximity to each other. Single cracks can be as long as the bevel is deep, while those in
groups are typically shorter (1/2 – 1 mm).
Cracks can be considerably more troublesome to repair than dents, simply because they call
for a treatment beyond a few hammer taps. However, as opposed to dents (which should be
straightened right away) the repair of many cracks (both small and large) can be postponed
until they actually begin to interfere with honing and/or the blade’s cutting action, that is,
when the corners of steel on either side of the cracks begin to bend out of line and/or (in the
case of a group of small cracks) little square pieces break off between any two of them, and
leave behind a gapping ‘tooth’. Once that happens, the edge should be repaired before
mowing continues. (Process outlined further below.)
In our experience, single cracks, even as long as 4 to 5 mm, tend to stay in alignment with
the rest of the edge longer than a series of small cracks. For this reason, instead of hurrying
to “fix” them, we suggest they be left alone, at least initially. Then, while peening in their
vicinity, the strength of hammer strikes should be reduced and hitting directly on top of them
avoided. Though gentle taps on the outermost 1 mm of the crack are usually okay, novices at
peening may be better off shaping the bevel near the crack (2-3 mm widthwise) with a file or
synthetic stone. Those inclined to prayer or visualization can also imagine the crack sitting
there solidly, not causing any trouble; it may indeed do just that… If such cracks don’t
actually lengthen (as a result of rough field use, or by incompetent peening) they can very
slowly wear away along with the rest of the edge. (By following this approach, we have
maintained some long cracks trouble-free for several seasons.) If one’s imaging is not
effective and/or the very same spot of the edge confronts a rock, then the crack-defining
section of steel nearer the tang will likely keep bending out of line each time after it is put
back in its place, or break off altogether. Then apt repair is in order.
Once the choice is made to actually remove cracks, it is, in principle, a very straightforward
affair consisting of:
a) Filing away all of the damaged edge deep enough so that no sign of a crack is left visible.
b) Blending the damaged area on a gradual and smooth line with the rest of the edge.
We recommend performing both of these steps simultaneously, using a flat or half-round file.
At this point we should perhaps draw attention to the fact that this is a revision of our advice
on edge repairs of long ago.(42) During the intervening years of peening hundreds of blades
and repairing many, we now advocate a more courageous steel removal in a considerably
wider zone on both sides of a crack or a tear. The objective is to create a very gradual
transition between the center of the damage and the rest of the edge. We can unequivocally
state that, following such an approach, the repairing of minor damage has become far less
daunting, often more or less “a piece of cake”.
Those advocating fundamentally different approaches could object on the grounds that what
we suggests involves a lot of filling (which is sometimes true) and/or that a longer section of
the edge will subsequently need to be brought back to the desired geometry (which is always
the case). What would be difficult to argue, however, is that the resulting gradual contour isn’t
consequently far easier to blend into the rest with the hammer while re-peening the damaged
section, with the potential complications greatly reduced. That alone is a significant
consideration regarding the options of approach.
Be it as it may, we surmise that many people following some of the instructions on scythe
blade repairs offered in print (ours from 2001 included) typically fail to create what we refer to
as a ‘gradual line’, making it thereby more difficult for themselves to subsequently re-shape
the repaired area without undesirable side effects (discussed further below).
In any case, our present approach is to file lengthwise along the edge, starting some
distance away from the crack, slightly increasing pressure in the vicinity of it, and then
relaxing the pressure on the other side. This long file stroke is continued until no sign of the
crack remains, all the while blending the damaged area with the rest of the edge on a
relatively gradual and smooth line. In order to remove steel more quickly, the file should be
applied on a rather steep angle, though not quite straight across. Alternatively filling from
both sides works fine, if that is found easier. If considerable filing is expected, it may be
better to clamp the blade by its back in a common machinist’s vice, with its underside facing
up and edge facing away from the filler. Given such a set up, the file can be applied with both hands
(as files are indeed meant to be used). Most of the material removal can be done in
this manner, and only the burr removed from the other side after the blade is again taken
from the vice, and while held in one hand (preferably against some firm surface). Figure 45
illustrates the approximate zone of filing (in this case illustrating a tear, rather than a crack;
the principle is the same).
(42) Our initial version of The Scythe Must Dance (first published in 2001, and ever since then re-printed – unfortunately
unrevised – as the addendum to The Scythe Book by David Tresemer) featured diagrams of edge repair that we now consider
‘The Scrooge Approach’, one rooted in the philosophy of “waste not, want not”, in this case by not filing away any more steel
than seems absolutely necessary. That may have been a fitting approach in the past, when steel was precious, and scythe
blades were very expensive. Although it is still practiced by many old men in Europe, by the time we had drawn those
diagrams, this approach – from our perspective a year or two later – was already out of date, however ‘respectful’ of the blade
it may be, and not one to recommend to novices. Regarding the “out of date”: for many years now, the global price of steel has
been ridiculously below its true (environmental and cultures’-destroying) cost, with scythe-smiths’ time also undervalued
with respect to their specialized skill. Consequently, we’ve come to consider such conservation of scythe blade’s body as an
example of ‘principles taken too far’. Why we do not recommend the approach to novices is explained in the main text.
Figure 45.
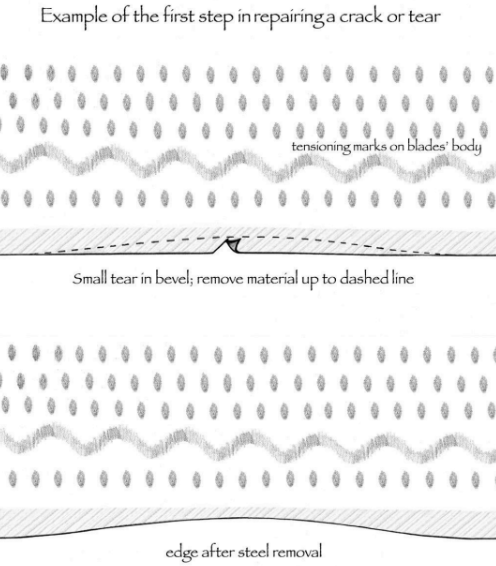
The filed zone should extend 10-20 times the depth of the crack, to each side. That is,
repairing a single crack 2 mm deep will affect 40 to 80 mm of the edge. In the case of a
group of cracks close together, with any one of them up to 2 mm deep, the filed zone would
be from 40-80 mm plus the distance between the outermost two cracks in the group. That we
consider the minimum; going even farther outwards with the file could make the consequent
re-peening easier.
To those who may be concerned that the amount of suggested filling might wear away their
blade too quickly, we would point out that there are countless (possibly hundreds of) bevels
stored within the width of an average blade’s body – a reservoir of potential edges that those
who peen rather than grind their blades are unlikely to ever deplete.
We realize, though, that for someone just learning to peen, the re-creating of such a long
‘ruined’ bevel may seem overwhelming. And while we can appreciate the predicament, it
ought to be understood that we are talking of the extra time taken as measured in minutes,
not hours. Plus, they are minutes of a far easier sort than those spent navigating the more
acute curves with a hammer.
All in all, considering the challenges – both at the time of the repair and afterwards while re-
peening the edge contour ensuing from the ‘scrooge filling approach’ (see Note 43) – we are
convinced that what we now practice is a favorable trade-off. The other, aforementioned,
aspect of all this is that the wide filing significantly reduces the chances of ‘waves’ –
something that most scythe users are likely to encounter sooner or later.
The waves along the scythe blade’s edge can be of two sorts: ‘in-and-out’, and ‘up-and-
down’. Each of them can vary in intensity and seriousness. The former are the result of
inaccurate peening or the natural aftereffect of edge repair. The latter are far more frequently
the result of a more seriously flawed peening technique or striking an inadequately supported
bevel, than of the blade actually encountering too tough a target while used in the field.
While acute in-and-out waviness of the edge following repair does not in itself impair cutting
efficiency, a portion of the subsequent re-peening attempts may lead to ‘up-and-down’ waves
in the area where the repair took place. Those are more challenging to work with, although
(contrary to what is sometimes said or written) they do not render the blade “useless”. True,
honing and peening up-and-down waves is somewhat more difficult, but such a blade can
still function passably in certain mowing situations. Besides, any waviness of a scythe blade
can be corrected. (To be discussed in Part 2.)
After the desired steel removal is completed (Figure 45) the next step can be performed in
two ways, plus some combinations of them. (43)
(43) After much deliberation we decided not to provide a visual representation of the post-filing hammer strike patterns, and
instead attempt to paint the picture with words alone. For one thing, limiting the representations to only one or two could be
misleading if they were passed along further without qualification that it is only one of the variations and hence a partial
picture; that has already happened with some of our material, and is likely to happen again… Secondly, we do not wish to fix
those strike patterns in “black and white” because of how much they can vary in real life.
One of the ways is the commonly advised approach to first peen / re-shape the damaged
area to the point where the repair per se is considered completed. Only afterwards is the
whole length of the edge re-peened in the course of a regular session, which might be done
immediately following the repair or put off until deemed necessary, with the blade used in the
meantime.
The other approach is to combine the ‘finishing’ of the repair with a follow up peening
session. If the crack was only 1-2 mm deep, such an approach is perfectly acceptable (or
sometimes even preferable). Whether the damage took place one or five hours after the last
peening does not really matter; another peening right after repairing the damage is not going
to be a “waste of time”. If nothing more is needed otherwise at that time, the peening can,
over much of the blades’ length, be merely a light pass along the outermost 1⁄2 to 1 mm of the
edge.
As usual, the pass (of this second approach) should begin at the beard and continue towards
the blade’s point. When the filed/damaged area is approached, the line of hammer strikes
makes a slight curve inward (towards the blades’ back) following the present bevel’s now
altered contour. The force of the hammer as well as its ‘pull’ should slightly increase, and
progressively more so as the line is reaching the center (most indented) area of the damage.
(Note that the blade’s position upon the anvil’s face needs to be shifted slightly in order to
provide support just under the hammer’s impact!) If more than one pass is needed, the
strikes should not land too close to the apex during this first pass. Sometimes, depending on
the depth of the initial damage, one such ‘once over’ – within its now file-corrected contour –
can suffice. It may not yet result in what is perceived as the desired geometry at that spot; if
that is the case, back up with the hammer once again to the other side of the file-affected
zone and repeat the strikes over it, this time a bit closer to the apex. It may take yet another
such maneuver, although insisting that that area ends up all the way to the line of the rest of
the edge would be foolish. With common blades for everyday use there is no need to hurry in
this regard; the evening-out of the bevel thickness can take place over two or three regular
peening sessions more gradually and with fewer chances of creating up-and-down waves. In
the meantime the repaired section of the edge may not penetrate stems with quite the ease
as the rest, but provided its outermost 1 mm zone is somewhat close to how thin it ought to
be for the respective task, and is well honed, the majority of mowers would hardly notice a
difference.
In cases where the bevel removal (depth-wise) was considerable (i.e. if the cracks were
deeper than 2 mm) then some combination of the two options discussed above may be the
approach to take. As an example:
Begin at the left side of the damaged zone, but not quite as far left as the point to where the
edge has been filed, loosely following the contour of the curve defining the filed (damaged)
zone. (Care should be taken that the blade’s body is supported under the hammer strikes as
well as can be managed!) Place the first row of strikes at least 1 mm away from the zone’s
outermost line. For reasons related to the hardening effect of peening (discussed further
below, as well in Chapter 4), these should not be mere taps, and the hammer’s diagonal pull
ought to be emphasized. When finished, that first row of strikes might end up approximately
2/3 (but no more than 3⁄4) of the complete length of the “repaired” area (i.e. of how far the file
had reached left and right of the damage’s center). As the next step, place another row
below it, overlapping them as suggested earlier, but this time begin a bit further to the left and
finish further to the right, so the second line will end up slightly longer than the first. Yet
another such (lengthening) line may be called for in some cases. To lessen the chances of a
mishap, the repaired portion should not extend too far outwards before the overall peening of
the sound edge (begun at the blade’s beard) joins it. The intent here is to only take the
“repair” to the point where it is perceived that the existing outline of the still-unmarred edge
will be relatively easy to blend with the repaired zone. Learning to identify that point is
something that comes more through practice rather than reading about it…
The potential trouble-causing spots are the two places where the undamaged edge meets
the repaired zone. If, through peening, a portion of metal is made to protrude further out than
the rest of the edge, it would be best to remove it with a file or coarse stone before peening
continues.
Although the respective patterns of the hammer strikes over the area being repaired may be
more or less the same within each optional approach discussed here so far, the number of its
actual prints per cm of edge’s length and millimeters of bevel’s width will inevitably differ,
either slightly or significantly. The influencing factors (as mentioned in the Freehand Peening
section of Chapter 4) are the force applied, along with the intensity of ‘directional pull’.
This wide filling approach provides plenty of grace to accommodate personal tendencies –
just as is the case while peening a blade’s complete edge under normal circumstances. We
tend to strike harder and pull the hammer more upon impact than presently seems to be the
norm, which automatically equates to fewer strikes per equivalently sized repair. The number
of lines needed may also differ; that is, if the more common strength of strikes would require
three lines to reshape the filed off edge, harder strikes might only need two. However, it
would not be wise to attempt expediting the process by striking harder with the hammer than
at an early stage of learning one is confident in implementing.
Finally, it deserves to be pointed out that yet another reason for differences in how
easily/quickly a wide section of damaged edge can be restored is related to the blade’s
hardness. In the section on freehand peening in Chapter 4 we touched on the pertinent
concepts; readers may benefit from re-reading that section and applying the information to
the topic of edge repair.
Keep in mind that whatever material remains above the bevel’s already peened zone is still
at the level of the blade’s initial factory-tempered hardness. That makes it ‘softer’ than the
material nearer to the apex. During repairs of mid-to-large damages more than just a minute
amount of material obviously needs to be ‘pulled down’ from that yet un-peened zone closer
towards the apex. Its (temporary) softness can, or perhaps even ‘ought to’, be taken
advantage of while the opportunity exists. How? In the section above, while discussing the
various patterns of lines of strikes during the repair, we stated that “when the filed area is
approached … both the force of the hammer and its ‘pull’ should slightly increase, and
progressively more so as the line is reaching the center (most indented) area of the
damage”.
As the line of hammer strikes is gradually moving inward (toward the blade’s body) from the
harder to softer bevel zone – increasing the hammer’s force will expedite the repair. Provided
the blade is well supported, the still softer steel can handle the ‘abuse’ precisely because it is
softer (and secondly because it is thicker, of course). Consequently, the repairer’s efforts
have more of the desired effect when the strikes are harder. What seems not to be generally
understood is how quickly even relatively light peening can begin to harden the bevel.
Accordingly, IF – when the line of strikes enters the (still) softer zone of the bevel – those
strikes are of the typically gentle sort, the chance to reshape the bevel easier shall promptly
diminish.
The challenge in the case of single cracks 4-5 mm long is that considerably more material
should be removed, and that, of course, over a greater length of the edge. If such a crack is
somewhere in the wider part of the blade then it is just a matter of a lot of filing (or careful
grinding with some efficient mechanical abrasive). But if it happens to be near the point
(where the blade’s body is considerably narrower), then the repaired area’s shape may be
unfavorably altered – which is one reason we suggest that such cracks are left alone, if at all
possible.
A final cautionary note on the origin of cracks in general:
As stated earlier, we think that a good portion (probably more than 50%) of cracks are
caused or predisposed by the blade owner’s hammer rather than the edge’s direct
confrontation with an obstacle out in the field. To borrow a quote from our previously referred
to 2001 guidelines:
“Overzealous or inaccurate hammering may stress the steel, in one or more spots along the
edge, nearly to the point of breaking, until some challenge (perhaps not an obvious one)
finishes the job. The challenge may come in the form of more of the same manner of
hammering in subsequent sessions. We might cut only young lawn grass in the meantime
and not realize what is happening. The cracks may be too tiny at first to be easily noticed by
the naked eye, and may not impair the blade’s performance. Peen over the tip of them some
more and they will grow longer and more troublesome; corners of the edge next to them may
bend out and start catching grass. At this point we are likely to notice the trouble, but may
curse the blade that cracked ‘on its own’, since we are sure we did not run into anything hard
interim.”
On the whole, we still consider the above to be a rather accurate ‘speculation’…
Tears
We refer to “tears” as damages principally similar to cracks, in that both are clearly defined
breaks in the steel. What differentiates them from cracks is that they are not perpendicular to
the edge, but instead positioned at various diagonal angles towards the blade’s beard.
Secondly, unlike most cracks, they can also extend past the bevel itself into the blade’s body
proper, occasionally as far as 20 mm or more. Tears of that length are more likely indicative
of abuse rather than a “defective” blade. Thirdly (unlike some cracks) tears rarely remain
lined up for very long. When they do bend out of line they begin snagging plant material
while the blade is used. If the tear is long enough and the bevel rather thin, the point of the
tear may almost fold over backwards. Bending it back into place is only a very temporary
measure; it won’t be long before the ‘flap’ will break off completely, leaving behind a
triangular gap. In the interim it may tear further… For all these reasons, a tear requires
prompt attention.
The principles already outlined in repairing cracks apply here as well: In case of relatively
short tears, file away an adequate amount of material on either side of the damage (as in
Figure 45) and then re-shape the bevel as discussed in the section on cracks. If the tear is
very deep we suggest one of the approaches below:
a) Apply the principles already outlined for repairing smaller cracks and tears, while keeping
in mind that considerably more material on both sides of the damage has to be removed.
Repairing, for instance, a 6 mm deep tear will affect from 60 to 120 mm of the edge. That
can mean a lot of filling. Of course, it can be done by more ‘modern’ means – an electric
grinder. In the latter case, instead of the ‘economy’ version many people may already
have at home, one of the so-called “wet grinders” would be preferable. A common dry
grinder outfitted with a specialty wheel that does not heat the steel as much (e.g. Norton
38A80) may be the next in the line of suitability.
b) In the era before electric welders, parts of broken blades, including torn tangs, were
sometimes re-joined by ‘brazing’ with brass. Today, folks with access to a TIG welder can
try to weld the tear. (Though we have not done this ourselves, we know those who have.
According to them, a heavy copper plate should be used underneath the welding area to
absorb heat and reduce chances of burning the steel on either side of the tear.) This may
or may not prove to be a lasting solution, but in any case there is not much to lose. If it
fails, options a) or c) can still follow.
c) A more foolproof remedy is cutting (not filing or grinding) a whole strip of steel off the
blade’s body.
This option is principally the same as a) except here that strip is wider and possibly
extends the entire length of the edge. In both cases a significant portion of the bevel has
to subsequently be re-created. (Pointers on that further below.)
If the c) approach is taken, the width of the removed strip would be determined by the depth
of the tear, where exactly along the length of edge it is located and the pattern of the blade.
In most cases, the latter (blade’s overall pattern) will be affected. The change can be
relatively minor or major, though even a significantly different shape / pattern is not
something to be overly concerned with. While learning about the merits of narrow blade
patterns, we have intentionally narrowed many blades in the manner described here and
have learned that sometimes the new shape of the edge actually functions better than the
original (see Note 45, further below).
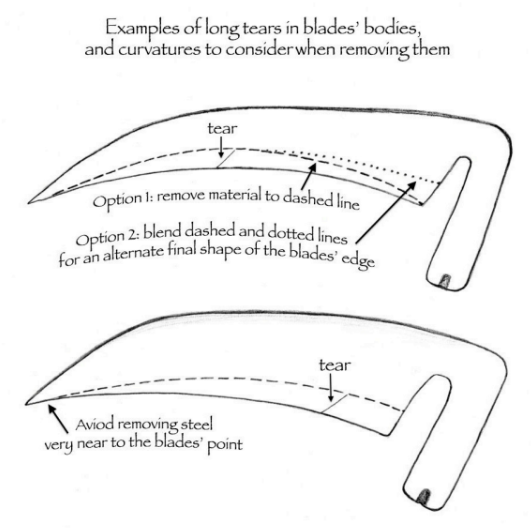
However, it is unadvisable to cut an equivalently wide strip along the whole length of the
blade; the last 4-5 cm near the point should definitely remain intact. Thus sculpting a new,
functional and shapely edge out of the torn one would be trickier/more difficult if the large tear
were near the blade’s point. Fortunately, extra large tears generally seem to occur in the
back half of the blade, and it is usually not difficult to remove a strip just wide enough to
match the depth of the tear and then blend the rest to either side in such a way that the
original profile in the 5-10 cm nearest the point is minimally affected.
We suggest first drawing a chalk line that might represent the new edge’s pleasing profile.
Then consider it carefully and see if, where, and how it can be altered so as not to distort the
blade’s shape any more than needed or desired. The ‘pleasing profile’ and thus the final
blade’s shape is subject to the repairer’s choice. Two examples of this approach are
illustrated in Figure 46.
There are various ways to cut a strip off the edge. Going by our experience to date, a narrow
“cut-off” disc mounted on a so-called “angle grinder” (used by practically every welder, car
body repairman, etc. these days) is probably the most expedient method – provided the
operator is well familiar with their potentially dangerous quirks. (Our car mechanic friend
does it for us, and after some practice specifically with scythe blades it now takes him just a
little over half a minute each.) We advise against using a “plasma cutter”, as it leaves a very
ragged edge that in the process becomes hardened beyond the common file’s ability to
smooth. Moving down in high-tech options, there are some versions of hand lever-operated
shears, although they are not among the tools of the average homeowner, and purchasing
one just to repair a scythe blade would be preposterous. (We have used the model with
revolving blades made by the Grizzly Co., but studying the picture of a version made by
Eastwood we now think the latter would work better for the herein discussed major repairs of
scythe blades.) As well, the bodies of most Continental blades can be cut with a simple pair
of good sheet metal shears (“tin snips”), and the most elemental low-tech option is the old
fashioned “cold” chisel, however slow it may be.
Figure 46. Cutting off a strip of the blade’s body in order to repair a tear approximately 20
mm deep.
Of course, after the cutting of a new profile is completed, a whole new bevel needs to be
recreated. The process consists of:
1. Smoothing the rough surface left behind by whatever means was used to cut off the strip
of steel.
2. Re-shaping the outermost 2-3 mm of the existing edge so as to provide a functional, easily
penetrating bevel. Numerous combinations of steps can accomplish the two parts of this
process.
Regarding 1: A file or grinder can be used, either individually or in combination. We prefer the
file, chiefly because our skill in using it surpasses our ability to do an accurate job with one
the fast spinning alternatives. For individuals with suitable modern equipment and an
understanding of how to avoid burning the edge, a file might seem too slow, though the
difference much depends on the respective quality of the two tools. (Good files are faster
than inefficient grinders!)
After first removing the leftover roughness of the initial cut, there are two options: Thinning
the outermost 3-4 mm of the existing edge OR, leaving it initially as thick as it is, to be
shaped to desired geometry solely by means of the peening hammer or a peening jig. We
have done it both ways and are certain that most people would find the subsequent peening
considerably easier if the edge was first at least partially thinned. The thinning can, of course,
be done by either a hand file, or mechanically. However, the outermost 3 mm – from which
the new bevel will arise – should end up to be of even thickness, or as even as can be
managed. Performing the thinning with an electric grinder may be tempting but a word of
caution is due. It requires above average skill with the grinder to perform the pre-shaping
very evenly. We are talking of minute differences in resulting thickness, but these – once the
pre-made bevel zone-to-be is further peened and thinned – will show up as sections of
protruding steel making the edge uneven, sometimes appearing as irregular in-and-out
waves. The wavy appearance is not much of an issue in itself, but peening a bevel that lacks
a certain degree of uniform thickness can present an additional challenge and may lead to
the less acceptable up-and-down waves…
Due to its overall geometry, thinning from the topside of the blade is notably more awkward.
However, the thinning can be done from only the underside of the blade’s body. It does not
matter that it is supposed to be “the side with no bevel”; the follow-up peening will set the
‘bevel relationships’ as they ought to be. Clamping the blade by its back between the jaws of
a bench vice (and periodically re-clamping it sideways) makes for a solid filing-friendly set up.
Once the blade is again removed from the vice the burr resulting from the filing can then be
quickly “cut-off” from the opposite (top) side with a few strokes of the file.
The thinned edge should thereafter be made very smooth, and the smoothing is equally
important even if the edge was not first thinned. A sequence of file, coarse/medium grit stone
and finally a fine stone work well.
If the thinning was skipped, or if performed with only a coarse grinder, a good file is the tool
we prefer for the smoothing. Then follow with two stones, the second of a fine enough grit so
as to leave behind no visible file-grooves. Those with electric grinders (and skill in their use)
can begin the smoothing that way, or – if also a finer grit wheel than the common 60-100 grit
is at their disposal – even complete it.
The re-shaping of the new bevel can be done in several ways. One approach is to thin the
area of the new bevel by means of a grinder so that it is nearly to the point of the geometry
desired, and then peen only the outermost 2-3 mm of it as it is done on a regular basis. The
other three approaches (all of them more ‘traditional’ than the first) are: completely freehand,
completely with the peening jig and a combination of the previous two. The second and third
are easier than the first, and the second less satisfactory than the first or third. The third is
recommended for those who have access to the jig but are also competent peening
freehand.
With regard to approaches one and three (and somewhat less so with two) we want to draw
attention to the previous ‘strength of hammer strikes’ topic. If the strikes are too gentle the
hardening of material will nevertheless begin to take place, and overall the task of reducing
the 0.9 to 1mm of thickness (typical of many among contemporary blades) to an acceptable
bevel shape will seem to take ‘forever’. It usually takes Peter about 6-7 passes to shape a
new 4-5mm bevel zone, by the way, and he is not all that gentle [with a hammer J].
However, the very first row – the transition between the blade’s body and the bevel-to-be – is
an exception. Its objectives are to mark off the two zones, provide visual guidance for the
next line and create a very small hollow into which the hammer can subsequently ‘bite’ with
considerably more force. To make this ‘pioneer zone’ as even as possible, it is advisable to
perform this one with less force behind the hammer strikes. Marking (with chalk or a felt pen)
a visual line to follow helps assure that the first pass of the hammer will be equal distance
from the present apex along the whole length. It is while making the second pass (and, to
already slightly diminishing degree, those to follow) that the advantage of the still more
malleable material can best be taken advantage of.
The final advice we want to offer is that after 2 or 3 passes the ‘smoothing step’ discussed
above should be repeated, this time with only the finest grit of the previously used stones. If
one takes a close look through a loupe, it will be seen that the apex is now not as smooth as
it appeared before. In addition, repeat this step shortly before the bevel is approaching its
final shape and before the outermost 1mm is to be directly aimed for. These two additional
smoothing/polishing touches go a long way to diminish chances of tiny cracks along the
edge.
As the perceptive readers have likely noticed, dealing with a deep crack or a tear in a way
outlined above is actually what in the opening to this chapter we referred to as one of the
“major” damages – and thus intended for the Part 2. However… see Note 44.
(44) In their respective published handbooks, both Lehnart and Miller have stated that a crack/tear/nick deeper than 5 mm
renders the blade “useless”. We believe that statement to be utter nonsense but as with other similar ‘facts’, it is likely to
spread still further afield… The approach we suggest here regarding repairs of such blades may be relatively unknown (or atleast is rarely talked about) but it certainly does work. We have re-profiled the bodies of many blades in this manner, not
because we ever end up with large enough tears, but rather in line with our ongoing experimenting, in this case comparing
the function of wide versus very narrow-bodied blades of various patterns. And (in case we perish before Part 2 manifests)
we now decided to include at least something here – in order to help prevent those “useless”/ “damaged beyond repair”
blades from needlessly ending in the scrap heap…
Repairing “schrupped up edge” and other kinds of minor damage
As we attempted to explain earlier, a schrupped up edge is somewhat like a chameleon
appearing in an array of colours; it is might near impossible to name any single one of them
and then offer a specific treatment. For one thing, it is often longer (but not necessarily
deeper) than any of the other damages covered above. It can contain cracks (though often it
doesn’t). A portion of it may include a pronounced dent gradually running into a shallow
curled up piece of the edge several cm long. It may be dented along with a crack, or be
missing a piece of steel altogether. With other words it is a variously dulled and roughed up
section of the edge, and our illustration in Figure 44 f. is an attempt to show it in that version.
All the versions of a schrupped edge are repaired by principally the same approach – a
combination of the techniques advised regarding the dents, crack and tears. If a dent or a
curled up edge is present, it should first be flattened. Then follow with the file etc. – exactly
as for cracks and tears.
In addition to the types of damage discussed so far, the blade’s bevel can lose a “half-moon”
(i.e. semi-circular) piece. If such a piece has suddenly “disappeared”, it is likely a sign that
the bevel, which was probably rather thick for general use, confronted a rock of just the ‘right’
shape. Had it been appropriately thin, it likely would have torn instead. During the typically
rough use to which “bush” blades are subjected, especially while working in rocky terrain, this
sort of edge damage can be expected. It is generally easy to repair, because only seldom is
it more than 2 mm deep. Treat the same as crack or a tear.
A file is, again, the fastest means to smooth the unevenness resulting from small missing
pieces, or a mangled section of edge. As is the case with all repairs, the file should be
followed by a medium grit stone, then preferably a fine one, and then the peening hammer.

